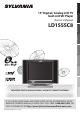
INTRODUCTION Owner's Manual INITIAL SETTING LD155SC8 CONNECTION 15" Digital / Analog LCD TV built-in DVD Player WATCHING TV OPTIONAL SETTING OPERATING DVD DVD SETTING HIGH-DEFINITION TELEVISION TROUBLESHOOTING IF YOU NEED ADDITIONAL ASSISTANCE WITH SETUP OR OPERATING AFTER READING OWNER’S MANUAL, PLEASE CALL TOLL FREE 1-800-968-3429, OR VISIT OUR WEB SITE AT http://www.SylvaniaConsumerElectronics.com © 2007 Funai Electric Co., Ltd.
INTRODUCTION WARNING: TO REDUCE THE RISK OF FIRE OR ELECTRIC SHOCK, DO NOT EXPOSE THIS APPLIANCE TO RAIN OR MOISTURE. CAUTION RISK OF ELECTRIC SHOCK DO NOT OPEN THIS SYMBOL INDICATES THAT DANGEROUS VOLTAGE CONSTITUTING A RISK OF ELECTRIC SHOCK IS PRESENT WITHIN THIS UNIT. CAUTION: TO REDUCE THE RISK OF ELECTRIC SHOCK, DO NOT REMOVE COVER (OR BACK). NO USER SERVICEABLE PARTS INSIDE. REFER SERVICING TO QUALIFIED SERVICE PERSONNEL.
TO PREVENT ELECTRIC SHOCK, MATCH WIDE BLADE OF PLUG TO WIDE SLOT, FULLY INSERT. ATTENTION: POUR ÉVITER LES CHOCS ÉLECTRIQUES, INTRODUIRE LA LAME LA PLUS LARGE DE LA FICHE DANS LA BORNE CORRESPONDANTE DE LA PRISE ET POUSSER JUSQU’AU FOND. FCC WARNING This equipment may generate or use radio frequency energy. Changes or modifications to this equipment may cause harmful interference unless the modifications are expressly approved in the manual.
INTRODUCTION LOCATION For safe operation and satisfactory performance of the unit, keep the following in mind when selecting a place for its installation: • Shield it from direct sunlight and keep it away from sources of intense heat. • Avoid dusty or humid places. • Avoid places with insufficient ventilation for proper heat dissipation. Do not block the ventilation holes at the top and bottom of the unit. Do not place the unit on a carpet because this will block the ventilation holes.
INTRODUCTION 5 Contents DVD Functions INTRODUCTION TV Functions INITIAL SETTING WATCHING TV OPTIONAL SETTING TROUBLESHOOTING Troubleshooting Guide . . . . . . . . . . . . . . . . . . . . . . . . . . . . . . . . . . . . . . . . . . . 43 INFORMATION Glossary . . . . . . . . . . . . . . . . . . . . . . . . . . . . . . . . . . . . . . . . . . . . . . . . . . . . . . . . 45 Maintenance . . . . . . . . . . . . . . . . . . . . . . . . . . . . . . . . . . . . . . . . . . . . . . . . . . . .
INTRODUCTION 5 Features TV • DTV/TV/CATV - You can use your remote control to select channels which are broadcast in digital, conventional analog, standard definition. Also, cable subscribers can access their cable TV channels. • Program Information Display (DTV only) - You can display the title, contents and other information of the current DTV program on the TV screen. • Auto Channel Scan - This unit automatically scans and memorizes channels available in your area, eliminating difficult setup procedures.
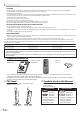
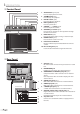
INTRODUCTION 5 Remote Control Function 12 13 14 15 1 2 3 5 19 20 6 21 8 22 23 9 10 11 3. 4. TROUBLESHOOTING Install the batteries (AA x 2) matching the polarity indicated inside battery compartment of the remote control. 3 INFORMATION 2 DVD SETTING 5 Installing the Batteries 1 OPERATING DVD 2. POWER button (p13) Press to turn the unit on and off. MUTE button (p16) Press to turn the sound on and off. SLEEP button (p19) Press to activate the sleep timer.
INTRODUCTION 5 Control Panel 1 2 3 4 5 6 7 8 SETUP STOP PLAY EJECT VOLUME CHANNEL INPUT POWER DVD top of the unit 1. SETUP button (p14 / p37) Press to display the main menu. 2. STOP C button (p28) Press to stop disc playback. 3. PLAY B button (p28) Press to begin disc playback. 4. EJECT A button (p28) Press to eject the disc. 5. VOLUME X / Y buttons (p16) Press to adjust the volume. 6. CHANNEL K/L buttons (p16) Press to select channels or move up/down through the main menu items. 7.
INTRODUCTION 5 Attaching a Wall Mount Bracket (sold separately) The following is a description of the method for attaching a wall mount to this unit. When performing this operation, refer to the instruction manual included with the wall mount kit. CONNECTION # CAUTION • Any damage caused by incorrectly attempting to mount this unit is not covered under the terms of the manufacturers warranty. • This unit may be used only with VMFb manufactured by CSAV.
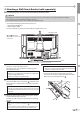
CONNECTION Cables not included. Please purchase the necessary cables at your local store. 5 Basic Connection This section describes how to connect the unit to an antenna, cable/satellite box, etc. Note: • Be sure your antenna or other device is connected properly before plugging in the power cord. [Antenna Cable Connection] When connecting the unit to an antenna or cable TV company (without cable/satellite box) Connect the RF coaxial cable on your home outlet to the antenna input jack of this unit. e.g.
INTRODUCTION Cables not included. Please purchase the necessary cables at your local store. CONNECTION 5 External Device Connection INITIAL SETTING [Component Video Cable Connection] Component video connection offers better picture quality for video devices connected to the unit. Use a component video cable to connect the unit to external video devices equipped with component video output jacks.
CONNECTION Cables not included. Please purchase the necessary cables at your local store. [Video Connection] Video connection offers standard picture quality for video devices connected to the unit. If you connect to the unit’s video input jack, connect RCA audio cables to the audio L/R jacks of VIDEO1. When the audio jack of the video device is monaural, connect the RCA audio cable to the audio L input jack. e.g.
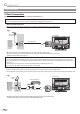
These operations are accessible by remote control. Some may also be accessible by controls on the main unit. 5 Initial Setup Note: Before you begin: Make sure if the unit is connected to antenna or cable. [POWER] to turn on the unit. • This operation may take a few moments. from the choices on the right side of the TV screen.
INITIAL SETTING 5 Main Menu 5 Auto Channel Scan This section describes the overview of the main menu displayed when you press [SETUP]. For more details, see the reference page for each item. The main menu consists of the function setting items below. If you switch wires (e.g., between antenna and CATV) or if you move the unit to a different area after the initial setting, or if you restore the DTV channel you deleted, you will need to perform auto channel scan.
5 Language Selection You can choose English, Spanish, or French as your on-screen language. 1 Press [SETUP] to display the main menu. CONNECTION 2 Use [Cursor K /L] to select “LANGUAGE”, then press INITIAL SETTING • If you connect the cable system directly, contact the CATV installer. • If you press [POWER] or [SETUP] during auto channel scan, the setting will be canceled. • When no channel can be received by auto channel scan, “NO TV SIGNALS” will be displayed on the TV screen.
WATCHING TV 5 Channel Selection 5 Volume Adjustment Select channels by pressing [CH. K/L] or [the Number buttons]. This section describes how to adjust the volume. The mute function, which turns the sound off and on, is also described. • To select the memorized channels, use [CH. K/L] or [the Number buttons]. • To select the non-memorized channels use [the Number buttons]. Use [VOL. X/Y] to adjust the audio volume.
INTRODUCTION 5 Switching Each Mode 5 Switching Audio Mode You can easily switch with the remote control to the DTV (ATSC) and TV (NTSC) or to access an external device when they are connected to the unit. This section describes how to switch the audio in the analog mode and how to switch the audio language in the digital mode. CONNECTION TV 1 Press [INPUT] repeatedly to cycle through analog TV, digital TV, VIDEO1 and VIDEO2.
WATCHING TV 5 Screen Information You can display the currently selected channel or other information such as the audio mode on the TV screen. DTV TV In the analog mode, the current channel number is displayed. In the digital mode, the detailed broadcasting information for the current channel such as program title, program guides are displayed. Press [DISPLAY] repeatedly to cycle through the available display modes. Press [DISPLAY].
INTRODUCTION 5 TV Screen Display Mode 5 Sleep Timer The sleep timer can be set to automatically turn off the unit after an incremental period of time. CONNECTION DTV 2 types of display modes can be selected in the digital mode when the broadcasting station is sending 16:9 video signal. Press [SCREEN MODE] repeatedly to switch the TV aspect ratio. 1 Press [SLEEP] to set the sleep timer. INITIAL SETTING SLEEP OFF • Sleep timer display appears on the TV screen.
OPTIONAL SETTING 5 Channel Add/Delete Note: The channel add/delete function lets you add the channel that was not added by the auto channel scan due to the reception status at the initial setting. You can also delete the unnecessary channels. 1 Press [SETUP] to display the main menu. 2 Use [Cursor K/L] to select “CHANNEL SETUP”, then • ”ADD/DELETE(DTV)” or “ADD/DELETE” menu will disappear automatically in about 10 seconds.
INTRODUCTION 5 Closed Caption TV 1 Press [SETUP] to display the main menu. [ENTER] repeatedly to change the setting. e.g.) digital TV mode or [ENGLISH] [OFF] [BRIGHT] [NORMAL] [CAPTION1] [TEXT1] OPERATING DVD [CAPTION2] • To show the closed caption on your TV screen, broadcast signal must contain the closed caption data. • Not all TV programs and commercials have the closed caption or all types of the closed caption. • Captions and texts may not match the TV voice exactly.
OPTIONAL SETTING 5 DTVCC Style 5 DTV Closed Caption DTV DTV In addition to the basic closed caption described on page 21, DTV has its own closed caption called DTVCC. Use this menu to change the settings for DTVCC. You can change the style of DTV CC such as font, color or size, etc. 1 Press [SETUP] to display the main menu. 1 2 Use [Cursor K /L] to select “DTVCC“, then press 2 Use [Cursor K /L] to select “DTVCC“, then press [ENTER]. Press [SETUP] to display the main menu. [ENTER]. e.g.
INTRODUCTION 5 Back Light Setting You can set the desired brightness mode. • CHARACTER EDGE Edge type of the displayed caption can be switched as below. 2 Use [Cursor K /L] to select “BACK LIGHT”, then press [ENTER] repeatedly to change the setting. e.g.) digital TV mode - TV SETUP - or • FORE OPACITY, BACK OPACITY Text and background opacity of the displayed caption can be switched as below. CAPTION SIZE [ENGLISH] [OFF] [BRIGHT] [NORMAL] [BRIGHT] Proportional font used in the menu screen.
OPTIONAL SETTING 5 Color Temperature 5 V-chip You can adjust color temperature of the TV screen. V-chip reads the ratings for programs, then denies access to the programs which exceed the rating level you set. With this function, you can block certain programming inappropriate for children. 1 Press [SETUP] to display the main menu. 1 Press [SETUP] to display the main menu. 2 Use [Cursor K /L] to select “COLOR TEMP.
INTRODUCTION A. TV Rating [ENTER]. e.g.) digital TV mode --- V--CHIP SETUP --TV RATING MPAA RATING DOWNLOADABLE RATING CHANGE PASSWORD [To Set the Sub Ratings] As for TV-Y7, TV-PG, TV-14 or TV-MA, you can further set the sub ratings to block specific elements of programming. To set the sub ratings, follow the steps below. 1 Use [Cursor K /L ] to select the desired main rating, then press [ENTER] twice to show its sub ratings.
OPTIONAL SETTING B. MPAA Rating C. Change Password MPAA Rating is the rating system created by MPAA (Motion Picture Association of America). Although the default code “0000” is supplied with the unit, you can set your own password. 4 Use [Cursor K /L] to select “MPAA RATING”, then press 4 Use [Cursor K /L] to select “CHANGE PASSWORD”, then [ENTER]. press [ENTER]. e.g.) digital TV mode e.g.
INTRODUCTION OPERATING DVD DVD Functions Type of media Mark (logo) DVD-video *1, 2, 4, 6, 10, 11 Region code 1 Recorded signals Media size PREPARATION CONNECTION 5 Playable Media Disc types or ALL - audio CD * 4, 6, 10 - title 1 title 2 chapter 1 chapter 2 chapter 3 chapter 4 chapter 1 chapter 2 5 inches (12 cm) OPTIONAL OPTIONAL SETTING SETTING DVD+RW DVD+R * 1, 4, 5, 6, 9, 10 e. g.) digital video (MPEG2) WATCHING TV - INITIAL SETTING DVD-RW DVD-R * 1, 3, 4, 5, 6, 7, 8, 9, 10 e.
OPERATING DVD These operations are accessible by remote control. Some may also be accessible by controls on the main unit. 5 Playback Before you begin: Turn on the amplifier and any other equipment which is connected to this unit. Make sure the external audio receiver are set to the correct input mode. 1 Press [POWER] to turn on the unit. Note: • “ ” may appear at the top-right on the TV screen when the operation is prohibited by the disc or this unit.
INTRODUCTION 5 Step-by-step Playback 5 Zoom DVD DVD Each time you [PAUSE F] in the pause mode, the disc goes forward one frame at a time. CONNECTION The zoom function allows you to enlarge the video image and to pan through the enlarged image. 1 During playback, press [MODE] repeatedly until To continue playback, press [PLAY B]. “ ” appears. OFF (ZOOM) INITIAL SETTING Note: • Set “STILL MODE” to “FIELD” in “DISPLAY“ menu if pictures in the pause mode are blurred. (Refer to page 38.
OPERATING DVD 5 Search Functions Chapter / Title Search DVD Track Search CD Using [MODE] Using [MODE] playback, press [MODE] repeatedly until 1 During “ “ appears. 1 During playback, press [MODE] repeatedly until “ “ appears. • If you want to perform the title search, press [Cursor K / L] repeatedly until “ “ appears. _ _ /29 (SEARCH) _ _ /12 (SEARCH) 2 2 Press [the Number buttons] to select your desired Press [the Number buttons] to select your desired chapter or title within 60 seconds.
INTRODUCTION 5 Repeat Playback Time Search You can repeat playback chapters, titles or tracks on a disc. “ “/“ playback, press [MODE] repeatedly until 1 During “ “ appears. “ appears. OFF CONNECTION 1 During playback, press [MODE] repeatedly until (REPEAT) e.g.) DVD _ _ /12 (SEARCH) 2 Use [Cursor K / L] repeatedly until “ or TOTAL DVD “ appears.
OPERATING DVD Note: Note: • Repeat setting (except “ALL“) will be cleared when moving to another title, chapter or track. • During programmed playback, repeat setting will be effective for the tracks in the program. • Repeat playback or repeat A-B playback may not available with some discs. • Repeat A-B playback does not function during other repeat mode. • To cancel point A, press [CLEAR] at step 2 in “Repeat A-B Playback“ • Stopping playback will cancel repeat A-B playback.
INTRODUCTION 5 On-screen Display CD You can check the information about the current disc by pressing [DISPLAY] on the remote control.
OPERATING DVD 5 Special Settings Subtitle Language DVD DVD This unit allows you to select a subtitle language (if available) during DVD playback. 1 During playback, press [MODE] repeatedly until “ Audio Language “ appears. This unit allows you to select an audio language (if multiple languages are available) during DVD playback. During playback, press [AUDIO] repeatedly until the desired language appears. 1.ENG Dolby D 3/2.1ch 48k/3 2 Use [Cursor K / L] repeatedly until your desired language appears.
INTRODUCTION Black Level Setting Virtual Surround CONNECTION You can enjoy virtual surround on your existing 2 channel stereo system. DVD Adjust the black level to make the dark areas of the TV picture brighter. 1 During playback, press [MODE] repeatedly until “ “ appears. 1 During playback, press [MODE] repeatedly until “ “ appears. 2 Use [Cursor K / L] to adjust the black level. ON (BLACK LEVEL) ON : Makes the dark areas brighter. OFF : Shows the original picture as recorded.
OPERATING DVD Marker Setup This feature allows you to assign a specific point on a disc to be called back later. To return to the marker later To set a marker 1 During playback, press [MODE] repeatedly until “ ”/“ ” appears. 1 To select a desired marker, repeat steps 1-3 in “To set a marker“. e.g.) DVD e.g.) DVD _ _ /12 (SEARCH) 2 Use [Cursor K /L] repeatedly until maker search menu or [ENTER] at the desired marker to start playback 2 Press from the specific point which you set. appears. e.g.
INTRODUCTION DVD SETTING Settings are only effective when the unit is in DVD mode and any discs should not be played back. QUICK MENU AT A GLANCE SETUP [ENTER]. [AUDIO] *1, *2 (Default: ORIGINAL) Select the desired audio language.
DVD SETTING 5 Display Setting You can change the TV aspect ratio and still mode clarity in “DISPLAY” menu. 1 In stop mode, press [SETUP] to display “TV SETUP”. 6 Use [Cursor K /L] to select the desired item, then press [ENTER]. --- TV SETUP --LANGUAGE BACK LIGHT COLOR TEMP. DVD SETUP [ENGLISH] [BRIGHT] [NORMAL] [TV MODE] (Default: 4:3 LETTER BOX) Select the desired TV aspect ratio. SETUP or 4:3 LETTER BOX 4:3 PAN & SCAN 2 Use [Cursor K /L] to select “DVD SETUP”, then press [ENTER].
Choose the appropriate audio settings for your equipment. It only affects during the playback of DVD. --- TV SETUP --[ENGLISH] [BRIGHT] [NORMAL] [DRC] (dynamic range control) (Default: ON) Set “DRC”. This function is available only on the discs which are recorded in the Dolby Digital format. SETUP or DRC DOWN SAMPLING DOLBY DIGITAL 2 Use [Cursor K /L] to select “DVD SETUP”, then press [ENTER]. SET:ENTER CANCEL:RETURN ON : Compress the range between soft and loud sounds.
DVD SETTING 5 Parental Setting Parental setting prevents your children from viewing inappropriate materials. (password protected.) Playback will stop if the ratings exceed the levels you set. 1 In stop mode, press [SETUP] to display “TV SETUP”. --- TV SETUP --LANGUAGE BACK LIGHT COLOR TEMP. DVD SETUP 7 Use [Cursor K /L] to select the desired item, then press [ENTER].
INTRODUCTION 5 Others You can change the other functions. 6 Use [Cursor K /L] to select the desired item, then press [ENTER]. --- TV SETUP --LANGUAGE BACK LIGHT COLOR TEMP. DVD SETUP [ENGLISH] [BRIGHT] [NORMAL] SETUP or 2 Use [Cursor K /L] to select “DVD SETUP”, then press INITIAL SETTING [ANGLE ICON] (Default: ON) Set to “ON” to show the angle icon when multiple camera angles are available during DVD playback.
DVD SETTING 5 Reset to the Default Setting 5 Language Code List You can reset all the settings except for the parental setting and on-screen menu language. Language 1 In stop mode, press [SETUP] to display “TV SETUP”. --- TV SETUP --LANGUAGE BACK LIGHT COLOR TEMP. DVD SETUP [ENGLISH] [BRIGHT] [NORMAL] 2 Use [Cursor K /L] to select “DVD SETUP”, then press [ENTER]. or --- TV SETUP --LANGUAGE BACK LIGHT COLOR TEMP.
INTRODUCTION 5 Troubleshooting Guide If the unit does not perform properly when operated as instructed in this owner’s manual, check the following chart once before calling for service. No color • Check the antenna or cable connection to the main unit. • When the outside antenna is used, check the wire condition and connection. • View other TV channels. The problem might be limited to the broadcasting station. • Adjust the “COLOR” in the main menu.
TROUBLESHOOTING Symptom Remedy The entered channel number changes automatically • Many digital channels have alternate channel numbers. The unit changes the numbers automatically to the ones signifying the broadcasting stations. These are the numbers used for analog broadcasts. Remote control does not work • Check the antenna or cable connection to the main unit. • Check the batteries of the remote control. • Check if there is an obstacle between the infrared sensor window and the remote control.
INTRODUCTION 5 Glossary Dolby Digital Region Code Acronym that stands for Advanced Television Systems Committee and the name of the digital broadcasting standards. The system developed by Dolby Laboratories to compress digital sound. It offers stereo sound (2ch) or multi-channel audio. Regions associate discs and players with particular areas of the world. This unit will only play back discs that have compatible region codes. You can find the region code of your unit by looking on the rear panel.
INFORMATION 5 Cable Channel Designations If you subscribe to cable TV, the channels are displayed as 1-135. Cable companies often designate channels with letters or letter-number combinations. Please check with your local cable company. The following is a chart of common cable channel designations.
MEMO 47 EN
LIMITED WARRANTY FUNAI CORP. will repair this product, free of charge in the USA in the event of defect in materials or workmanship as follows: DURATION: PARTS: LABOR: FUNAI CORP. will provide parts to replace defective parts without charge for one (1) year from the date of original retail purchase. Certain parts and LCD image burn-in are excluded from this warranty. FUNAI CORP. will provide the labor without charge for a period of ninety (90) days from the date of original retail purchase.