LCD COMPUTER MONITOR Installation & User's Manual MODEL: SCM1901/ SCM2001/SCM2201/ SCM2401 * Important Notice: Please read this manual carefully
Contents English Package Contents.......................................................................................3 Hardware Setup.......................................................................................... 3 Hardware Installation..................................................................................4 Menu Control Buttons................................................................................. 5 On Screen Display (OSD) Menu Mode.......................................
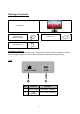
Package Contents LCD Monitor External Univ15 pin D-sub (RGB Analog) input signal cable Power cord Man User's Manual ual Hardware Setup Handle the LCD monitor with care. Turn off the monitor's and computer's power before beginning setup. Follow the installation instructions step by step. Input AC100-240V VGA 1 2 NO.
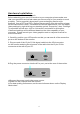
Hardware Installation ® Please note for Windows User's Before attaching your new LCD monitor to your computer, please make sure that your resolution and refresh rates are set correctly for your monitor to work properly. This is especially important if you are changing monitors (for example, from a CRT to a LCD). Before disconnecting your old monitor, please set the resolution to 1024 x 768 and set the refresh rate to 60Hz.
Menu Control Buttons 1 2 3 4 5 6 No. Button Function 1 AUTO 1. Automatically Adjusts the screen, when not in the OSD menu. 2. To exit a submenu. 2 MENU 1. Show the main OSD menu. 2. To enter a submenu. 3 UP 4 DOWN 5 POWER 6 O (indicator) 1. To navigate up / right through the menu option selection. 2. Increase an option value. 3. Select the image size of the screen (WIDE or 4:3) when not in the OSD menu. 1. To navigate down / left through the menu option selection. 2.
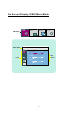
On Screen Display (OSD) Menu Mode PICTURE COLOR SETUP TRACKING Main Menu Menu Name PICTURE BRIGHTNESS 50 CONTRAST 50 Icons GAMMA 0 6 SubMenus
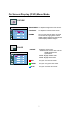
On Screen Display (OSD) Menu Mode PICTURE PICTURE BRIGHTNESS To adjust the brightness of the screen. PICTURE BRIGHTNESS 50 CONTRAST To adjust the contrast of the screen. GAMMA Set your own gamma value:-50 /0 /50 On the monitor, high gamma values display whitish images and low gamma values display blackish images. CONTRAST 50 GAMMA 0 COLOR COLOR Select the screen color. SRGB: Set the screen color to fit the sRGB standard color specification. 6500K: Slightly reddish white.
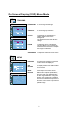
On Screen Display (OSD) Menu Mode TRACKING TRACKING TRACKING HORIZONTAL To move image left and right. HORIZONTAL 50 VERTICAL VERTICAL To move image up and down. CLOCK To minimize any vertical bars or stripes visible on the screen background. The horizontal screen size will also change. PHASE To adjust the focus of the display. This item allows you to remove any horizontal noise and clear or sharpen the image of characters. SHARPNESS To adjust the clearness of the screen.
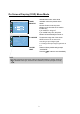
On Screen Display (OSD) Menu Mode Activate this function when white and black colors are present in the screen. Use this function to set the power indicator on the front side of the monitor to ONor OFF . If you set OFF, it will go off. If you set ON at any time, the power indicator will automatically be turned on.
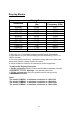
Display Modes Resolution 640x480 640x480 640x480 720x400 800x600 800x600 800x600 1024x768 1024x768 1024x768 1024x768 Display Mode Vertical Frequency (Hz) 59.94 72.81 75.00 70.09 60.32 72.19 75.00 60.00 70.07 71.92 75.03 Horizontal Frequency (KHz) 31.47 37.86 37.50 31.47 37.88 48.08 46.80 48.36 56.48 58.04 60.02 1.We offer you 11 available modes compatible with Windows®. 2.Interference on your screen while you are modulating your PC or OSD is normal. 3.
Troubleshooting LCD Pixel Criteria Normally, a Monitor display has nearly 3.8 million sub-pixels. There may be up to 8 non-performing pixels on the LCD screen, which is only 0.000002% of the total sub-pixels. This percentage is acceptable for any inspection specifications. 1. There is no picture on the screen A. Power saving mode may be on. Press any key or move the mouse to deactivate this mode. B. Signal cable connector pins may be damaged.
Maintenance To clean your monitor, please refer to the instructions below: NOTE: To prevent electrical shock, do not open the LCD monitor casing. Leave repair of the monitor to qualified personnel, please see the tech support information in the warranty. 1. Unplug the power Unplug the LCD monitor from the AC socket before cleaning the monitor. 2. Check the cover Check to see if the LCD monitor and accessories are damaged, broken, or strained.
2.Do not apply pressure to the screen surface when wiping it clean. 3.Do not pour or spray any liquid directly onto the screen or case of the LCD monitor. Chemical cleaners may damage the screen or the LCD monitor. Precautions 1.Read all of these instructions and save this manual for later use. 2.Follow all warnings and instructions on the product. 3.Do not cover or block the ventilation holes in the case. 4.
Contenu Française Contenu du Paquet........................................................................................3 Configuration du Matériel..............................................................................3 Installation du Matériel..................................................................................4 Boutons de Contrôle du Menu........................................................................5 Mode Menu Affichage à l'écran (OSD)....................................
Contenu du Paquet Moniteur LCD Univ15 pin D-sub Extérieur (Analogique RGB) Câble d'entrée de signal Corde d'alimentation Manuel de l'Utilisateur Man ual Configuration du Matériel Manipulez le moniteur LCD avec précautions. Eteignez la source de mise en marche du moniteur et de l'ordinateur avant de commencer la configuration. Suivez les instructions d'installation étape par étape. Entrée AC100-240V VGA 1 NO.
Installation du Matériel Veuillez noter pour les utilisateurs de Windows Avant de connecter votre nouveau moniteur LCD à votre ordinateur, assurez-vous que votre résolution et les taux de rafraîchissement sont configurés correctement pour votre moniteur pour fonctionner convenablement. Ceci est très important si vous changez de moniteurs (par exemple, d'un CRT à un LCD). Avant de déconnecter votre ancien moniteur, veuillez régler la résolution au 1024x768 et réglez le taux de rafraîchissement à 60Hz.
Boutons de Contrôle du Menu 1 2 3 4 5 6 No. 1 2 3 4 5 6 Bouton Fonction 1. Ajustez automatiquement l’écran, si ce n’est pas en AUTO menu OSD. 2. Pour quitter un sous-menu. MENU 1. Affiche le menu OSD principal. 2. Pour entrer un sous-menu. 1. Pour naviguer en haut/droite dans la sélection de HAUT l’option de menu. 2. Pour augmenter la valeur d’une option. 3. Sélectionnez la taille de l’image de l’écran (LARGE ou 4 :3) si ce n’est pas en menu OSD. BAS 1.
Mode Menu Affichage à l'écran (OSD) PICTURE COLOR SETUP TRACKING Menu principal Nom du Menu PICTURE BRIGHTNESS 50 CONTRAST 50 Icones GAMMA 0 6 SousMenus
Mode Menu Affichage à l'écran (OSD) PICTURE IMAGE PICTURE BRIGHTNESS 50 LUMINOSITE Pour ajuster la luminosité de l'écran. CONTRASTE Pour ajuster le contraste de l'écran. CONTRAST 50 Configurez votre propre valeur gamma : -50/0/50 Sur le moniteur, les hautes valeurs gamma affichent des images blanchâtres et les basses valeurs gamma affichent des images noirâtres. GAMMA GAMMA 0 COLOR COULEUR COLOR PRESET RED 50 PREREGLAGE Sélectionnez la couleur de l'écran.
Mode Menu Affichage à l'écran (OSD) TRACKING SUIVI TRACKING HORIZONTAL Pour déplacer les images à gauche et à droite. HORIZONTAL 50 VERTICAL VERTICAL Pour déplacer les images en haut et en bas. CLOCK Pour minimiser toutes barres verticaux ou bandes visibles sur le fond d'écran.La taille de l'écran horizontal changera également. PHASE Pour ajuster le centrage d'affichage.Ceci vous permet de supprimer tout bruit horizontal et éclaircir ou aiguiser l'image des caractères.
Mode Menu Affichage à l'écran (OSD) SETUP LANGUAGE ENGLISH OSD POSITION HORIZONTAL 50 VERTICAL 50 ANALOG 1280 x 720 60Hz INDICATEUR Activez cette fonction quand les couleurs blanc D'ALIMENTATION et noir sont présents sur l'écran. Utilisez cette fonction pour allumer ou éteindre l'indicateur d'alimentation à l'avant du moniteur. Si l'indicateur est au OFF, il s'éteindra. Si l'indicateur est au ON à tout moment, l'indicateur d'alimentation s'allumera automatiquement.
Modes d'Affichage Resolution 640x480 640x480 640x480 720x400 800x600 800x600 800x600 1024x768 1024x768 1024x768 1024x768 Display Mode Vertical Frequency (Hz) 59.94 72.81 75.00 70.09 60.32 72.19 75.00 60.00 70.07 71.92 75.03 Horizontal Frequency (KHz) 31.47 37.86 37.50 31.47 37.88 48.08 46.80 48.36 56.48 58.04 60.02 1.Nous vous offrons 11 modes disponibles compatibles avec Windows. 2.Interférence sur votre écran quand vous modulez votre PC ou OSD est normal. 3.
Dépannage Critère du Pixel du LCD Normalement, un moniteur d'affichage a à peu près 3,8 millions sous-pixels. Il pourrait avoir 8 pixels non-performants sur l'écran LCD, qui représente seulement 0,000002% des sous-pixels total. Ce pourcentage est acceptable pour toutes spécifications d'inspection. 1. Pas d'image sur l'écran A. Le mode économie d'énergie peut être allumé. Appuyez n'importe quelle touche ou déplacez la souris pour désactiver ce mode. B.
Maintenance Pour nettoyer votre moniteur, référez-vous aux instructions suivantes : NOTE : Pour éviter un choc électrique, n'ouvrez pas le boîtier du moniteur LCD. Laissez la réparation du moniteur à des personnes qualifiées, veuillez lire les informations de support technique dans la carte de garantie. 1. Débranchez l'alimentation Débranchez le moniteur LCD de la prise de courant AC avant de nettoyer le moniteur. 2.
2.Ne mettez pas de pression sur la surface de l'écran quand vous nettoyez. 3.Ne versez et ne pulvérisez aucun liquide directement sur l'écran ou le boîtier de votre moniteur LCD. Les nettoyants chimiques pourraient endommager l'écran ou le moniteur LCD. Précautions 1.Lisez toutes les instructions et conservez ce manuel pour utilisation ultérieure. 2.Suivez tous les avertissements et instructions sur le produit. 3.Ne couvrez et ne bloquez pas les trous de ventilation du boîtier. 4.