AccuScan Palm / AccuScan Palm Pro Version 2.0 User Manual AccuScan Palm Version 2.0 POS-X Inc. Telephone: 1-800-903-6572 Fax: 1-360-738-3048 http://www.pos-x.com support@pos-x.com This document and the software described by this document are sold and distributed by POS-X Inc. All rights reserved. Use of the software described herein may only be done in accordance with the License Agreement provided with the software. Information in this document is subject to change without notice.
AccuScan Palm / AccuScan Palm Pro Version 2.0 User Manual Contents Chapter 1: Introduction................................................................................................................ 4 1.1 1.2 1.3 1.4 1.5 1.6 1.7 What is AccuScan Palm? .............................................................................................. 4 New Features in AccuScan Palm 2.0............................................................................ 4 Free Trial ...................................
5.5 HotSyncing Data from the PC to the PDA................................................................... 30 5.5.1 Sending Session Data to the PDA.............................................................. 31 5.5.2 Creating Session Data Files with Excel ...................................................... 31 5.5.3 Sending Drop-Down Lists to the PDA......................................................... 32 5.5.4 Sending Field Hints to the PDA (Pro version only)....................................
Chapter 2: Installation Chapter 1: Introduction 1.1 What is AccuScan Palm? Create enterprise class, barcode enabled, data collection applications in minutes for most tasks including asset management, inventory control, and many others with AccuScan Palm. No programming knowledge is needed. Simply create your familiar forms right on your PDA. Designed by Symbol Certified Programmers, AccuScan Palm incorporates time saving features that are not seen in any other applications.
Chapter 2: Installation 1.3 Free Trial AccuScan Palm is a shareware application. A shareware application typically means that you can use it on a trial basis for no fee. In the AccuScan Palm Splash Screen, select the version you would like to try (Standard or Pro) and you can demo all of the features for that version. The trial download is limited in that only allows 2 sessions can be created and only 5 records will transfer to and from the PC.
Chapter 2: Installation 1.6 Integrating AccuScan Palm AccuScan Palm data can be HotSynced to the PC in one of five popular file formats. Refer to Section 5.3.1 for a more detailed discussion on file transfer formats. This flexibility makes it possible to integrate AccuScan Palm with most programs and databases. AccuScan Palm Pro also allows for Custom HotSync paths, allowing users to specify a specific file download location.
Chapter 2: Installation Chapter 2: Installation This chapter details the steps for installing AccuScan Palm. 2.1 System Requirements • • • 2.2 Windows 95/98/NT/2000/XP Palm Desktop v3.1 or higher (includes HotSync Manager) Palm OS PDA running Palm OS 3.0 or higher Automatic Installation 1. Make sure you have Palm Desktop installed and working with your PDA. If not, please visit www.palm.com or contact your PDA vendor for support.
Chapter 2: Installation POS-X encourages all users who benefit from AccuScan Palm to register their copy. To register AccuScan Palm, we only require your AccuScan Palm PDA ID and an Email address. We generate a unique registration code for your AccuScan Palm PDA ID so it is important that you send the ID exactly as it appears on the AccuScan Palm splash screen; capitalization and spacing are critical. How to Register: 1. Send your PDA ID number and email address to support@pos-x.com or call 1-800-9036572 2.
Chapter 2: Installation New Registration Code Required Due to a new licensing algorithm, all users upgrading to AccuScan Palm 2.0 will need to get a new registration code. This process is discussed in Section 2.4. You can easily register by calling POS-X.com at 1-800-903-6572. New Location for Data Files C:\Program Files\AccuScan Palm\Data\username\FromPDA New Location for Uploading Files C:\Program Files\AccuScan Palm\Data\username\ToPDA New Name for List Upload Files NEW: S01F02.
Chapter 3: Sessions Chapter 3: Sessions AccuScan Palm allows users to create up to 32 unique data capture programs. These unique programs are called Sessions. Sessions are easily accessed from the Main Screen, where captured data can be viewed and searched. In this section, you will learn how to configure session attributes to meet your data capture needs. Chapter 4 details how to configure individual fields within a Session. 3.
Chapter 3: Sessions 2. Select Session Settings. 3. Select the New button. AccuScan Sessions [General] 4. Enter the name of the session you are creating. AccuScan Sessions [General] 5. Configure your session’s General, Hot Sync, Data and Backup attributes as described in Sections 3.2.1-3.2.4. When you are finished, press Done. If you do not need to modify the session, the default settings will be used and you can proceed directly to Field Settings, Chapter 4, if you wish to use default session settings.
Chapter 3: Sessions option takes effect only when this session was the last one used – each session has its own settings. Start On Field Select the first field the User is focused on when New is selected from the data view screen. This setting is commonly selected to control what data must be entered when the program is initially opened. Example: A session is created to capture package delivery information. Date and Time stamps are captured in fields 1 and 2.
Chapter 3: Sessions Archive PC Data Select Archive PC Data if you wish to archive any PC files transferred to the PDA during HotSync. Any data files sent from the PC are renamed with a prefix of “old_” after a successful HotSync if this option is selected. In a multi-user environment, many users would not select this option because it prevents any other user from receiving updated PC files. PC Files include both list contents as well as any session data needing upload to the PDA.
Chapter 3: Sessions This formatting option transfers all fields using a fixed width. Any space remaining at the end of Field data is padded with spaces. Use of the Max Length field setting is also used to dictate the width of each fixed width field. The maximum length of any given field is 30 chars. Each record is terminated with CRLF. XML This formatting option allows data to be transferred in XML format. This is very useful for customers when importing into existing systems.
Chapter 3: Sessions AccuScan Settings [Backup] Note: Enabling these backup options can slow down your HotSync process considerably, since each time you HotSync a copy of the selected databases is made on your PC. You may want to enable these options, then HotSync, then disable them again once you have the copies made. Backup Session Data When this option is selected, the actual session configuration is backed up to your Palm Desktop backup location.
Chapter 4: Field Settings Chapter 4: Field Settings After a session is created, fields within that session may also require configuration. Before configuration, all available fields within the session are in a default state. Customizing your session settings and field settings is not required, as the default settings will work perfectly for many users. However, to fully realize the power of AccuScan Palm, some of these settings may need modification for your specific needs.
Chapter 4: Field Settings 2. Select Field Settings. 3. Select a AccuScan Palm session. AccuScan Settings [General] 4. Select a field to configure. 5. Enter the field Name. AccuScan Settings [General] 6. Select a Field Type. Section 4.2.1 discusses these field types in more detail. 7. Enter General field settings. Section 4.2.2 discusses these settings in more detail. AccuScan Settings [General] 8. Enter additional field settings. Refer to Sections 4.2.3 through 4.2.
Chapter 4: Field Settings 4.2 Field Settings Explained 4.2.1 Field Types The Field Type setting is used to control what type of data is entered for this field. AccuScan Palm has four available Field Types: Text, Drop-Down, Checkbox and Variable. AccuScan Palm Pro has an additional Signature Field Type. AccuScan Settings [General] Text Text fields should be chosen when data is to be entered via a bar code, keyboard, or graffiti.
Chapter 4: Field Settings Check Box Check box fields are used when simple Yes/No, True/False, On/Off selections are made. Check boxes should be used whenever possible to speed data entry, and limit data entry error. AccuScan Settings [General] Variable Variable fields are used to automatically enter values such as Time and Date. To set a Variable field the user selects the value they would like to enter in the field from the drop down menu.
Chapter 4: Field Settings DATESYS When DATESYS is selected, the current date is automatically entered in the field in the same format as you have chosen in system prefs. This option give you the greatest flexibility. To select a date format, click on “Home” and then “Prefs”, and choose “Formats” from the upper right-hand menu. USER When USER is selected, the current PDA User ID is automatically entered in the field. INCR:1,1 When INCR:1,1 is selected, the field is set to be an auto-incrementing field.
Chapter 4: Field Settings AccuScan Settings [General] General General is set to accept all data types in a field, including date time stamps. Numeric Numeric is set when the field is only used for numeric data. When a field’s Data Type is set to Numeric, it does not accept any Alpha characters. Date Date is set when the field is used to enter dates. Time Time is set when the field is used to enter times. Note: Time data is always stored in military format.
Chapter 4: Field Settings Note 1: The Default value is only used when the Clear on Submit option in the After Scan menu is selected for this field. If the user changes this value during data entry and Clear on Submit is not checked, the changed value is retained for the next record. Note 2: If the user clicks the Clear All button from the data entry screen, this value is cleared, as well. Default values can also be entered using Variable field settings. Refer to Section 4.2.2 for more information.
Chapter 4: Field Settings Read Only When the Read Only option is selected, the user does not have the ability to enter data in the selected field. This is commonly used in conjunction with default values and Variable type fields. 4.2.3 Validation Field Settings Validation Field Settings allow the user to exhibit controls that check the accuracy of the entered data.
Chapter 4: Field Settings NOTE: The ‘After Scan’ rules are triggered by both a completed barcode scan as well as pressing the Down Arrow key on your PDA. AccuScan Settings [After Scan] Auto Submit This option represents whether or not to automatically submit this record following an 'After Scan' event for this field. If this option is chosen for the selected field, the system automatically submits the record and sets the focus to the field selected in the Go To prompt for the selected field.
Chapter 4: Field Settings 4.2.5 Drop-Down Lists Drop Downs allow AccuScan Palm users to create their own Drop-Down list menus for specific fields. AccuScan Palm gives the user the ability to create these lists either directly on the PDA or from a file on the PC via a HotSync data transfer. AccuScan Settings [Drop-down] Allow PC Update This option allows the user to create drop-down lists on the PC.
Chapter 4: Field Settings 3. Enter a List Item via barcode scan or Graffiti. 4. Repeat steps 2-3 to add additional list items. AccuScan Drop-down Lists… AccuScan Palm List Items can be edited and deleted in the AccuScan Palm Lists screen. Simply choose the value to be edited and select the appropriate button. NOTE: List Items may also be deployed to multiple users.
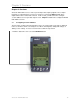
Chapter 5: Managing Data Chapter 5: Managing Data 5.1 Entering Data To enter data in AccuScan Palm, the user must first select the appropriate session. Once that is selected, clicking the New button will start the data entry/collection process. AccuScan Entry Screen The Entry Screen is the area where the user does his data entry. The fields are presented to the user with the customized fields as they were configured. The user enters data for each field presented.
Chapter 5: Managing Data Clicking any field’s label will open the field’s Hint window. The Hints window displays reference details that aid in data collection. Sections 4.2.2 explains how to create and edit field Hints. AccuScan Settings [General] 5.2 Quick Buttons AccuScan Palm specializes in streamlining screen interaction. We do this through implementation of several unique features. This allows for very fast and accurate data entry.
Chapter 5: Managing Data 5.3 Finding Data While in the Main Screen, AccuScan Palm users can search the session database while by using the Find feature. Follow the directions below to use the find feature. 1. Select a field to search. 2. Scan or enter data into the Find Field. 3. Click the Find button. AccuScan AccuScan If you are manually entering data, you must click the Find button. If you are scanning data, this is done automatically when you scan a barcode value.
Chapter 5: Managing Data 5.4.3 Linking AccuScan Palm Session Data to an MS Access Table Microsoft Access is an affordable and popular database that can be utilized to manage AccuScan Palm data. To import AccuScan Palm session 1 data, file name S01_data.txt, follow these steps: 1. In MS Access, open your database or create a new database. 2. Select File. 3. Select Get External Data. 4. Select Import. 5. In the Import dialog box, select Files of type: Text files (*.txt). 6.
Chapter 5: Managing Data 5.5.1 Sending Session Data to the PDA All data prepared for upload to the PDA must be stored in a folder called ToPDA. This folder must be located under the AccuScan Palm\Data folder where AccuScan Palm was installed, and inside the folder for the current user. These folders are automatically created after HotSyncing. An example of what the data location of this folder might look like is C:\Program Files\POSX\AccuScan Palm\Data\JohnSmith\ToPDA.
Chapter 5: Managing Data 6. 7. 5.5.3 Close the Excel file Perform a HotSync to upload the data file to the PDA Sending Drop-Down Lists to the PDA AccuScan Palm also allows the user to prepare and manage Drop-Down lists on the PC for later upload to the PDA running AccuScan Palm. The filename of list data to be uploaded must be named SxxFyy.
Chapter 6: Administration Settings Chapter 6: Administration Settings Once sessions are configured it is customary to implement password protection so field personnel cannot easily alter the session settings. When a Password is set, a user is required to enter this Password to access any areas protected by the AccuScan Palm Admin Settings. Administrators commonly Enable Protection for Session Settings and Field Settings.
Chapter 6: Administration Settings 6.2 Deploying Configured Sessions to Multiple Users 6.2.1 How to Copy One PDA’s Configuration to Other PDAs AccuScan Palm configured sessions can easily be deployed to your mobile workforce. To perform an enterprise-wide deployment, simply follow these steps. 1. 2. 3. 4. 5. 6. 7. 8. 9. 6.2.2 Create desired configuration on one PDA. Test this configuration until satisfied with the results. Perform HotSync with this PDA.