
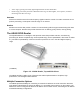
User's Manual


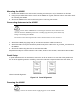

To power on (and off) the AR400:
1. Connect the provided 24 VDC power supply to the AR400’s power port.
2. Plug the power supply into a 24 V power outlet. The green Power LED on the AR400 lights to
indicate the AR400 is powered on.
3. To power off the AR400, unplug the power supply from the power outlet. The green Power LED
turns off to indicate that the device is powered off and the system is not operational.
Do not power off the AR400 until the yellow LED is off, indicating that reads are not in
process.
Verifying Hardware Functionality
Power On Test
The red Error LED lights when power is supplied to the AR400, then turns off. The green Power LED
lights when the AR400 completes power-up and is operational.
Read Test
After the AR400 powers up, test the read range to verify that it meets requirements.
1. Enable polling using the Web-based AR400 Administrator Console. See Scan Control on page 3-6.
2. Control the AR400 through a real-time application such as TagVis. Refer to the TagVis User Guide.
3. Present a tag so it is facing the antenna.
4. Walk slowly toward the antenna until the AR400 lights the yellow Read LED to indicate that it
detected and read the tag. The distance between the tag and the antenna is the approximate read
range.
For optimal read results, do not hold the tag at an angle or wave the tag, as this can
cause the read distance to vary.
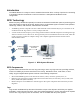
Connecting the AR400 for Communication
Connect the AR400 to a host or network via Ethernet or RS232.