w P i D T t h T I e 8 1 0 0 n t e l c h n o S e r i X S c a l o g y e l s e TM
P w i D t T h T 8 1 I e 0 n c t h 0 e l n o S e r i e s X S c a l e l o g y © 2002 SYMBOL TECHNOLOGIES, INC. All rights reserved. Symbol reserves the right to make changes to any product to improve reliability, function, or design. Symbol does not assume any product liability arising out of, or in connection with, the application or use of any product, circuit, or application described herein.
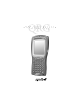
Q u i c k R e f e r e n c e Introduction Congratulations on purchasing a Symbol Technologies’ PDT 8100 Series Terminal with Intel XScaleTM technology! Its unique combination of features make this product superior for use in a wide range of applications.
P w • • • • • • • • • • • • • i D t T h T 8 I e 1 0 0 n t e l c h n o S e r i e X S c a l l o g y s e Using the Stylus on page 18 Today Screen on page 19 Navigation Bar and Command Bar on page 20 Input Methods on page 20 Using the Integrated Laser Scanner on page 23 Resetting Your Terminal on page 24 Host Communications on page 25 Maintaining the Terminal on page 26 Troubleshooting on page 27 END-USER LICENSE AGREEMENT on page 32 Regulatory Information on page 35 Warranty Service Information.
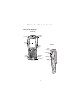
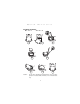
Q u i c k R e f e r e n c e Parts of the Terminal FRONT VIEW Scan LED Telephony receiver TFT LCD (color) SIDE VIEW Scan trigger Audio connector Handstrap clip Power button Backlight button Microphone 3 Handstrap Scan trigger
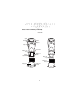
P w i D t T h T 8 I e 1 0 0 n t e l c h n o S e r i e X S c a l l o g y Parts of the Terminal (continued) BACK VIEW Stylus Handstrap clip Speaker IrDA port Stylus silo Reset button Battery cover switch Battery compartment Battery lock switch Flash card cover Lithium-ion battery Battery door Battery door latches 4 s e
Q u i c k R e f e r e n c e Parts of the Terminal (continued) TOP VIEW 1-D Exit Window (terminals with scanner) 15-Pin Serial Port (terminals without scanner) BOTTOM VIEW Serial port Getting Started Before you can use your terminal, perform these basic setup procedures: • Insert the Compact Flash card (optional). • Install and charge the battery. • Start the PDT 81xx. • Initiate the network connection (PDT 8146 only).
P w i D t T h T 8 I e 1 0 0 n t e l c h n o S e r i e X S c a l l o g y s e 2. Remove the flash card cover at the top of the battery compartment by pulling the top out, and lifting the cover up. 3. Insert the flash card into the compartment with the pins facing forward, and the main label facing down. It only fits one way. The two metal tabs on the locking mechanism will prevent you from pushing the card all the way in. Pull top out & lift cover Insert flash card Compact flash card cover 4.
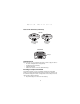
Q u i c k R e f e r e n c e Installing the Battery 1 5 4 6 Caution: 3 2 7 8 Do not expose the battery to temperatures in excess of 140°F (60°C). Do not disassemble, incinerate, or short circuit the battery.
P w i D t T h T 8 I e 1 0 0 n t e l c h n o S e r i e X S c a l l o g y s e Charging the Battery Charging the Main Battery and Memory Backup Battery for the First Time Before using your terminal for the first time, charge the lithium-ion battery in the terminal for a minimum of 12 hours, with the terminal off. Charge the battery using the Serial/Charging Cable or the appropriate cradle (1950 mAh battery only).
Q u i c k R e f e r e n c e Charging the Battery Using the Serial/Charging Cable 1. Insert the battery charging receptacle into the bottom of the terminal. 2. Plug the power cable into a wall outlet. 3. Plug the other end of the power cable into the battery charging receptacle.
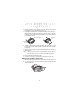
P w i D t T h T 8 I e 1 0 0 n t e l c h n o S e r i e X S c a l l o g y s e Attaching the Handstrap 1 3 2 Starting the Terminal Press the red Power button to turn the terminal on and off. Power button As the terminal initializes its Flash File System, the Symbol splash screen displays for about 30 seconds. When the Welcome screen appears, tap anywhere on the screen to continue to the Align screen. Note that these screens also appear every time you perform a hard reset.
Q u i c k R e f e r e n c e Aligning the Screen To align your terminal so the cursor on the touch screen aligns with the tip of your stylus: 1. Remove the stylus from its storage silo on the back of the terminal. 2. Tap the center of each target that appears on the screen with the tip of the stylus. Tap the target firmly and accurately at each location on the screen. The target will continue to move until the screen is aligned. 3.
P w i D t T h T 8 I e 1 0 0 n t e l c h n o S e r i e X S c a l l o g y s e Adjusting the Backlight Keyboard Keys Description 28-key Function + “1” Decrease display backlight (decrease brightness) Function + “2” Increase display backlight (increase brightness) Function + “G” Decrease display backlight (decrease brightness) Function + “I” Increase display backlight (increase brightness) 37-key 47-key Function + “Y” Decrease display backlight (decrease brightness) Function + “W” Incre
Q u i c k R e f e r e n c e Using the Keyboard Note: Key functions can be changed by an application. Your keyboard may not function exactly as described. For more detailed keyboard information, refer to the PDT 8100 Series with Intel XScaleTM Technology Product Reference Guide. Using the 28-Key Keyboard The 28-key keyboard uses an alphanumeric keypad that produces the 26character alphabet (A-Z), numbers (0-9), and assorted characters.
P w i D t T h T 8 I e 1 0 0 n t e l c h n o Key S e r i e X S c a l l o g y s e Action Note: 1 Press Func, then another key to produce the value or function above that key. See individual key descriptions in this table for additional Function key usage. 2 Press Func + Ctrl + Clear to close applications. Alpha Press Alpha to toggle between alpha and numeric mode. In alpha mode, pressing a key produces the yellow letter on that key; in numeric mode, pressing a key produces the number in gray.
Q u i c k R e f e r e n c e Using the 37-Key Keyboard The 37-key keyboard uses an alphanumeric keypad that produces the 26character alphabet (A-Z), numbers (0-9), and assorted characters. The keyboard is color-coded to indicate which modifier key (Alpha-Numeric, Func) to press to produce a particular character or action. The keyboard default is numeric, producing the gray number or white character on that key.
P w i D t T h T 8 I e 1 0 0 n t e l c h n o Key S e r i e X S c a l l o g y s e Action Alpha Press Alpha to toggle between alpha and numeric mode. In alpha mode, pressing a key produces the yellow letter on that key; in numeric mode, pressing a key produces the number in gray or character in white. Backlight See Controlling the Backlight on page 11. Caps/Shift Press Shift when in alpha mode, then another key to capitalize the letter on that key.
Q u i c k R e f e r e n c e Using the 47-Key Keyboard The 47-key keyboard uses an alphanumeric keypad that produces the 26character alphabet (A-Z), numbers (0-9), and assorted characters. The keyboard is color-coded to indicate which modifier key (Alpha-Numeric, Func) to press to produce a particular character or action. The keyboard default is the key value, producing the gray number or lower case yellow letter on that key.
P w i D t T h T 8 I e 1 0 0 n t e l c h n o Key S e r i e X S c a l l o g y s e Action Caps/Shift Press Shift when in alpha mode, then another key to capitalize the letter on that key. Press Func + Shift to toggle All Caps on and off. Clear Press Clear to generate an Escape key. This is application dependent but typically closes a window or clears the screen. Cursor keys: C, G, H, I Press Func + a cursor key to move the cursor up, down, left, and right on the screen.
Q u i c k R e f e r e n c e Today Screen When you turn on your terminal for the first time each day (or after 4 hours of inactivity), the Today screen appears. You can also display it by tapping , then Today. On the Today screen, you can see important information for the day. Tap to switch to a program. Tap to change volume or mute all sounds. Tap to change date and time. Tap to open an item. Your day at a glance. Tap to create a new item. Tap to view connection status.
P w i D t T h T 8 I e 1 0 0 n t e l c h n o S e r i e X S c a l l o g y s e Navigation Bar and Command Bar The navigation bar at the top of the screen displays the active program and current time, and allows you to select programs and close screens. The command bar at the bottom of the screen contains menus and buttons to perform tasks in programs. Tap to change the volume or mute the device. Tap to quickly select a program you have recently used. Tap to select a program.
Q u i c k R e f e r e n c e To show or hide the input panel, tap the Input Panel button. Tap the arrow next to this button to view input methods. Select input method settings. Select an input method. Tap to see your choices. Input Panel button. When you use the input panel, your terminal anticipates the word you are typing or writing and displays it above the input panel. When you tap the displayed word, it is inserted into your text at the insertion point.
P w i D t T h T 8 I e 1 0 0 n t e l c h n o S e r i e X S c a l l o g y s e When you write a letter, it is converted to typed text on the screen. For instructions on entering Block Recognizer characters, with Block Recognizer open, tap the question mark next to the writing area, or see Block Recognizer Characters on page 22. Using the Letter Recognizer 1. Tap the arrow next to the Input Panel button, then Letter Recognizer. 2.
Q u i c k R e f e r e n c e Using the Integrated Laser Scanner The terminal has an integrated scanner which collects data by scanning bar codes. Before using the terminal to scan bar codes, ensure the scanner is initialized. See the PDT 8100 Series with Intel XScaleTM Technology Product Reference Guide for information on configuring your terminal for scanning. To scan bar codes with the terminal: 1. Aim the scanner at the bar code. 2. Press the scan trigger.
P w i D t T h T 8 I e 1 0 0 n t e l c h n o S e r i e X S c a l l o g y s e Resetting Your Terminal If your terminal stops responding to input, reset it. Performing a Soft Reset A soft reset restarts the terminal and saves all stored records and entries. To perform a soft reset press and hold the Power button (for approximately ten seconds) and release it as soon as the screen changes and the terminal begins to reboot. Caution: Files that remain open during a soft reset may not be retained.
Q u i c k R e f e r e n c e To perform a hard reset on the terminal: 1. Remove the battery cover. 2. While holding down the Function key, use the stylus (or similar object without a sharp tip) to gently press the reset button. Func Key (37-key keyboard pictured) Reset Button 3. Replace the battery cover and press the Power button. 4. As the terminal reboots, the Symbol splash screen displays for about 10 seconds. 5. Realign the screen as described on page 11.
P w i D t T h T 8 I e 1 0 0 n t e l c h n o S e r i e X S c a l l o g y s e 1. Ensure all connections between the cradle and the host computer are secure. See the Quick Reference Guide that shipped with your cradle for instructions on setting up the cradle. 2. Power on the host computer, the cradle, and the terminal. 3. Insert the terminal into the cradle. 4. Begin host communications as specified by your application. Communicating with Printers To print from a standard printer: 1.
Q u i c k R e f e r e n c e Troubleshooting Problem Cause Terminal does not turn on. Lithium-ion battery not charged. Charge or replace the lithium-ion battery in the terminal. Lithium-ion battery not installed properly. Ensure battery is installed properly. System crash. Perform a soft reset. If the terminal still does not turn on, perform a hard reset. See Resetting Your Terminal on page 24. Battery failed. Replace battery.
P w i D t T h T 8 I e 1 0 0 n t e l c h n o S e r i e X S c a l l o g y s e Problem Cause Solution During data communication, no data was transmitted, or transmitted data was incomplete. Terminal removed from cradle or unplugged from host PC during communications. Replace the terminal in the cradle, or replace the Synchronization cable, and re-transmit. Incorrect cable configuration. See your System Administrator. Communication software was incorrectly installed or configured.
Q u i c k R e f e r e n c e Problem Cause Solution Terminal doesn’t recognize my handwriting. Character strokes written incorrectly with the stylus. If you’re using the Block Recognizer input method, characters must be written a certain way. See the PDT 8100 Series with Intel XScaleTM Technology Product Reference Guide for information about how to write character strokes. Character strokes written on the wrong part of the LCD screen.
P w i D t T h T 8 I e 1 0 0 n t e l c h n o S e r i e X S c a l l o g y s e Problem Cause A message appears stating that your terminal memory is full. Too many files stored on the terminal. Delete unused memos and records. You can save these records on your computer. Too many applications installed on the terminal. If you have installed additional applications on your terminal, remove them to recover memory. Select Start, then Settings, and select the System tab.
Q u i c k Problem Your terminal does not accept scan input. R e f e r e n c e Cause Solution Scanning application is not loaded. Verify that the unit is loaded with a scanning application. See your System Administrator. Unreadable bar code. Be sure the symbol is not defaced. Distance between exit window and bar code is incorrect. Be sure you are within proper scanning range. Terminal is not programmed for the bar code.
P w i D t T h T 8 I e 1 0 0 n t e l c h n o S e r i e X S c a l l o g y s e END-USER LICENSE AGREEMENT • You have acquired a device (“DEVICE”) that includes software licensed by Symbol Technologies, Inc. (“SYMBOL”) from Microsoft Licensing Inc. or its affiliates (“MS”). Those installed software products of MS origin, as well as associated media, printed materials, and “online” or electronic documentation (“SOFTWARE”) are protected by international intellectual property laws and treaties.
Q u i c k R e f e r e n c e arising out of errors in the speech and handwriting recognition processes. • Limitations on Reverse Engineering, Decompilation and Disassembly. You may not reverse engineer, decompile, or disassemble the SOFTWARE, except and only to the extent that such activity is expressly permitted by applicable law notwithstanding this limitation. • Single DEVICE. The DEVICE Software is licensed with the DEVICE as a single integrated product.
P w i D t T h T 8 I e 1 0 0 n t e l c h n o S e r i e X S c a l l o g y s e COPYRIGHT. All title and intellectual property rights in and to the SOFTWARE (including but not limited to any images, photographs, animations, video, audio, music, text and “applets,” incorporated into the SOFTWARE), the accompanying printed materials, and any copies of the SOFTWARE, are owned by MS or its suppliers (including Microsoft Corporation). You may not copy the printed materials accompanying the SOFTWARE.
Q u i c k R e f e r e n c e Regulatory Information All Symbol devices are designed to be compliant with rules and regulations in locations they are sold and will be labeled as required. Any changes or modifications to Symbol Technologies equipment, not expressly approved by Symbol Technologies, could void the user’s authority to operate the equipment. Ergonomic Recommendations Caution: In order to avoid or minimize the potential risk of ergonomic injury follow the recommendations below.
P w i D t T h T 8 I e 1 0 0 n t e l c h n o Scanner Labeling 36 S e r i e X S c a l l o g y s e
Q u i c k R e f e r e n c e Laser Labels In accordance with Clause 5, IEC 825 and EN60825, the following information is provided to the user: ENGLISH CLASS 1 CLASS 2 HEBREW CLASS 1 LASER PRODUCT LASER LIGHT DO NOT STARE INTO BEAM CLASS 2 LASER PRODUCT DANISH / DANSK KLASSE 1 KLASSE 1 LASERPRODUKT KLASSE 2 LASERLYF SE IKKE IND I STRÅLEN KLASSE 2 LASERPRODUKT ITALIAN / ITALIANO CLASSE 1 PRODOTTO AL LASER DI CLASSE 1 CLASSE 2 LUCE LASER NON FISSARE IL RAGGIOPRODOTTO AL LASER DI CLASSE 2 DUTCH / NEDERLAN
P w i D t T h T 8 I e 1 0 0 n t e l c h n o S e r i e X S c a l l o g y s e Power Supply Note:Use only a Symbol-approved power supply 50-14000-107 output rated 9Vdc and minimum 2A. The power supply is certified to EN60950 with SELV outputs. Hinweis:Benutzen Sie nur eine Symbol Technologies genehmigt Stromversorgung 50-14000-107 in den Ausgabe: 9Vdc und minimum 2A. Die Stromversorgung ist bescheinigt nach EN60950 mit SELV Ausgaben.
Q u i c k R e f e r e n c e Radio Frequency Interference Requirements - Canada This device complies with RSS 210 of Industry & Science Canada. Operation is subject to the following two conditions: (1) this device may not cause harmful interference and (2) this device must accept any interference received, including interference that may cause undesired operation. This Class B digital apparatus complies with Canadian ICES-003. Cet appareil numérique de la classe B est conforme à la norme NMB-003 du Canada.
P w i D t T h T 8 I e 1 0 0 n t e l c h n o S e r i e X S c a l l o g y s e The European Economic Area (EEA) Statement of Compliance for Modems (integrated into terminals) Symbol Technologies, Inc., hereby, declares that this device is in compliance with the essential requirements and other relevant provisions of Directives 1999/5/EC, 89/ 336/EEC and 73/23/EEC. Declaration of Conformities may be obtained from http:// www2.symbol.
Q u i c k R e f e r e n c e Warranty (A) Seller’s hardware Products are warranted against defects in workmanship and materials for a period of twelve (12) months from the date of shipment, provided the Product remains unmodified and is operated under normal and proper conditions.
Service Information Before you use the unit, it must be configured to operate in your facility’s network and run your applications. If you have a problem running your unit or using your equipment, contact your facility’s Technical or Systems Support.