Using the MC75A 2 - 17 Resetting the MC75A There are two reset functions, warm boot and cold boot. A warm boot restarts the MC75A by closing all running programs. A cold boot also restarts the MC75A, and also resets the clock. Data saved in flash memory or a memory card is not lost. If the MC75A is not functioning properly, perform a warm boot first. If the MC75A still does not respond, perform a cold boot. Performing a Warm Boot AF T Hold down the Power button for approximately five seconds.
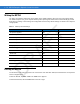
- 18 MC75A Enterprise Digital Assistant User Guide Waking the MC75A The wake-up conditions define what actions wake up the mobile computer after it has gone into suspend mode. The mobile computer can go into suspend mode by either pressing the Power button or automatically by Control Panel time-out settings. These settings are configurable and the factory default settings are shown in are subject to change/update.
Figure 2-18 Unlock Device Window T Using the MC75A 2 - 19 Password Locking AF If the MC75A was locked with a password, a prompt appears for the password. Use the Password window to set a password to disable unauthorized access to the MC75A. NOTE Tap Start > Settings > Lock icon > Password tab. D R 1. If the device is configured to connect to a network, use a strong (difficult to figure out) password to help protect network security.
2 - 20 MC75A Enterprise Digital Assistant User Guide b. Re-enter the password in the Confirm: field. 6. Tap OK. 7. To set a hint to remember the password, tap the Hint tab. 8. In the text box, enter a hint for a password reminder. 9. Tap OK. AF T When the MC75A is not used for a period of time and the user tries to access the device, the Password window appears. This also appears when the MC75A is connected to a host computer with either a cradle or communication cable.
Using the MC75A 2 - 21 Power Button Scan/Action Button Action Button Scan/Action Button AF Figure 2-21 Function Buttons T Up/Down Button • Power: Press the red Power button to turn the MC75A screen on and off. The MC75A is in suspend mode when the screen is off. For more information, see Powering On the MC75A on page 1-7. Also use the Power button to reset the MC75A by performing a warm or cold boot. See Resetting the MC75A on page 2-17. • Scan/Action: Press to scan bar codes or capture images.
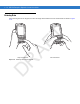
2 - 22 MC75A Enterprise Digital Assistant User Guide Entering Data AF T When entering data on the keypad, use either the single-hand method or the two-hand method as shown in Figure 2-22.
Using the MC75A 2 - 23 Interactive Sensor Technology This section describes the functionality of the Interactive Sensor Technology (IST) feature on the MC75A. The IST supports the following features. • Power Management – manage power by configuring IST to control switching on/off the backlight, control suspend mode of the MC75A by monitoring motion and orientation. • Display Orientation – switch the screen orientation to either landscape or portrait depending on the MC75A orientation.
2 - 24 MC75A Enterprise Digital Assistant User Guide Free Fall Detection IST continuously monitors gravitational force on the MC75A according to its current position. When the MC75A free falls, IST detects the absence of gravitational force and records the event data if it detects a free fall more than 450 ms, which may indicates nearly a one meter drop. This data can be used as an indicator of potential abuse or misuse. R AF T IST features a log for recording the free fall events.
Using the MC75A 2 - 25 1. Tap Start > Pictures & Videos icon. 2. Tap Camera on the command bar. 3. Tap Menu > Video to set shooting mode to video. The available recording time displays on the screen. NOTE 4. By default, the time limit for recording videos is set to 30 seconds. Press the Enter key to begin recording. Viewing Photos and Videos For detailed information on the Photos and Videos, refer to the Microsoft Applications User Guide for Mobile 6, p/n 72E-108299-xx.
Figure 2-25 Beam Window Tap OK. Infrared Connection AF 3. T 2 - 26 MC75A Enterprise Digital Assistant User Guide Using infrared, you can enable short-range file exchange between your MC75A and another IrDA device. Exchanging Files using IR Connection Ensure that the IrDA function on both the MC75A and the other device are enabled. To send files via IrDA connection: 1. Switch to the program where you created the item you want to send and locate the item in the list.
Figure 2-27 Beam Contact To receive files via IrDA connection: T Using the MC75A 2 - 27 Align the IrDA port of the MC75A with that of the other IrDA device so that they are unobstructed and within a close range. 2. On the other device, send the file to the MC75A. R AF 1. D Figure 2-28 Receive File 3. When the Receiving Data dialog displays, tap Yes.
D R AF T 2 - 28 MC75A Enterprise Digital Assistant User Guide
Introduction AF T Chapter 3 Data Capture The MC75A offers three types of data capture options: • Laser scanning • Imaging • Color digital camera. To perform data capture a scanning enabled application must be installed on the MC75A. A sample scanning application can be downloaded from the Motorola Support site at http://support.symbol.com.
3-2 MC75A Enterprise Digital Assistant User Guide • Hold the MC75A farther away for larger symbols. • Move the MC75A closer for symbols with bars that are close together. NOTE Scanning procedures depend on the application and MC75A configuration. An application may use different scanning procedures from the one listed above. Bar Code Scanning Ensure that a scan enabled application is loaded on the MC75A. AF T 1. Figure 3-1 Linear Scanning Press and hold the scan button.
Data Capture 3-3 Operational Modes MC75A with an integrated imager support three modes of operation, listed below. Activate each mode by pulling the trigger or pressing the Scan button. • Decode Mode: In this mode, the MC75A attempts to locate and decode enabled bar codes within its field of view. The imager remains in this mode as long as you hold the trigger, or until it decodes a bar code. NOTE To enable Pick List Mode, download the Control Panel applet from the web site at http://support.symbol.com.
MC75A Enterprise Digital Assistant User Guide AF Figure 3-4 Imager Aiming Pattern T 3-4 Figure 3-5 Pick List Mode with Multiple Bar Codes 3. Release the scan button. Imager decoding usually occurs instantaneously. The MC75A repeats the steps required to take a digital picture (image) of a poor or difficult bar code as long as the scan button remains pressed.
3-5 T Data Capture Figure 3-6 Sample Scan Application with Preview Window Move the MC75A until the red aiming reticle is on the bar code to scan. The aiming reticle turns green when the MC75A is able to decode the bar code. R AF 4. Figure 3-7 Digital Camera Scanning Release the scan button. The Scan/Decode LED lights green and a beep sounds, by default, to indicate the bar code was decoded successfully. D 5.
MC75A Enterprise Digital Assistant User Guide D R AF T 3-6
T Chapter 4 Using the Phone AF Introduction Use the MC75A to make phone calls, set up speed dials, keep track of calls, and send text messages. Your wireless service provider may also provide other services such as voice mail, call forwarding, and caller ID. R Also use the integrated phone to connect to an ISP or work network in order to browse the Web and read e-mail.
4-2 MC75A Enterprise Digital Assistant User Guide To access the phone keypad tap Start > Phone or press the green phone key on the MC75A’s keypad. To receive calls when the MC75A is suspended, leave the phone radio turned on and ensure the MC75A is set to wake with any key. Turning the Phone On and Off Windows Mobile 6 devices include Wireless Manager, which provides a simple method of enabling and disabling the phone. AF T To open Wireless Manager, tap the Connectivity icon.
Using the Phone 4-3 Audio Modes The MC75A offers three audio modes for use during phone calls: • Handset Mode: Switches audio to the speaker at the top front of the MC75, so you can use the MC75A as a handset. This is the default mode. • Speaker Mode: Use the MC75A as if on speaker phone. Tap the Speaker On button to activate this mode. Tap the Speaker Off button to switch back to handset mode. • Headset Mode: Connect a wired or Bluetooth headset to automatically switch audio to the headset.
MC75A Enterprise Digital Assistant User Guide Figure 4-4 Using a Headset Using a Bluetooth Headset T 4-4 AF You can use a Bluetooth headset for audio communication when using an audio-enabled application. See Chapter 6, Using Bluetooth for information on connecting a Bluetooth headset to the MC75A. Set the MC75A’s volume appropriately before putting the headset on. When a Bluetooth headset is connected the speakerphone is muted.
Using the Phone 4-5 Figure 4-6 Phone Volume Slider T Phone Volume Slider NOTE AF To adjust the volume tap the Speaker icon in the Title bar. Move the slider up or down to adjust the volume. Adjust the conversation phone volume during a call. Adjusting the volume while not in a call affects the ring and notification sound levels. Making a Call NOTE You can make emergency calls even when the MC75A is locked or when a SIM card is not installed.
MC75A Enterprise Digital Assistant User Guide Figure 4-7 Contacts Menu Tap Call Work, Call Home or Call Mobile. NOTE To make a call from an open contact, tap the number to call. See On-Device Help for more information about Contacts. Using Call History AF 3. T 4-6 To make a call using Call History: Tap Start > Phone or press the green phone key on the MC75A’s keypad. 2. From the Phone keypad, tap Call History. R 1. D Phone icon Figure 4-8 Call History Window 3.
Using the Phone 2. 4-7 From the Phone keypad, tap and hold the speed dial location number assigned to a contact. (To dial a one-digit speed dial location number, tap and hold the speed dial number. To dial a two-digit speed dial location number, tap the first digit and then tap and hold the second digit.) or From the Phone keypad, tap Speed Dial and tap the speed dial location number of the desired contact in the list.
MC75A Enterprise Digital Assistant User Guide Figure 4-10 Incoming Call T 4-8 AF To ignore the incoming call tap Ignore. This may send the caller to voice mail, depending on the service provider. Otherwise, this presents busy signal to the calling party. To end the call tap End or press the red phone key on the MC75A keypad. Incoming Call Features • If you receive a call while in a call, tap Wait to place the call in call waiting. • You can use other programs on the MC75A during a call.
Using the Phone 4-9 To find a contact name: • Enter the first letter of a contact’s first name or last name. Smart Dialing searches for the letter starting from the first character of a contact name as well as from the character that appears after a space, dash, or underscore in a contact name.
4 - 10 MC75A Enterprise Digital Assistant User Guide Figure 4-12 Mute Button and Icon AF Taking Notes T Mute Icon To create a note during a call, tap Note on the display, then enter the note. For more information about creating notes see the Windows On-Device Help. To access a note created during a call: Tap Start > Phone or press the green phone key on the MC75A’s keypad. 2. From the Phone keypad, tap Call History. 3.
Using the Phone 4 - 11 Using Speed Dial Create speed dial numbers to dial frequently called numbers with a single tap. Before creating a speed dial entry, ensure the phone number exists in Contacts. Adding a Speed Dial Entry To add a speed dial entry from the phone keypad: Ensure the contact and phone number are in the Contacts list. 2. Tap Start > Phone or press the green phone key on the MC75A’s keypad. 3. Tap Speed Dial button > Menu > New. AF Tap the desired contact name and number in the list.
Figure 4-16 Speed Dial Contact List 7. Tap OK to exit the Speed Dial Contact List. T 4 - 12 MC75A Enterprise Digital Assistant User Guide Tap Start > Contacts. R 1. AF To add a speed dial entry from the Contacts window: D Figure 4-17 Contacts 2. Tap a contact name. 3. Tap Menu > Add to Speed Dial.
Using the Phone 4 - 13 4. Tap the up/down arrows to select an available location to assign as the new speed dial entry. The first speed dial location is reserved for voice mail. 5. Tap OK. Editing a Speed Dial Entry Tap Start > Phone or press the green phone key on the MC75A’s keypad. 2. Tap Speed Dial button. AF T 1. Figure 4-19 Speed Dial Contact List Tap and hold the contact name. 4. Tap Edit... . 5. Change the name, phone number, or location information. 6. Tap OK. R 3.
4 - 14 MC75A Enterprise Digital Assistant User Guide Using Call History Use Call History to call someone who was recently called, or recently called in. Call History provides the time and duration of all incoming, outgoing, and missed calls. It also provides a summary of total calls and easy access to notes taken during a call. Table 4-1 lists the call history icons that appear in the Call History window.
Figure 4-21 Call History - Tools Menu Select Call Timers... . R AF 4. T Using the Phone 4 - 15 Figure 4-22 Call History - Call Timers Tap Reset. (The All Calls: counter cannot be reset.) 6. Tap OK to exit the Call Timers window. D 5. Deleting All Call History Items 1. Tap Start > Phone or press the green phone key on the MC75A’s keypad to display the Phone keypad. 2. From the Phone keypad, tap Call History. 3. Tap Menu.
Figure 4-23 Call History - Tools Menu Select Delete all calls. AF 4. T 4 - 16 MC75A Enterprise Digital Assistant User Guide Figure 4-24 Call History - Delete All Dialog 5. Tap Yes. 6. Tap OK to exit the Call History window. R Viewing Call Status Tap Start > Phone or press the green phone key on the MC75A’s keypad to display the Phone keypad. 2. From the Phone keypad, tap Call History. 3. Tap an entry. The Call Status window appears. D 1.
Using the Phone 4 - 17 4. Tap OK and then OK to exit. Using the Call History Menu Use the Call History menu to dial voice mail, access the Activation Wizard, save to contacts, view a note, delete a listing, send a text message, and make a call. Tap Start > Phone or press the green phone key on the MC75A’s keypad to display the Phone keypad. 2. From the Phone keypad, tap Call History. 3. Tap and hold an item in the list. AF T 1.
Figure 4-27 Call Swapping - Hold Tap Hold on to place the first number on hold. 4. Enter the second number and tap Talk. R AF 3. T 4 - 18 MC75A Enterprise Digital Assistant User Guide Figure 4-28 Call Conferencing - Conferencing Tap Swap to move from one call to the other. D 5. 6. Tap End or press the red phone key on the MC75A keypad to end each call. Swapping Calls on an MC75A8 To swap between two incoming phone calls: 1. Tap Answer to connect to the first call.
Figure 4-29 Answer a Call T Using the Phone 4 - 19 When a second call arrives, tap Answer. The first call is placed on hold. 3. Tap Talk to swap from one call to the other. R AF 2. Figure 4-30 Call Swapping Tap End or press the red phone key on the MC75A keypad to end active call. The remaining call re-connects, tap Answer to connect to the call. D 4. 5. Tap End or press the red phone key on the MC75A keypad to end the last call.
Figure 4-31 Conference Call - Hold T 4 - 20 MC75A Enterprise Digital Assistant User Guide Tap Hold to place the first call on hold. 4. Enter the second phone number and tap Talk. 5. After the call is answered, tap Menu > Conference to place the calls in conference mode. R AF 3. D Figure 4-32 Creating a Conference Call 6. Tap Hold to place the conference on hold. 7. Enter another phone number and tap Talk. 8.
Using the Phone 4 - 21 Three-way Calling on an MC75A8 NOTE Three-way Calling may not be available on all services. Please check with your service provider for availability. To create a three-way phone session with two people and you as the initiator: Tap Start > Phone or press the green phone key on the MC75A’s keypad to display the Phone keypad. 2. Enter the first phone number and press Talk. 3. To call a second person, tap Keypad. Enter the second number and tap Talk. AF T 1.
4 - 22 MC75A Enterprise Digital Assistant User Guide Figure 4-34 New Text Message Notification T Text Message Notification Icon R AF The Caller Identification feature matches incoming text message numbers with those stored in Contacts so you know who is sending you a message. Furthermore, the New Text Message dialog box gives you the option to call the sender or save, dismiss, or delete the message.
2. The Text Messages window appears. 3. In the message list, tap the text message. Enter reply here. NOTE AF Figure 4-37 Text Messages List T Using the Phone 4 - 23 If the phone is turned off and you tried to call the sender, send a reply, or forward the message, you are prompted to turn the phone function on. Sending a Text Message To create a text message: On the Phone screen, select a contact name that you want to send a message to. 2. Tap Menu > Send Text Message. D R 1.
4 - 24 MC75A Enterprise Digital Assistant User Guide Address Area Figure 4-39 Create Text Message T Message Area • The auto-correct feature automatically fixes common spelling errors as you type so your messages are more accurate. AF • The character counter lets you see and control the size of the message as you compose. • If you want to know if your text message was received, tap Menu > Message Options, then select the Request message delivery notification check box. 4.
Figure 4-40 SIM UI Window Select Dual and then tap Select. R AF 2. T Using the Phone 4 - 25 Figure 4-41 Change Phone Line Select Change and then tap Select. 4. If applicable, sign in with the PIN number for the other line. D 3.
D R AF T 4 - 26 MC75A Enterprise Digital Assistant User Guide
AF Introduction T Chapter 5 Using GPS Navigation The MC75A includes Global Positioning System (GPS) technology using the SiRF III chipset. GPS technology is based on a worldwide system of GPS satellites orbiting the earth that continuously transmit digital radio signals. These radio signals contain data on the satellites’ locations and their exact clock time and are used to determine your location on the earth.
5-2 MC75 User Guide Operation Acquiring satellite signals may take a few minutes. It is best to be outside and have a clear, unobstructed view of the sky. Without a clear view, acquisition takes much longer and could result in the MC75A being unable to compute the initial position quickly. When operating the device indoors access to the GPS signals may be limited or unavailable. When using a GPS navigation application, ensure that the MC75A does not go into suspend mode.
AF T Using GPS Navigation D R Figure 5-1 SUPL Setup Tab Figure 5-2 MISC Tab 5-3
MC75 User Guide T 5-4 D R AF Figure 5-3 Info Tab
AF Introduction T Chapter 6 Using Bluetooth Bluetooth-equipped devices can communicate without wires, using frequency-hopping spread spectrum (FHSS) radio frequency (RF) to transmit and receive data in the 2.4 GHz Industry Scientific and Medical (ISM) band (802.15.1). Bluetooth wireless technology is specifically designed for short-range (30 feet/10 meters) communication and low power consumption. MC75As with Bluetooth capabilities can exchange information (e.g.
6-2 MC75A Enterprise Digital Assistant User Guide The Bluetooth radio in this MC75A operates as a Class 2 device power class. The maximum output power is 2.5mW and the expected range is 32.8 feet (10 meters). A definition of ranges based on power class is difficult to obtain due to power and device differences, and whether one measures open space or closed office space. NOTE It is not recommended to perform Bluetooth wireless technology inquiry when high rate 802.11b operation is required.