f P D o r T P o 8 c 1 k 0 e 0 t S P e C r 2 i e s 0 0 2
P D T 8 1 0 0 f o r P o c k e t S e r i e s P C 2 0 0 2 © 2001 - 2003 SYMBOL TECHNOLOGIES, INC. All rights reserved. Symbol reserves the right to make changes to any product to improve reliability, function, or design. Symbol does not assume any product liability arising out of, or in connection with, the application or use of any product, circuit, or application described herein.
Q u i c k R e f e r e n c e Introduction Congratulations on your purchase of Symbol Technologies’ PDT 8100 Terminal! Its unique combination of features make this product superior for use in a wide range of applications.
P D T • • • • • • • • • • • 8 1 0 0 S e r i e s Using the Keyboard on page 14 Using the Stylus on page 20 Today Screen on page 21 Navigation Bar and Command Bar on page 22 Input Methods on page 22 Scanning with the PDT 8100 on page 25 Resetting Your PDT 8100 Terminal on page 27 Host Communications on page 29 Maintaining the PDT 8100 on page 30 Troubleshooting on page 31 EID Number (PDT 8133 Only) on page 44.
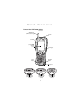
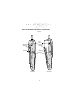
Q u i c k R e f e r e n c e Parts of the PDT 8100 Series Front View WAN Antenna (PDT 8133/8137 only) Speaker Scan LED LCD (monochrome) TFT LCD (color) Scan Trigger Power Button Backlight Button Microphone Top View 15-Pin Serial Port (terminals without scanner) 1-D Exit Window (terminals with scanner) 3 2-D Exit Window (terminals with scanner)
P D T 8 1 0 0 S e r i e s Parts of the PDT 8100 Series (continued) Side View Audio connector 1-D terminal Handstrap clip 2-D terminal Handstrap bar Handstrap Handstrap Scan Trigger 2-D Terminal 1-D Terminal 4
Q u i c k R e f e r e n c e Parts of the PDT 8100 Series (continued) Back View WAN Antenna Stylus Stylus Silo IrDA Port Reset Button Battery Cover Switch Battery Compartment SIM Socket Flash Card Cover Lithium-ion Battery Battery Door Latch Battery Door Latch Battery Door Bottom View Serial Port 5
P D T 8 1 0 0 S e r i e s Getting Started Before you can use your PDT 8100, perform these basic setup procedures: • Install the antenna packaged with the terminal by screwing it into the antenna receptacle on the top of the terminal (PDT 8133/8137 only). • Install the SIM card (PDT 8137 only). • Insert the Compact Flash card (optional). • Install and charge the battery. • Start the PDT 81xx. • Initiate the network connection (PDT 813x/814x only). Installing the SIM Card (PDT 8137 Only) 1.
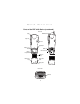
Q u i c k R e f e r e n c e Inserting a Compact Flash Card The PDT 8100 contains a slot for a standard compact flash card, which includes a locking mechanism that prevents the card from coming loose if the PDT 8100 is dropped. Insert the compact flash card carefully to ensure it engages this locking mechanism. 1. Open the battery door and remove the battery. 2. Remove the flash card cover at the top of the battery compartment by pulling the top out, and lifting the cover up. Compact Flash Card Cover 3.
P D T 8 1 0 0 S e r i e s Removing a Compact Flash Card 1. Open the battery door and remove the battery and flash card cover. 2. Use the stylus to press the flash card release button inside the flash card compartment. Installing the Battery 1. Slide the latches on the battery door up and lift the battery door away from the PDT 8100.
Q u i c k R e f e r e n c e 2. Insert the lithium-ion battery in the battery compartment with the battery tether positioned properly (as shown below), making sure the battery snaps into place. Tether 3. Replace the battery cover, pressing down firmly along the top edge while sliding the latches down into the locked position.
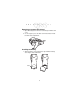
P D T 8 1 0 0 S e r i e s 2. Insert the PDT 8100 terminal in the cradle. Terminal Status LED 3. The Terminal Status LED turns red (may take up to one minute) to indicate charging, then turns off when the battery is fully charged. The terminal’s battery is fully charged after approximately 2 1/2 hours. Charging a Spare Battery To recharge a spare battery, insert it in the spare battery charging slot in the back of the cradle, so the contacts are facing down and towards the back of the cradle.
Q u i c k R e f e r e n c e Charging the Battery Using the Synchronization Cable 1. Insert the Synchronization cable into the bottom of the terminal. 2. Plug the power cable into a wall outlet and plug the other end into the battery charging receptacle on the side of the Synchronization Cable.
P D T 8 1 0 0 S e r i e s Starting the PDT 8100 Press the red power button to turn the PDT 8100 on and off. If the terminal does not power on, perform a hard reset. See Performing a Hard Reset on page 28. Power Button As the terminal initializes its unique Flash File system, the Symbol splash screen displays for about 10 seconds. When the Welcome screen appears, tap anywhere on the screen to continue to the Align screen. Note that these screens also appear every time you perform a hard reset.
Q u i c k R e f e r e n c e 4. Follow the directions on the screen which explain how to use the stylus and pop-up menus, and allow you to set your city and time zone. Initiating a Network Connection Before using the terminal, set up the Spectrum24, CDPD (Cellular Digital Packet Data) or GSM (Global System for Mobile Communication) network connection. Refer to the PDT 8100 Series Product Reference Guide for Pocket PC 2002 for setup instructions.
P D T 8 1 0 0 S e r i e s Adjusting the Contrast (Monochrome LCD) Keyboard Keys 28-key Function + “1” Decrease contrast (lighten the screen) Function + “2” Increase contrast (darken the screen) 37-key 47-key Description Function + “G” Decrease contrast (lighten the screen) Function + “I” Increase contrast (darken the screen) Function + “Y” Decrease contrast (lighten the screen) Function + “W” Increase contrast (darken the screen) Using a Headset If your terminal is equipped with an audi
Q u i c k R e f e r e n c e character or action. The keyboard default is numeric, producing numbers. Cursor keys Caps/Shift key Space/ Backspace key End key Send key Scan key Scan key Home Clear key Page up & down keys Tab key Alpha key Enter/Escape key Function key Control key Alt key Backlight key Power key Key Action Note: Press Func, then another key to produce the value or function above that key. See individual key descriptions in this table for additional Function key usage.
P D T 8 1 0 0 Key S e r i e s Action Contrast See Adjusting the Contrast (Monochrome LCD) on page 14. Cursor Press cursor keys to move the cursor left, right, up and down on the screen. Press Func + up cursor to raise the volume. Press Func + down cursor to lower the volume. End Press End to move the cursor to the end of a line. Enter/Escape Press Enter after entering data or a command. Press Func + Enter to partially or completely escape from an application level or screen.
Q u i c k R e f e r e n c e character or action. The keyboard default is numeric, producing the gray number or white character on that key. Scan key Caps/Shift key Space/ Backspace key End key Send key Function key Clear key Alt key Tab key Volume (+) key Control key Volume (-) key Alpha key Backlight key Enter/Escape key Power key Key Action Note: Press Func, then another key to produce the value or function above that key.
P D T 8 1 0 0 Key S e r i e s Action Contrast See Adjusting the Contrast (Monochrome LCD) on page 14. Cursor keys: C, G, H, I Press cursor keys to move the cursor left, right, up and down on the screen. End Press End to move the cursor to the end of a line. Escape/Enter Press Enter after entering data or a command. Press Func + Enter to partially or completely escape from an application level or screen. Power See Starting the PDT 8100 on page 12. Scan Press Scan to scan bar codes.
Q u i c k R e f e r e n c e Using the 47-Key Keyboard The 47-key keyboard uses an alphanumeric keypad that produces the 26-character alphabet (A-Z), numbers (0-9), and assorted characters. The keyboard is color-coded to indicate which modifier key (Alpha-Numeric, Func) to press to produce a particular character or action. The keyboard default is the key value, producing the gray number or lower case yellow letter on that key.
P D T 8 1 0 0 Key S e r i e s Action Caps/Shift Press Shift when in alpha mode, then another key to capitalize the letter on that key. Press Func + Shift to toggle All Caps on and off. Func + Shift also erases all entered data from the screen. Clear Press Clear to clear the screen. Contrast See Adjusting the Contrast (Monochrome LCD) on page 14. Cursor keys: C, G, H, I Press cursor keys to move the cursor left, right, up and down on the screen.
Q u i c k R e f e r e n c e Today Screen When you turn on your terminal for the first time each day (or after 4 hours of inactivity), the Today screen appears. You can also display it by tapping , then Today. On the Today screen, you can see important information for the day.
P D T 8 1 0 0 S e r i e s Navigation Bar and Command Bar The navigation bar at the top of the screen displays the active program and current time, and allows you to select programs and close screens. The command bar at the bottom of the screen contains menus and buttons to perform tasks in programs. Input Methods Enter information in any program by typing with the 28-, 37-, or 47key keyboard, or use the input panel to type with the soft keyboard, write using Block Recognizer, or the Letter Recognizer.
Q u i c k R e f e r e n c e To show or hide the input panel, tap the Input Panel button. Tap the arrow next to this button to view input methods. Select input method settings Select an input method Tap to see your choice Input Panel Button When you use the input panel, your terminal anticipates the word you are typing or writing and displays it above the input panel. When you tap the displayed word, it is inserted into your text at the insertion point.
P D T 8 1 0 0 S e r i e s 2. Write a letter in the left side of the box, or a number in the right side, using special character strokes. When you write a letter, it is converted to typed text on the screen. For instructions on entering Block Recognizer characters, with Block Recognizer open, tap the question mark next to the writing area, or see Block Recognizer Characters on page 25. Using the Letter Recognizer 1. Tap the arrow next to the Input Panel button, then Letter Recognizer. 2.
Q u i c k R e f e r e n c e Block Recognizer Characters The following chart is a partial display of the characters you can write while using the Block Recognizer (the dot on each character is the starting point for writing). Scanning with the PDT 8100 The PDT 8100 has an integrated scanner which collects data by scanning bar codes. See the PDT 8100 Product Reference Guide for Pocket PC 2002 for information on configuring your terminal for scanning.
P D T 8 1 0 0 S e r i e s To scan bar codes with the PDT 8100: 1. Aim the scanner at the bar code. 2. Press the scan trigger. Ensure the red scan beam covers the entire bar code. The green scan LED lights and a beep sounds to indicate a successful decode. Scanning PDF417 Bar Codes The 2-D scanning PDT 8100 terminal supports PDF417 bar code scanning. The raster pattern has multiple scanning rows to accommodate the PDF417 symbol’s multiple rows. 1. Point the scanner at the bar code and press the trigger.
Q u i c k R e f e r e n c e down, keeping the beam horizontal to the rows, until the pattern scans the entire symbol. Resetting Your PDT 8100 Terminal If your PDT 8100 terminal stops responding to input, reset it. Performing a Soft Reset A soft reset restarts the terminal and saves all stored records and entries. Caution: Files that remain open during a soft reset may not be retained. DO NOT perform a soft reset if the terminal is suspended.
P D T 8 1 0 0 S e r i e s To perform a soft reset: Keyboard Keys 28-key Backlight + Down Arrow + Function 37-key Backlight + Alpha + Function 47-key Backlight + End + Function Performing a Hard Reset A hard reset also restarts your PDT 8100 terminal, but erases all stored records and entries. Therefore, never perform a hard reset unless a soft reset does not solve your problem. Note: You can restore any data previously synchronized with your computer during the next ActiveSync operation.
Q u i c k Note: R e f e r e n c e With a hard reset, Formats, Preferences, and other settings are restored to their factory default settings. Host Communications The PDT 8100 Series terminal can communicate with a host PC either directly through its communications port using an RS-232 serial cable, the cradle, or wirelessly via the Spectrum24® wireless LANs, CDPD (Cellular Digital Packet Data), or GSM (Global System for Mobile Communication).
P D T 8 1 0 0 S e r i e s Communicating with Printers To print from a standard printer: 1. Attach an RS-232 serial cable to the serial port in the bottom of the PDT 8100. 2. Attach the other end of the cable to the serial port on the printer. 3. Run your application’s print function. To print from an IrDA-compliant printer: 1. Point the IrDA port on the back of the PDT 8100 at the IrDA port on the printer, at a maximum distance of 39 inches (1 meter). 2. Run the application’s print function.
Q u i c k R e f e r e n c e Troubleshooting Problem PDT 8100 does not turn on. Rechargeable lithium-ion battery did not charge. Cannot see characters on display. Cause Solution Lithium-ion battery not charged. Charge or replace the lithium-ion battery in the PDT 8100. Lithium-ion battery not installed properly. Ensure battery is installed properly. System crash. Perform a hard reset. See Resetting Your PDT 8100 Terminal on page 27. Battery failed. Replace battery.
P D T Problem Fail to communicate with IrDA printer. During data communication, no data was transmitted, or transmitted data was incomplete. No sound is audible. 8 1 0 0 Cause S e r i e s Solution Distance from printer is more than 1 meter (39 inches). Bring the terminal closer to the printer and attempt communications again. Obstruction interfered with communication. Check the path to ensure no objects were in the way. Application is not enabled to run IrDA printing.
Q u i c k Problem R e f e r e n c e Cause Solution PDT 8100 turns itself off. PDT 8100 is inactive. Your PDT 8100 turns off after a period of inactivity. This period can be set from one to five minutes, in one-minute intervals. Check the Power dialog box (in the System tab under Start/Settings), and change the setting if you need a longer delay before the automatic shutoff feature activates. PDT 8100 doesn’t recognize my handwriting. Character strokes written incorrectly with the stylus.
P D T 8 1 0 0 S e r i e s Problem Cause A message appears stating that your PDT 8100 terminal memory is full. Too many files stored on the terminal. Delete unused memos and records. You can save these records on your computer. Memory allocation too low. Adjust the memory allocation. Select Start, then Settings, and select the System tab. Tap Memory and adjust the slider. Too many applications installed on the terminal.
Q u i c k R e f e r e n c e Problem Cause Solution Your PDT 8100 terminal does not accept scan input. Scanning application is not loaded. Verify that the unit is loaded with a scanning application. See your System Administrator. Unreadable bar code. Be sure the symbol is not defaced. Distance between exit window and bar code is incorrect. Be sure you are within proper scanning range. Terminal is not programmed for the bar code.
P D T 8 1 0 0 S e r i e s END-USER LICENSE AGREEMENT • You have acquired a device (“DEVICE”) that includes software licensed by Symbol Technologies, Inc. (“SYMBOL”) from Microsoft Licensing Inc. or its affiliates (“MS”). Those installed software products of MS origin, as well as associated media, printed materials, and “online” or electronic documentation (“SOFTWARE”) are protected by international intellectual property laws and treaties. The SOFTWARE is licensed, not sold. All rights reserved.
Q u i c k R e f e r e n c e part of a sale or transfer of the DEVICE, provided you retain no copies, you transfer all of the SOFTWARE (including all component parts, the media and printed materials, any upgrades or backup copies, this EULA and, if applicable, the Certificate(s) of Authenticity), and the recipient agrees to the terms of this EULA. If the Software is an upgrade, any transfer must include all prior versions of the SOFTWARE. • Termination.
P D T 8 1 0 0 S e r i e s NO LIABILITY FOR CERTAIN DAMAGES. EXCEPT AS PROHIBITY BY LAW, MS SHALL HAVE NO LIABILITY FOR ANY INDIRECT, SPECIAL, CONSEQUENTIAL OR INCIDENTAL DAMAGES ARISING FROM OR IN CONNECTION WITH THE USE OR PERFORMANCE OF THE SOFTWARE. THIS LIMITATION SHALL APPLY EVEN IF ANY REMEDY FAILS OF ITS ESSENTIAL PURPOSE.
Q u i c k R e f e r e n c e Scanner Labeling 39
P D T 8 1 0 0 S e r i e s In accordance with Clause 5, IEC 825 and EN60825, the following information is provided to the user: ENGLISH CLASS 1 CLASS 2 HEBREW CLASS 1 LASER PRODUCT LASER LIGHT DO NOT STARE INTO BEAM CLASS 2 LASER PRODUCT DANISH / DANSK KLASSE 1 KLASSE 1 LASERPRODUKT KLASSE 2 LASERLYF SE IKKE IND I STRÅLEN KLASSE 2 LASERPRODUKT ITALIAN / ITALIANO CLASSE 1 PRODOTTO AL LASER DI CLASSE 1 CLASSE 2 LUCE LASER NON FISSARE IL RAGGIOPRODOTTO AL LASER DI CLASSE 2 DUTCH / NEDERLANDS KLASSE 1 KL
Q u i c k R e f e r e n c e FCC RF Exposure Guidelines This device was tested for typical body-worn operations with the holster providing a minimal spacing of 2.0 cm from the body to the back of the terminal/antenna. To maintain compliance with FCC RF exposure compliance requirements, use only beltclips, holsters, or similar accessories that maintain a 2.0 cm separation distance between the user’s body and the back of the terminal, including the antenna.
P D T 8 1 0 0 S e r i e s Persons with pacemakers: • Should always keep the device more than 15cm (6 inches) from their pacemaker when turned on • Should not carry the device in a breast pocket • Should use the ear furthest from the pacemaker to minimize the potential for interference. If you have any reason to suspect that interference is taking place turn off your device immediately. Hearing Aids The device may interfere with some hearing aids.
Q u i c k R e f e r e n c e Radio Frequency Interference Requirements Note: This equipment has been tested and found to comply with the limits for a Class B digital device, pursuant to Part 15 of the FCC rules. These limits are designed to provide reasonable protection against harmful interference in a residential installation.
P D T 8 1 0 0 S e r i e s CE Marking and European Economic Area (EEA) For Wideband Radio Devices: RLAN’s (2.4GHz) for use through the EEA have the following restrictions: • Maximum radiated transmit power of 100 mW EIRP in the frequency range 2.400 -2.4835 GHz • France, equipment is restricted to 2.4465 -2.4835 GHz frequency range • Belgium outside usage, the equipment is restricted to 2.460 -2.4835 GHz frequency range • Italy requires a user license.
Q u i c k R e f e r e n c e Warranty (A) Warranty Symbol Technologies (hereafter “Seller”) hardware Products are warranted against defects in workmanship and materials for a period of twelve (12) months from the date of shipment, unless otherwise provided by Seller in writing, provided the Product remains unmodified and is operated under normal and proper conditions.
Service Information Before you use the unit, it must be configured to operate in your facility’s network and run your applications. If you have a problem running your unit or using your equipment, contact your facility’s Technical or Systems Support.