
User's Manual
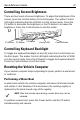

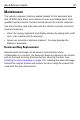
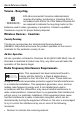
Table Of Contents
- Warranty
- Patents
- Introduction
- About This Guide
- Features
- Unpacking
- Optional Accessories
- Mounting Bracket Installation
- Installing the Desiccant Bags
- Installing the VC5090 in a Forklift
- Installing the VC5090 on a Wall or Desktop
- Installing the Optional Keyboard
- Powering the VC5090 On/Off
- Charging the Internal Backup Battery
- Calibrating the Touch Screen
- Controlling Screen Brightness
- Controlling Keyboard Backlight
- Resetting the Vehicle Computer
- Programmable Keys
- Connecting Accessories
- Maintenance
- Troubleshooting
- Regulatory Information
- Products Equipped with Bluetooth® Wireless Technology
- Country Approvals
- Health and Safety Recommendations
- FCC / EU RF Exposure Guidelines
- Power Supply
- Batteries
- Taiwan - Recycling
- Wireless Devices - Countries
- Radio Frequency Interference Requirements
- Radio Frequency Interference Requirements - Canada
- Marking and European Economic Area (EEA)
- Waste Electrical and Electronic Equipment (WEEE)

Quick Reference Guide 21
Controlling Screen Brightness
There are four levels of screen brightness. To adjust the brightness of the
screen, press the Control button on the front panel. The amber Control
LED lights indicating that the VC5090 is in the control mode. Press the
P1 button to decrease the brightness or the P2 button to increase the
brightness. Press the Control button to exit this mode.
Controlling Keyboard Backlight
To toggle the keyboard backlight on and off, press the Control button on
the front panel. The amber Control LED lights indicating that the VC5090
is in the control mode. Press the P3 button to toggle the keyboard backlit.
Press the Control button to exit this mode.
Resetting the Vehicle Computer
If your vehicle computer stops responding to inputs, perform a warm boot
or cold boot.
Performing a Warm Boot
A warm boot restarts the vehicle computer and saves all stored records
and entries. In the Windows CE environment, the working registry is
replaced by the latest saved copy of the registry.
To perform a warm boot, press the Power button and the P2 button
simultaneously and release.
NOTE Files that remain open during a warm boot may not be
retained.
Control LEDP2 ButtonP1 Button
P3 Button
Control Button