
Vehicle Computer Product Reference Guide


Getting Started 1 - 7
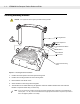
Getting Started
In order to start using the vehicle computer for the first time:
•
install the desiccant bags and desiccant door
or
install only desiccant door
•
install the vehicle computer in a vehicle or on a wall or desktop
•
start the vehicle computer.
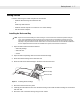
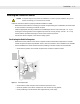
Installing the Desiccant Bag
1. Open the desiccant kit and remove all items:
•
desiccant package
•
desiccant door
•
screws.
2. Open the desiccant package and remove the six desiccant bags.
3. Place three desiccant bags in the desiccant well.
4. Place the other three desiccant bags in the back of the desiccant door.
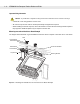
Figure 1-5
Installing Desiccant Bags
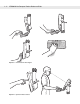
5. Ensure that the door seal is in place.
6. Carefully place the desiccant door onto the back housing. Ensure that the desiccant bags do not interfere
with door seal.
7. Secure the door to the back housing using the four screws.
NOTE Symbol recommends installing the desiccant bags in environments where extreme temperature changes
occur, such as applications where the device may be continuously moved between a freezer and a hot /
humid area. Desiccant bags should be replaced more often in the hot / humid months of summer and less
frequently in dry/cold months of winter. If desiccant is not used, the desiccant door must still be installed and
secured. Replacement Desiccant Kits are available from Symbol, Part Number: KT-84524-01.
Desiccant Bags
Desiccant Door
Desiccant Well