Chapter 1 S100 User Guide SyncServer S100 User Guide Installation, Configuration, and Operation for the SyncServer S100 - OS Version 1.3 Part #: S100 User Guide, Rev.
1 2 S100 User Guide – Rev.
Table of Contents 1 Chapter 1 Introduction and Overview 1 Conventions Used 2 Product Details 3 Time Standards 3 Global Positioning System (GPS) 3 Stratum Levels 4 Time Synchronization and Business 4 How the S100 Solves the Problem 5 National Measurement Institutes 5 Special Safety Instructions Lithium Battery Disposal Instructions Electrical Safety Instructions 6 6 6 2 3 Chapter 2 S100 Technology 7 Overview S100 Product Overview Sources of Time On the Network Web-based Access 7 7
SyncServer S100 1 Your CD-ROM Using the Software PuTTY Folder Details PUTTY.EXE PSCP.EXE PSFTP.EXE PLINK.EXE PAGEANT.EXE PUTTYGEN.
Logging In 54 Administrative Interface 54 Admin Interface: Base Menu 55 Administrative Menu: Expanded 56 System Status 57 Timing Configuration 57 NTP Relationships NTP Time Source Test NTP Dialup NTP Restart NTP Status Advanced: ntp.
SyncServer S100 SyncServer Help NTPD Help Search NTPD Manual 1 84 84 84 Logging Off 85 Chapter 5 Operations & Time-Protocols 87 S100: Operations and Time Protocols 87 Sysplex Timer 87 Time Protocol (RFC 868) 89 Daytime Protocol (RFC 867) 89 Simple Network Time Protocol (RFC 2030) 90 Network Time Protocol (RFC 1305) 90 NTP Authentication Authentication: NTP v3 Authentication: NTP v4 Autokey Public Domain NTP Package 93 93 94 94 Typical NTP Configuration Considerations 94 Other NTP Considerations C
How many satellites are necessary for me to operate the S100? 111 How do I know if the satellite signal strength is good? 111 What is the maximum antenna cable length for use with the S100? 111 What are the available antenna cable lengths and antenna requirements? 111 What are some guidelines for correctly cutting the cable, using splitters, and using cable connectors? 111 How many NTP requests can be processed by the S100 each second? 112 Does the S100 support NTP v4? 112 Can the S100 utilize a certificate
SyncServer S100 Appendix B 1 Time Glossary 121 Appendix D Customer Assistance 137 US Assistance Center Customer Service Technical Support 137 137 137 EMEA Assistance Center Customer Service Technical Support 137 138 138 Appendix C Appendix E vi Antenna Replacement 141 Index 143 S100 User Guide – Rev.
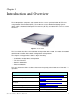
Chapter 1 1 Introduction and Overview The S100 provides computers and network devices secure synchronization to UTC time using Network Time Protocol (NTP). The S100 can use the Global Positioning System (GPS), NIST's Automated Computer Time Service (ACTS), or another NTP server as a time reference. 2 3 Figure 1-1: The S100 This User Guide describes the installation and operation of the S100. It is written for network administrators familiar with network configuration and operations.
SyncServer S100 1 How to...
Product Details 1 Details about the physical description and operating environment of the S100 are found in Appendix A, “S100 Specifications” on page 119 of this User Guide. Details about S100 operations are in “The Web-Based Interface” on page 53, as well as “Chapter 3” on page 13, and “Operations & Time-Protocols” on page 87. 2 Time Standards The international time standard is called Coordinated Universal Time or, more commonly, UTC.
SyncServer S100 Stratum Levels 1 The Internet Engineering Task Force (IETF) established standards for Network Time Protocol (NTP) in IETF RFC 1305. These hold that the source of time for each server is defined by a number called its stratum. The highest level is 0; Stratum 0 devices, such as GPS or radio clocks, are connected to a primary time reference, such as the national atomic clock. Each level “away” from this primary time reference adds on another number.
• Bandwidth consumption: Synchronizing the time over a WAN (wide area network) consumes expensive bandwidth and degrades time accuracy (versus synchronizing over a LAN). 1 • Lost time: If your network synchronization relies on a time reference outside your network, your network can be seriously compromised if the one connection to that outside time reference is lost.
SyncServer S100 Special Safety Instructions 1 Lithium Battery Disposal Instructions Caution: Replace lithium battery only with one of the same type and ratings. Dispose of the battery in accordance with all local codes. Contact your local environmental control or disposal agency for details. Electrical Safety Instructions Caution: Do not install the modem (phone) cord during an electrical storm. Note: minimum 26AWG phone cord is recommended for added safety.
Chapter 2 1 S100 Technology 2 3 Overview This chapter gives a review of the S100 technology. There is additional information in “S100 Specifications” on page 119. S100 Product Overview The S100 network time server synchronizes secure network time. The following sections describe this technology. 5 Sources of Time The S100 obtains time from GPS, ACTS, or another S100, and delivers it to computers and other devices on a network.
SyncServer S100 by secure web sites to protect credit card numbers and other sensitive information from unintended interception. 1 The S100 also supports SNMP v1.8 and SNMP v3 (Simple Network Management Protocol) for easy integration into your existing management hierarchy. Web-based Access The S100 management is web-based. Using a standard browser, you can set up and configure an S100 from any point on the Internet. See Chapter 3 for more about this web access.
Time Distribution Model Stratum 0 GPS Satellites or NMI Dial-Up Service Stratum 1 Network time distribution systems use a hierarchical time distribution model, as shown in this figure: Symmetricom SyncServer 2 Stratum 2 SyncServers or Computer Systems (NTP Clients) Stratum 3 3 Computer Systems (NTP Clients) Figure 2-1: The S100 in the Time Distribution Hierarchy 5 In hierarchical systems, primary time source clocks are Stratum 0 (zero), including GPS satellites, National Institute of Standards
SyncServer S100 More details are found in “Chapter 3” on page 13 and “The Web-Based Interface” on page 53. 1 S100 and Time Distribution Time is distributed over an IP network using Network Time Protocol (NTP), Simple Network Time Protocol (SNTP), Time Protocol, and Daytime Protocol over TCP/IP. S100s can be distributed throughout a LAN or intranet. Also, a single GPS antenna is all that is required to acquire UTC time for an array of S100s, making the network less vulnerable to damage or attack.
Digitally signed public certificates are required by the Autokey protocol. (See the interface at “Advanced: Keys/Certificates” on page 64.) All of this data goes into your certificate request (X.509) to a trusted Certificate Authority (CA). The CA can be an outside trust authority, such as VeriSign, or the device can certify itself. The S100 itself is “self-signed”, or shipped to you with an authenticated certificate.
SyncServer S100 1 12 S100 User Guide – Rev.
Chapter 3 Installation and Configuration Overview 2 Installation, setup, and getting started with the S100 are reviewed in this section. before Symmetricom recommends you review beginning your installation so that you are already familiar with the references to the interface once you begin to use it. 3 Getting Up and Running This chapter guides you through the following basic steps: 2. Set up the hardware and make all connections (Optional: Install GPS antenna, connect phone line).
SyncServer S100 For the S100-Dial-up/ACTS For the S100-GPS CD with NTP Clients, SymmTime™ software, User Guide PDF CD with NTP Clients, SymmTime™ software, User Guide PDF Six-foot RS-232 Cable Six-foot RS-232 Cable Phone cord Phone cord D-BNC Signal Breakout Cable BC11576-1000 D-BNC Signal Breakout Cable BC11576-1000 Bullet Antenna Antenna Mast - aluminium mast threaded to screw into the bottom of antenna Mounting Bracket Hardware - for attaching mast to railing 50-foot RG58 (Belden 8240 or equiva
S y n c S e rv e r S100 R S -2 3 2 C a b le P h o n e C o rd 2 C D w ith N T P C lie n ts , S y m m T im e , U s e r G u id e AC Power C o rd 3 D -B N C S ig n a l B r e a k o u t C a b le F o r G P S o p tio n : B u lle t A n te n n a A n te n n a C a b le A n te n n a M a s t a n d B ra c k e ts 5 Figure 3-1: S100 and Accessories Your CD-ROM The CD does not autoload when inserted into the CD-ROM drive. Use the file browser to view the contents of the CD.
SyncServer S100 • TermPro23.exe is used to install Tera Term terminal emulation software, if desired. The manual refers to using Hyperterminal. Either will work (as well as any others). This version supports Win 95, NT 3.51 and 4.0. • PuTTY is described below. Using the Software None of the files in the PuTTY folder must be installed. They are provided in case you require them and do not have them. The SymmTime (click SymmTime200x.exe to launch) file must be used for synchronization.
DOS Prompt (in 95, 98, ME) or the Command Prompt (in NT, 2000). This is available from the Programs section of your Start Menu. To start PSCP, add the directory containing PSCP to your PATH environment variable, enter the following in the console window: set PATH=C:\path\to\putty\directory;%PATH% This will only work for the lifetime of that particular console window. To set your PATH more permanently on Windows NT, use the Environment tab of the System Control Panel.
SyncServer S100 • Windows prevents programs from accidentally accessing one another's memory space and it allows programs to access one another's memory space deliberately (e.g., debugging). If a virus, trojan, or other malicious program attaches onto your Windows system while Pageant is running, it could access the memory of the Pageant process, extract your decrypted authentication keys, and send them back to its master. Before you run Pageant, you need to have a private key. Use Puttygen.
Installing Your S100 Install the S100 in a physically secure location with strong physical access controls. Symmetricom recommends that you read the operating environment requirements and other specifications in “S100 Specifications” on page 119, before starting. WARNING! To prevent electrical shock or injury, DO NOT remove the S100 cover. Dangerous voltages exist within this enclosure! Rack Mounting 2 3 The S100 is designed for mounting in a standard 19-inch (48.26 cm) rack.
SyncServer S100 Making All Connections: An Overview Use your standard PC workstation to configure the S100. Refer to the illustrations in this section when you install the S100. You will need to make a network connection (you may or may not require a hub to do this). It is suggested you obtain an IP address from your IT department. The Serial cord connects the S100 to your computer. Connect the S100 to your network using the network port.
Setting Up the Hardware On the S100 Front Panel 2 3 Figure 3-2: S100 Front Panel Close-up Complete the following steps before turning on the power: 1. 2. Connect the 9-pin serial cable from the PC workstation to the S100 serial port. You are doing this so to configure the S100 using a PC; see “Establishing A Serial Connection” on page 24 in the next section. Connect the RJ45-terminated Ethernet cable to one or both network ports on the S100.
SyncServer S100 On the S100 Rear Panel Telephone Telephone cable cable to wall to phone DB9 Connector (optional) GPS ANT. J1 DB15 Connector GPS Antenna Connector Power Panel Figure 3-3: S100 Rear Panel Close-up Complete the following steps to complete the S100 installation: 1. 2. Connect the power cable to the S100. GPS Option: Install GPS Antenna by connecting it to the GPS Antenna connector shown in Figure 3-3. Connect the Phone cord to a telephone line.
Installing the GPS Antenna If you are installing an S100 with the GPS option, a bullet antenna is provided. The bullet antenna provided with the S100 GPS version comes with a weatherproof housing, suitable for permanent installation in an outdoor location. Note: The GPS and bullet antennas and cables described in this manual have been replaced as described in “Appendix E” on page 141. 2 WARNING: Do not cut the cable to a shorter length. Instead, bundle any excess cable.
SyncServer S100 Installing the GPS antenna Note: The GPS antenna and cable described in this manual have been replaced as described in “Appendix E” on page 141. 1. 2. Slide the antenna mounting pole down over the antenna cable so that the cable passes through the center of the pole. Take the end of the cable that has passed through the pole and screw the antenna onto the cable by turning the antenna. 3. Screw the antenna down on the mounting pole by turning the pole. 4.
the hub directly to the network using the third Ethernet cable and perform an on-network test. 2 3 Figure 3-4: Connecting the S100 The following instructions assume you are using Windows OS. With your computer turned on: 1. 2. Use and configure Hyperterminal, click Start->Programs->Accessories>Communications>HyperTerminal. The “Connection Description” dialog box appears. In the Name field, enter a name. In this example, it is S100. 3. Click OK. 4.
SyncServer S100 Figure 3-5: COM Port Properties * To set the Terminal Type, select File>Properties>Settings. 7. Click OK. 8. In the terminal emulation (e.g., hyperterminal) window, select File->Properties. The “Properties” dialog opens. Click Settings tab. Verify the Telnet Terminal ID is set at VT100. 9. Click OK. Note: When your Hyperterminal is connected and operational, at the bottom of the window you should see the following : Setting Up the IP Address 1. Power on the S100 unit.
Figure 3-6: Login and Command Line 3. A command line appears. 4. Type netconfig and press . 5. The Network Config screen pop-up appears, “Would you like to setup networking?” This screen should appear as follows: 2 3 Figure 3-7: Network Configuration Screen 6. If your screen does not appear this way, check the settings on your Hyperterminal. Select Yes . 7. Another Network Config screen appears. If you select the DHCP box, setup will automatically find an IP address.
SyncServer S100 Testing Network Functionality To ensure that your network is functioning correctly, check to see if the S100 is on the network. First, check the Ethernet connection between the client computer and the S100: 1. Call up the client computer’s command prompt. Use the Windows MS-DOS command prompt. At the command line, type: IPCONFIG. Your computer’s IP address appears (see A). A B C Figure 3-9: IPCONFIG and PING Screen Note: In Win95, type WINIPCFG at the command line in Step 1.
3. Now, verify the S100’s IP address. At the Unix command prompt, at the command line (Figure 3-6), type IFCONFIG and press . The following appears (Figure 3-10). 2 Figure 3-10: Linux IP Confirmation Screen 4. Open your web browser, enter the IP address in the browser Address field and press. The Configuration Wizard link appears. Use the Wizard to complete the S100 configuration process.
SyncServer S100 How to Acquire Time With the S100, you can choose your source of secure time. Each of the time references described in this section is configured using the web-based interface’s Configuration Wizard. First, log on. Logging On In your browser, enter the IP address of the S100 (use this format: “http://ipaddress”). Add the S100 home page to your ‘Favorites’ list for future convenience. If the link/icon is not present, in your browser address window, enter the S100 IP address .
Administrator Log-In On the System Status Screen, click the Administrator Log-In link. After the security alert, the following dialog is displayed. 2 Figure 3-13: Logging In Enter the default user name, admin, and default password, symmetricom. We strongly recommend you change these settings as soon as possible. (You may log off by clicking Log Out at the top of each screen in the interface. More about logging off can be found in “Logging Off” on page 85.
SyncServer S100 Next Step If this is your first log-in, your next step is to select the Configuration Wizard link at the top of the System Status page (see Figure 3-14). If you have logged in before and have already configured your S100, skip the Configuration Wizard and instead choose the item you want from the Administrative Index in the left pane. Details are then provided in the right window pane. If you have established the S100's IP address, type it in the browser's Address field and press .
Choose Your Time Source The first dialog in the Configuration Wizard asks you to choose the source of time. 2 Figure 3-16: Choose Your Time Source 3 The choices are: • Global Positioning System (GPS) • Dial-up (to NIST's Automated Computer Time Service (ACTS)) • Network Time Protocol (NTP) • IRIG-B Figure 3-17 shows the screen flow after choosing the time source option you prefer. Warning: If you've already configured your timing engine, the Configuration Wizard will remove all of that configuration.
SyncServer S100 Figure 3-17: Configuring the S100 Time Source Beginning on the following pages, you will be walked through each of the various configuration screens used in the Wizard. Most information is self-explanatory. Regardless of the time source chosen for configuration, the Wizard uses a common set of screens and only the specific information relating to the time source chosen may be different on any particular screen. 34 S100 User Guide – Rev.
GPS 2 Figure 3-18: Dialup Backup If you choose GPS (see Figure 3-16) and click Next, the Dialup Backup dialog is displayed. If you wish to use dial-up as a backup time source to GPS, click the checkbox next to Use dialup as backup to GPS, then click the Next button. 3 If you do not want to back up your GPS time source with dial-up, leave the checkbox unselected, and click Next, which will open the System Information dialog (see Figure 320).
SyncServer S100 Then click Next for the System Information dialog. Figure 3-20: System Information • Admin e-mail, for the administrator of the S100. After a test is conducted, this email address receives the notice. • Mail forwarder, or the SMTP server • Host name • System (S100) location Confirm the data that is in the fields. If it is not accurate, change it to the correct information. Click Next. Note: All the fields are optional. A unit can be configured and tested with all the fields blank.
System Tests Dialog 2 3 Figure 3-21: System Testing options You can skip the test by clicking Finish, or initiate the test by clicking Test Now. The default is to test all the services, so unless you un-check them, they all will be tested. If you do not use dial-up as backup, it will not be listed here nor will it be tested. Initiate the test by clicking Test Now. Test Results dialog 5 Figure 3-22: Test Results shown This displays the results of your test.
SyncServer S100 There is no output to the “Mail test” field. That is because mail is tested by sending an e-mail to the address that was not provided earlier. Click Finish.
2 Figure 3-24: Dial-up Settings If you choose the Dialup radio button and click Next, the Dialup Settings dialog is displayed. 3 In the field, enter or paste your modem phone number. Then click Next for the System Information dialog. System Information dialog 5 Figure 3-25: System Information fields This shows: • Admin e-mail, for the administrator of the S100 • Admin Password • Mail forwarder, or the SMTP server S100 User Guide – Rev.
SyncServer S100 • Host name • System (S100) location Confirm the data that is in the fields. If it is not accurate, change it to the correct information. Click Next. System Tests dialog Figure 3-26: System Testing options You can skip the test by clicking Finish, or initiate the test by clicking Test Now. The default is to test all the designated services, so Dialup and E-Mail, unless you uncheck them, will be tested. To initiate the test, click Test Now. 40 S100 User Guide – Rev.
Test Results dialog 2 Figure 3-27: Test Results shown 3 This screen tells you if the dial-up time source for your S100 is functioning properly. In this example, failed tests are shown. There is no output to the “Mail test” field. That is because mail is tested by sending an e-mail to the address that you indicated earlier. Click Finish.
SyncServer S100 NTP ntp1.symmetricom.com Figure 3-29: Defining Your NTP Settings You can also acquire time through other NTP servers and S100s. Note: If you have not configured DNS, use IP addresses rather than hostnames. Choose the NTP radio button (see Figure 3-16) and click Next. The Network Time Protocol Settings dialog (Figure 3-29) appears. On this screen, name one (or more) NTP servers or peers. NTP v4’s Autokey requires digitally signed certificates.
System Information dialog 2 3 Figure 3-30: System Information fields The System Information dialog shows you: • Admin e-mail, for the administrator of the S100 • Mail forwarder, or the SMTP server • Host name • System (S100) location 5 Confirm the data that is in the fields. If it is not accurate, change it to the correct information. Click Next. S100 User Guide – Rev.
SyncServer S100 System Tests dialog Figure 3-31: System Testing options You can skip the test by clicking Finish, or initiate the test by clicking Test Now. The default is to test all the services, so NTP and E-Mail, unless you un-check them, will be tested. Click Test Now. Test Results dialog Figure 3-32: Test Results shown This screen tells you if the NTP time source for your S100 is functioning properly or if there is a test problem. 44 S100 User Guide – Rev.
There is no output to the “Mail test” field. That is because mail is tested by sending an e-mail to the address that you indicated earlier. Click Finish. Setup Complete dialog 2 3 Figure 3-33: Your set-up is complete This screen verifies your configuration of the S100: • Its time source • Host name • System location • Administrator e-mail Configuring NTP To configure NTP, use the NTP Relationships dialog (See “NTP Relationships” on page 58).
SyncServer S100 Dialup Backup dialog Figure 3-34: Dial-up Settings If you check Use dialup as backup for IRIG-B, a similar Dialup Settings dialog is displayed (see Figure 3-24). In the field, enter or paste in your modem phone number. Then click Next. A screen similar to Figure 3-35 now appears. System Information dialog Figure 3-35: System Information fields This shows: • Admin e-mail, for the administrator of the S100 • Mail forwarder, or the SMTP server 46 S100 User Guide – Rev.
• Host name • System (S100) location Confirm the data that is in the fields. If it is not accurate, change it to the correct information. Click Next. System Tests dialog 2 3 Figure 3-36: System Testing options You can skip the test by clicking Finish, or initiate the test by clicking Test Now. 5 The default is to test all the services, so unless you un-check them, they all will be tested. If you do not use dial-up as backup, it will not be listed here nor will it be tested. S100 User Guide – Rev.
SyncServer S100 Test Results dialog Figure 3-37: Test Results shown This screen shows whether the IRIG-B for your S100 failed or passed. In this example, the IRIG-B failed. There is no output to the “Mail test” field as no addresses had been provided in the System Information dialog (Figure 3-35). Click Finish.
Using SymmTime™ Next, you need to install client software to test NTP (Windows installation). The SymmTime utility is a handy way of doing this. It keeps accurate time on your client Windows computer. 2 Figure 3-39: SymmTime™ Utility and Clock Display Use SymmTime200x.exe to launch SymmTime on your PC. When executed from the CDROM, a small pop-up containing four clocks appears. Once installed, visit http://www.ntpsystems.com/symmtime.asp and download the latest updated files. 3 Installing SymmTime 1. 2.
SyncServer S100 50 5. Right-click the displayed clocks for the menu and select Sync Servers 6. The following screen appears. Click Add Server. 7. New Server dialog box, enter the IP address and location of the S100. Click OK. The IP address you use will be the one obtained in the setup of the S100. S100 User Guide – Rev.
8. The IP is added to the Active Servers window. Click OK. The IP address is listed under Active Servers. 2 To Synchronize SymmTime: 1. Right-click anywhere on the clocks. Select Sync Status from the menu to tell your computer to automatically get time from the S100. A similar screen will appear. 3 5 2. Click Sync Now. If you receive a no response, it is because you have not yet configured the S100; configure it now. An affirmative response confirms you have configured the S100.
SyncServer S100 52 S100 User Guide – Rev.
Chapter 4 The Web-Based Interface Overview 2 The following is a description of the web-based software interface that you use to manage the S100. This material is designed to be a reference for you as you use the S100. It also describes some of the procedures that will help you begin using the S100. 3 Symmetricom recommends you review this section before beginning the permanent installation of the S100, so that you will be familiar with it when you need to use it.
SyncServer S100 Logging In Using your browser, the following dialog is displayed once you enter the S100’s IP address or click the link to or icon for the S100. Figure 4-1: Logging In Enter the default user name, admin, and default password, symmetricom. Assuming this is the first time you have logged in, you will see the System Status screen (see “System Status” on page 57). Log-ins after this first log-in will bring you to the last screen you accessed in your most recent session.
Admin Interface: Base Menu The first thing you see on the left of your screen is the base Administrative (Admin) Menu. This is the starting point for administration tasks on the S100. Click “+” to expand the sub-menu. 2 Figure 4-2: Administrative Interface: Base Menu 3 5 S100 User Guide – Rev.
SyncServer S100 Administrative Menu: Expanded Expanding each item on the base menu shows you all the available options. Click Collapse (at the bottom of the menu) to revert to the base version of the menu. Figure 4-3: Interface Admin Menu, expanded 56 S100 User Guide – Rev.
System Status Clicking this item, you will quickly see the status of the S100. 2 3 Figure 4-4: Checking the Status The color of the box on the left side of the page is your guide.
SyncServer S100 NTP Relationships Use this option to configure NTP . Figure 4-5: Configuring New Clients and Servers Define the relationships between and among this host and other hosts. For more details, see “NTPD Help” on page 84 or click HTPD Help embedded in the S100 web interface. In the NTP Associations panel of this screen you see the configuration of the network that you are putting the S100 on. These are all the devices from which the S100 can get time.
• Server • Broadcast • Manycast Client • Broadcast Client • Manycast Server • Multicast Client Address - Enter the IP address or host name for the host you are adding. 2 Dialup, timing engine, and Set timing engine mode links - Use these links to populate the address field appropriately. Dialup Phone Number - Enter the modem phone number you will be using. Enter a 9, (nine comma) if required to get an outside line.
SyncServer S100 NTP Time Source Test The NTP Server Test dialog lets you test the servers you designated in the NTP Relationships panel (see “NTP Relationships” on page 58. Figure 4-6: Testing the NTP Time Source Host • All • 127.127.40.0 (onboard GPS/IRIG reference clock driver) • 127.127.18.3 (NIST ACTS reference clock driver) • localhost Options - Use the checkbox to enable Verbose Output. NTP Dialup In the following dialog, enter or paste in your modem phone number. Then click Submit.
NTP Restart Here, you can restart the NTP daemon, for troubleshooting purposes only. Figure 4-8: Restart NTP 2 However, please note the following warning: Warning! It can take NTP a significant period of time to go through its processes. If you choose to restart, you will be required to reset your time source. 3 NTP Status This screen gives you the following information: 5 Figure 4-9: Snapshot of NTP Status Reference Time - This is the last time it synced.
SyncServer S100 Leap Indicator - This is a two-bit code warning of an impending leap second. The numbers mean: 00 = no warning 01 = the last minute has 61 seconds 10 = the last minute has 59 seconds 11 = alarm condition (clock not synchronized) Stratum - This is the stratum level of the S100. Precision - This is an eight-bit signed integer indicating the precision of the local clock, in seconds to the nearest power of two. The range is -6 to -18.
Advanced: ntp.conf The following dialog is only for those with advanced knowledge of NTP. 2 3 Figure 4-10: Viewing the NTP Configuration File The dialog in Figure 4-10 displays the NTP configuration file. It allows you to edit the config text file. If you need help with the NTP config file, click the NTP Configuration Help link near the top of the screen, and you will be directed to NTP Help. Additional information about NTP is available is available at www.ntp.org .
SyncServer S100 Advanced: Keys/Certificates Use this NTP Keys/Certificates dialog to obtain a digital certificate that verifies the identity of the S100. Figure 4-11: Obtaining and Generating Keys and Certificates Working from top to bottom: Generate Keys - Select the key algorithm and hash algorithm you wish to use: • RSA + MD5 • RSA + SHA1 • DSA + SHA1 DSA + SHA1 is the default. New Random MD5 Keys - Select this checkbox to generate random MD5 keys. Then click Generate.
Alternatively, you can use Paste Certificate to copy and paste the certificate from the certreq.jsp file into this field. Open the certreq.jsp file using a text editor (e.g., Notepad) and copy the contents. The certificate should be base 64 encoded. Paste the contents in the Paste Certificate field here, then click Submit. The S100 is self-signed, thus it can verify your certificate. For more about how the S100 uses NTP keys and certificates, see “S100 and NTP v4’s Security Features” on page 10.
SyncServer S100 • Real-Time Clock, or RTC, synchronizes the oscillator to the 1PPS signal from the timing engine itself Mode - How time is being acquired. Time Format - The timing engine uses Binary code time. Year - Set the year here. (Note: You must enter the year if you are using IRIG as the primary reference source). Local Offset - Allowed values are -16 through +16, and can include half-hour offsets.
The default modulation envelope is AM. Time Code Settings - This confirms the settings: • Time Code = The time code in setting • Code Modulation = The modulation type associated with the time code signal • Time Code Out = The time code out setting • Generator Time Offset = This shows any offset to the time code signal being produced by the timing engine. 2 Clicking Reset lets you clear any data you’ve entered, and Submit implements changes you have made.
SyncServer S100 6 (Unused) 7 (MSB) (Unused) Notes: (1) After this error is detected, its bit remains set until the GPS receiver is reset. (2) This bit follows the current status of the antenna feed line fault-detection circuitry. Since GPS receiver has an integral antenna assembly, this information of little import; it is only shown for the sake of completeness, being important for sensors with separate antennas.
GPS Time GPS time is noted here. 2 Figure 4-16: GPS Time Seconds of Week - This is expressed in the number of seconds since January 6, 1980 (GPS Week). 3 GPS Week Number -This is expressed in the number of weeks since January 6, 1980. GPS/UTC Offset - Currently this is 13 seconds. GPS Position This screen shows you the calculated coordinates of the gps antenna.
SyncServer S100 Other Information The following screens give additional information about the S100. Engine Time The engine time is read directly from the timing engine. Figure 4-18: Timing Engine Time Clock Settings The clock settings here are: Figure 4-19: Clock Settings Oscillator - This is internal to the timing engine. DAC Value - A 16-bit Digital Analog Converter is used to set the frequency on the oscillator.
Disc Control - Short for disciplining control, this disciplining function is the part of the software that matches the local clock phase and frequency with the selected time reference function. Phase Control - Short for local clock phase shifting, this function shows if the software is shifting the one-second rollover point of the local hardware clock by a specified amount.
SyncServer S100 Model Information The following page provides basic data about the bc635/637 PCI board, the timing engine of the S100. Figure 4-21: Timing Engine Model Information Networking Use the following dialogs to configure several parameters of the S100 on your network. TCP/IP The following dialog enables you to define the following parameters: Figure 4-22: Configuring TCP/IP Network Interface - Here, choose the Ethernet port you are using. If there is only one interface, use eth0, the default.
of the ports; a signal is transmitted and returned to the sending device and the returned signal is compared with the transmitted signal in order to evaluate the integrity of the equipment or transmission path. DHCP - This is the Dynamic Host Configuration Protocol, which assigns an IP address to each node in a network. Here, the default is Enable. Static IP - Click the radio button to Enable, then enter the S100’s IP address, subnet mask, and default gateway. The setting for On Boot is defaulted to Enable.
SyncServer S100 ifconfig Output This screen gives you information about the network configuration of the S100. It lets you troubleshoot network problems. Figure 4-23: Configuration Information Ping Use the ping command to test the network route between the S100 and a remote host. Figure 4-24: Pinging the Remote Host This is a diagnostic tool that confirms that all is well between the two devices.
Wait time - Response time between pings Ping count - Try to ping this number of times before quitting Options • Route: Gives detailed information about the route followed between two hosts • Quiet: No output until done • Allow Ping of Broadcast Address: Lets you ping broadcast addresses so all machines in a broadcast group can respond 2 Traceroute Traceroute shows you the network route between the S100 and a remote host. Use it as a diagnostic tool.
SyncServer S100 • Skip Name Lookup: If you check this, the S100 will not take the time to look up the host names of the intermediate hosts along the path. Administration Here, configure non-NTP features of the S100. You can also shut down or restart the S100. Shutdown/Reboot This option shuts down the network connection. WARNING! If you click Shutdown, you will shut down the S100’s network connection. When - Using a 24-hour clock, enter the time here.
Reset - Click Reset to clear the data you have entered. Submit - Clicking Submit to disconnect the server from the network. Admin Users Use this dialog to change, delete, or add a user. 2 3 Figure 4-27: Changing or Adding Users Restart Web Interface This page lets you do a clean restart of the web server. WARNING If you click Restart, you will shut down the webserver, then it will restart. This will take a minute or two to complete.
SyncServer S100 Time Zone Use this option to set the time zone displayed in the web-based admin interface. Figure 4-29: Setting the Time Zone The time zone is for display purposes only. It will not affect NTP, the output, or clients. Highlight the time zone you want, then click Submit to set the time zone. System Log Configuration Use this option to configure the System Log. Figure 4-30: System Log Configuration Note: Remote logging is available by specifying an IP address preceded by an @ sign.
SNMP Configuration 2 Figure 4-31: SNMP Configuration 3 When populated with text, this screen is a summary of the SNMP configuration commands entered in the SNMP Edit screen. SNMP Edit 5 Figure 4-32: SNMP Edit Use this screen to enter your SNMP commands for configuration and any other related information. S100 User Guide – Rev.
SyncServer S100 Alarms This page lets you configure alarm activity . Figure 4-33: Setting Alarm Parameters E-mail Address - This e-mail address is where any alarm messages will be sent. Mail forwarder - The server that will handle the e-mail. Issue Alarms - Here, check when you want alarms sent: • Upon boot, and if Flywheeling continues for more than 60 seconds. If you check here for this alarm, it will tell you that the system has lost contact with its source of time but will keep going for some period.
Logs You can access the NTP, Boot, System, Config and HTTPD logs through either the admin menu or in the drop-down list box in the Logs parameter. All the logs have the following parameters and values: Logs - This drop-down list box lets you access other logs from this screen. The size of the log you choose will be displayed beneath the drop-down box. Filter - 2 • No filter: Displays all logs. • Display only the last __ lines: Useful for avoiding screen clutter.
SyncServer S100 Boot Log Use this log to see messages created during the boot process. Figure 4-35: Boot Log System Log Use this log to monitor system activity. Figure 4-36: System Log 82 S100 User Guide – Rev.
Config Log This log shows you S100 configuration and status messages. 2 3 Figure 4-37: Config Log HTTP Log This log shows webserver messages. 5 Figure 4-38: HTTP Log S100 User Guide – Rev.
SyncServer S100 Help This is the last section of the S100 admin menu. Available Help functions are: Figure 4-39: Help Options SyncServer Help This is the application Help. Use the Table of Contents, Index, or Search to find information. NTPD Help For detailed information about NTP (Network Time Protocol), use the NTPD Help link (see “NTPD Help” on page 84) embedded in the S100’s web interface to review the NTP Distribution document (source: University of Delaware).
Logging Off Log off by clicking Log Out, at the top of each screen within the interface. 2 3 Figure 4-40: Log Off screen You will see the System Status screen with some prompts. At this point, you can choose among the following options: • Log back in • Go to the Configuration Wizard, which will require you to log back in but will then take you directly to the wizard • Continue the logoff by closing your browser S100 User Guide – Rev.
SyncServer S100 86 S100 User Guide – Rev.
Chapter 5 Operations & Time-Protocols S100: Operations and Time Protocols 2 Sysplex Timer “Sysplex” means SYStem comPLEX, a term often used to describe continuous computing on clusters of computers. The Sysplex Timer is sometimes called an External Time Reference (ETR). The Sysplex Timer provides a synchronized Time-of-Day (TOD) clock for multiple attached computers. A Sysplex is needed when two or more systems are configured in a Sysplex.
SyncServer S100 Figure 5-41: Time Information String Parameters Comm parameters can be controlled by modifying the /etc/.ss_profile file. Various operational parameters for the sysplex daemon can be controlled using parameters in the .ss_profile file. Use the serial connection or SSH to login to the S100 in order to change this file. Set the value of the SYSPLEX_PROGRAM environment variable by adding or removing the # comment character in the first column.
will run the odd parity (9600,8,o,1) version of the protocol. The currently available versions of the protocol are: • sysplex (9600,8,n,1) • sysplexoddp (9600,8,o,1) • sysplexnof (9600,8,n,1) with the 'F' (see sysplex definition) suppressed. • sysplexoddpnof (9600,8,o,1) with the 'F' (see sysplex definition) suppressed. 2 The SYSPLEX_OPTIONS environment variable can be set to either "on" or blank.
SyncServer S100 When used over UDP, the S100 listens for a datagram on port 13. The S100 responds to the UDP request with the current date and time as an ASCII character string. For additional information, see: http://www.faqs.org/rfcs/rfc867.html. Simple Network Time Protocol (RFC 2030) Simple Network Time Protocol (SNTP) is a simplified access protocol for servers and clients using NTP as it is now used on the Internet. The access paradigm is identical to the UDP/ Time client implementation.
Table Intro-1: NTP Message Data 0 LI 8 VN MODE 16 Stratum 24 Poll 31 Precision Synchronizing Distance (Root Distance) (32 bits) Synchronizing Dispersion (Root Dispersion) (32 bits) Reference Identifier (32 bits) 2 Reference Time Stamp (64 bits) Originate Time Stamp (64 bits) Receive Time Stamp (64 bits) Transmit Time Stamp (64 bits) Authenticator (Optional) (96 bits) 3 Leap Indicator (LI) This is a two-bit code warning of an impending leap second that will be inserted or deleted in the last minu
SyncServer S100 Mode This is a three-bit integer indicating the mode. The S100 can be operated in any mode. Stratum This is an eight-bit integer indicating the stratum level of the local clock. For the S100 this field is set to one indicating a primary reference, if the S100 is relying on its GPS receiver or dial-up modem connection for timing information. Otherwise, it will accurately reflect its location in a timing hierarchy.
detected. Therefore, the Reference Timestamp will indicate the time at which the timing signal was lost. When the timing signal returns, the Reference Timestamp will be updated. Originate Timestamp This is the local time at which the request departed the client host for the service host, in 64bit time stamp format. Receive Time stamp 2 This is the local time at which the request arrived at the service host, in 64-bit time stamp format.
SyncServer S100 The message digest is computed using preferred Message Digest 5 (MD5). An alternative is the Digital Encryption Standard, Cipher Block Chaining (DES-CBC). The Message Authentication Code (MAC) is made up of a key identifier, then the message digest. Keys are held in a key cache; the cache is initialized from a private file. Authentication: NTP v4 Autokey NTP v4 uses public-key cryptography, meaning all keys are random, and private keys are never revealed.
Other NTP Considerations The following are information modules regarding NTP. They are used here as a FYI. Clients An NTP client can have a number of servers, and broadcast and non-broadcast servers can be used by the same client. NTP clients synchronize their time to match NTP servers, while NTP servers never synchronize their time to match NTP clients. However, NTP clients can also be NTP servers to clients of their own. 2 There are several points to consider for various client configurations.
SyncServer S100 Basic NTP Configuration No special configuration is required for a machine with a running NTP to be used by other network nodes as a standard server (as opposed to a broadcast server or peer). However, access control is needed to prevent a machine from acting as an NTP server to clients. Further, operating as a broadcast server or a peer server involves additional configuration. Basic guidelines for architecting an NTP solution, should include: 1. 2.
multicasting is likely to be nearly as accurate as using a nonbroadcast server. Multicasting is preferable to broadcasting because it makes identifying NTP traffic easier and does not affect non-NTP clients on the network. Broadcasting or multicasting is a good fit in some environments, however, it is not appropriate for all environments. In particular, architectural or security concerns may preclude the use of broadcasting or multicasting.
SyncServer S100 • Use a server’s local clock as a reference clock (not a good idea) Synchronizing the server to a public NTP server is the most common route for most small installations. Use the ntptrace command to obtain a general idea of the server's quality. It is important to find a server that is peered with several other servers to provide robustness. The NTP protocol is designed as a hierarchy to prevent large numbers of clients from accessing the same primary time sources.
selecting these sources. Note that, while NTP detects and rejects loops involving neighboring servers, it does not detect loops involving intervening servers. It is strongly advised, and in practice for most primary servers today, to employ the authentication or access-control features of the NTP specification in order to protect against hostile intruders and possible destabilization of the time service.
SyncServer S100 Figure 5-43: Large Net NTP Configuration 100 S100 User Guide – Rev.
Figure 5-44: Large Net NTP Configuration 2 2 3 5 S100 User Guide – Rev.
SyncServer S100 Figure 5-45: Small Net NTP Configuration Figure 5-46: Small Net NTP Configuration 102 S100 User Guide – Rev.
Figure 5-47: Minimum Net NTP Configuration Peers Setting up a peer can be accomplished by adding the peer command to the ntp.conf file. The configuration of a peer is basically the same as setting up a client: an address or host name needs to be specified, along with a key and possibly the prefer keyword. Peers also have an associated polling interval that can be set in the ntp.conf file. While a set of peers can use different polling intervals, true peers use the same polling interval.
SyncServer S100 ACTS Operation Use the S100’s web-based interface to configure this method of access to time (for information, see “Main Settings” on page 65). ACTS provides a backup time service through an ASCII time broadcast, and supports a measured delay mode for enhanced accuracy. This service is based on the use of asynchronous modems. It is designed to coexist with a standard IRIG B time code input. The S100’s ACTS operation includes simultaneous support of both client and server modes.
NMS executes applications that monitor and control managed devices. One or more NMSs must exist on any managed network. There are four basic SNMP commands: read, write, trap, and operations: • The read command is used to monitor managed devices. The NMS examines different variables that are maintained by managed devices. • The write command is used to control managed devices. The NMS changes the values of variables stored within managed devices. • The trap command is used to report events to the NMS.
SyncServer S100 SNMP is a simple request/response protocol. The network-management system issues a request, and managed devices return responses. This is implemented using one of four operations: Get, GetNext, Set, and Trap. The Get operation is used to retrieve the value of one or more object instances from an agent. If the agent responding to the Get operation cannot provide values for all the objects in a list, it does not provide any values.
All of this information is passed to commands using the command line arguments described in the table below. An authenticated request example: COMMAND: snmpget -v 3 -n "" -u MD5User -a MD5 -A "The UCD Demo Password" -l authNoPriv 255.255.255.255 sysUpTime.0 RESPONSE: system.sysUpTime.0 = Timeticks: (83491735) 9 days, 15:55:17.35 An authenticated and encrypted request example: 2 COMMAND: snmpget -v 3 -n "" -u MD5DESUser -a MD5 -A "The UCD Demo Password" -x DES -X "The UCD Demo Password" -l authPriv 255.
SyncServer S100 108 S100 User Guide – Rev.
Chapter 6 Frequently Asked Questions Questions 2 How can we obtain NTP client software to use with the S100? NTP client software information and configuration details are available from http:// www.ntp-systems.com 3 Client software and configuration information for Unix platforms can be downloaded from http://www.ntp.org. SNTP client software is included with the S100 hardware.
SyncServer S100 • With an optional Rubidium oscillator installed, an IRIG time code output and an IRIG time code input are available from the Rubidium oscillator cable. On units without the Rubidium oscillator, a D-BNC Signal Breakout Cable BC11576-1000 provides a 1 PPS output, an IRIG time code output, and an IRIG time code input. How does the S100 handle Leap Second? Today’s clocks keep pace with one another to within two or three millionths of a second over a year’s time.
How many satellites are necessary for me to operate the S100? Four. The unit will usually track six to eight satellites. How do I know if the satellite signal strength is good? Any signal over 6 is good and usable by the S100. The unit will continue to track a satellite down to 3 once it has acquired it at a level 6 or over. 2 What is the maximum antenna cable length for use with the S100? A maximum length of 300 feet can be used with the standard (Bullet II) antenna.
SyncServer S100 How many NTP requests can be processed by the S100 each second? More than 5,000 requests per second can be processed. Does the S100 support NTP v4? The S100 does incorporate the added functions of NTP v4. Specifically, the S100 supports the autokey scheme to secure the delivery of the NTP packets to NTP v4 clients as well as authentication of the server to the client.
Depending on the type of client software, requests can be made by a client anywhere from 1 per minute to 1 per day but a good average for Unix clients is 1 every 15 minutes and 1 every 60 minutes per Windows client. So, for every 1,000 clients (guessing 90% Windows and 10% Unix), you would see 900 packets per hour from the Windows clients and 400 packets per hour from the Unix clients. Or, 1300 packets / hours * (48 bytes/packet request + 48 bytes/packet response) = 124800 bytes/hour or about 35 bytes/sec.
SyncServer S100 How to install NTP v4 on a UNIX system Requirements: A Unix system with compiler, standard tools and openssl installed. 1. 2. Download NTP tarball from www.ntp.org Extract the source using tar -xvf 3. Run the configuration and specify autokey using ./configure --withcrypto=autokey 4. Run make. 5. Make install. How to configure an NTP v4 client to connect to an NTP v4 server with the autokey scheme 1. 2. Create or modify /etc/ntp.
How to install your GPS antenna See “Installing the GPS Antenna” on page 23. How to acquire and install SymmTime™ To acquire SymmTime, download this free software from http://www.ntp-systems.com/symmtime.asp Directions on its installation are found in “Installing SymmTime” on page 49. 2 Use the quick “How to” guide This is found in “Introduction and Overview” on page 1 of this book. 3 How to change the root password The S100 is shipped with a default root password of symmetricom.
SyncServer S100 passwd: all authentication tokens updated successfully [root@syncserv1 /root]# This is really an advisory in the form of an error message. The S100 will still accept a “dictionary” word as your password, despite this error message. However, we suggest that you take its advice seriously and use a random combination of letters and numbers. How to get information about NTP To learn more about NTP, use the following links: • http://www.ntp.org • http://www.faqs.org/rfcs/rfc1305.
Also check that the configuration settings are set to a VT100 ASCII terminal using 9600, 8, N, 1 and hardware flow control. Try pinging the S100 from your management PC, and the PC from the S100. Then use traceroute (see “Traceroute” on page 75) to check the path between the two; this should give you some useful data that will solve the problem.
SyncServer S100 118 S100 User Guide – Rev.
Appendix A S100 Specifications Note: The GPS antenna described in this manual has been replaced as described in “Appendix E” on page 141. 2 S100 Data Sheet Specifications Component Specifics Description Network Interface Ethernet over 10/100Base-T IEEE 802.
SyncServer S100 S100 Data Sheet Specifications Component Specifics Description Operating & Storage Environments Temperature and Humidity 0°C to +45°C/5-95% @ 40°C Options Long Antenna Cable (Belden 9913), Lightning Arrester, High-gain GPS Antenna, GPS In-Line Amplifier, Rack Mount Slides Pin Descriptions P1: Ethernet RJ45 Description: 8-pin Phone Jack, Mfr: AMP, Part # 555153-1 Pin Number Description 1 TX (+) 2 TX (-) 3 RX (+) 4 N/C 5 N/C 6 RX (-) 7 N/C 8 N/C P3: Serial A (Data Te
Appendix B Time Glossary Access Control 2 The mechanisms of limiting entry to resources based on users’ identities and their membership in various predefined groups. The network resources with these access restrictions typically are servers, directories, and files. ACTS Automated Computer Time System, a NIST service that provides announced time by telephone.
SyncServer S100 allocation of bandwidth, meaning users get only the bandwidth they need and are charged accordingly. Attribute Certificate A type of certificate that emphasizes certification of access rights and constraints. This is in contrast to Identity Certificate, which binds a distinguished name (DN) and a public key. Commonly, attribute certificates are issued with short validity periods and do not contain a public key value.
Certificate Authority (CA) A trusted entity that issues a certificate after verifying the identity of the person or program or process that the certificate is intended to identify. A CA also renews and revokes certificates and, at regular intervals, generates a list of revoked certificates. Certificate Extension An extension of the X.509 standard that lets the certificate hold additional identifying information.
SyncServer S100 Data Encryption Standard (DES) Encryption method in which both the sender and receiver of a message share a single key that decrypts the message. Symmetricom Secure Network Time Protocol (SS/NTP) The protocol created by Symmetricom, based on NTP, that includes additional security features. DCLS Direct Current Level Shift, or digital IRIG. See also: IRIG Decryption The transformation of unintelligible data (“ciphertext”) into original data (“clear text”).
Digital Signature Algorithm (DSA) The asymmetric algorithm that is at the core of the digital signature standard. DSA is a publickey method based on the discrete logarithm problem. Digital Signature Standard (DSS) A NIST standard for digital signatures, used to authenticate both a message and the signer. DSS has a security level comparable to RSA (Rivest-Shamir-Adleman) cryptography, having 1,024-bit keys.
SyncServer S100 Firewall Firewalls are software and hardware systems that define access between two networks, offering protection from outside data that could be harmful, such as a virus sent using the Internet. GMT Greenwich Mean Time, the mean solar time of the meridian of Greenwich, England, used until 1972 as a basis for calculating standard time throughout the world. GPS Global Positioning System.
IKE Internet Key Exchange, a security system that uses a private key and an exchange key that encrypts private keys. Passwords are delivered over the Internet. In-band Authentication When you use PKI—which involves public keys and a private key— for authentication, it is called in-band authentication. See also: Out-of-band Authentication Integrity 2 Data that has retained its integrity has not been modified or tampered with.
SyncServer S100 L1 Band, L2 Band Each Navstar GPS satellite currently transmits in two dedicated frequency bands: L1 and L2, which is centered on 1227.6 MHz. L1 carries one encrypted signal, as does L2, both being reserved for the military. L1 also carries one unencrypted signal, for civilian use.
Multiplexing Process during which two or more signals are combined into one; at the other end, signals are “unbundled” by a demultiplexer. TDM is Time Division Multiplexing, FDM is Frequency Division Multiplexing, and CDMA is Code Division Multiple Access. National Measurement Institute (NMI) Also known as National Metrology Institute(s), the National Measurement Institute(s) is the national authority in each country that is usually recognized as the source of official time.
SyncServer S100 Online validation A way of validating a key each time before it is used to verify that it has not expired or been revoked. OSI Operations System Interface Out-of-band Authentication When authentication is performed using relatively insecure methods, such as over the telephone, it is called out-of-band authentication. In-band authentication, which uses PKI, is preferred.
Public Key Certificate Certificate in the form of data that holds a public key, authentication information, and private key information. RA A Registration Authority (RA) does not issue certificates, but does the required identification for certain certificate data. Resolution 2 Resolution of a time code refers to the smallest increment of time, whether it is days, hours, seconds, or other. Revocation The withdrawing of a certificate by a Certificate Authority before its expiration date or time.
SyncServer S100 SNMP Simple Network Management Protocol is the Internet standard protocol for network management software. It monitors devices on the network, and gathers device performance data for management information (data)bases (“MIB”). Solar Time Time based on the revolution of the earth around the sun. SSL Secure Sockets Layer, a protocol that allows secure communications on the World Wide Web/Internet.
enters at the computer or terminal are delivered to the remote machine, and the remote computer response is delivered back to the user’s computer or terminal. TFTP TFTP is a UDP-based, connectionless protocol. Time Signing The process by which a StampServer issues a digital signature of the time stamp, then encrypts it. Time-Stamp 2 A record mathematically linking a piece of data to a time and date. Time-Stamp Request The client computer or application sends a time-stamp request to a StampServer.
SyncServer S100 Traceability Traceability infers that the time standard used on the Time StampServer was set using time directly or indirectly from a National Measurement Institute (NMI). Transaction An activity, such as a request or an exchange. Triple-DES Also called Triple Data Encryption Algorithm (TDEA), Data Encryption Standard is an algorithm that encrypts blocks of data.
UTC See Coordinated Universal Time (UTC) Vault Secure data storage facility. Verification The process of making sure the identity of the parties involved in a transaction is what they claim it to be. Virus 2 An unwanted program that hides “behind” legitimate code, and which is activated when the legitimate program is activated. VPN Virtual Private Network, a way that authorized individuals can gain secure access to an organization's intranet, usually over the Internet.
SyncServer S100 X.509 v3 Certificate Extension The X.509 standard with extended features approved by the IETF. 136 S100 User Guide – Rev.
Appendix D Customer Assistance Symmetricom's Customer Assistance Centers are a centralized resource to handle all your customer needs. Our Centers are staffed with logistics personnel to handle product quotes, order status and scheduling as well as technical personnel for technical support, installations or service quotes. 2 Technical support is operated as a fee-based service, either under contract or on an hourly basis.
SyncServer S100 Customer Service For product quotes, service quotes, installations, order status and scheduling 8:00 am to 5:00 pm Greenwhich Mean Time, Monday through Friday, excluding UK Holidays. Technical Support For technical support 24 hours a day, 7 days a week, every day of the year, contact us at: emea_support@symmetricom.com Comments, complaints and suggestions are always gladly accepted. customer_relations@symmetricom.com 138 S100 User Guide – Rev.
Appendix C Declaration of Conformity DECLARATION OF CONFORMITY In accordance with ISO/IEC GUIDE 22 and EN 45014 Symmetricom, Inc. 3750 Westwind Blvd. Santa Rosa, Ca. 95403 USA Declares that the 2 3 MODEL S100 NETWORK TIME SERVER MODEL NO. S100 MODEL NO. S100/GPS MODEL NO. S100/RB MODEL NO.
SyncServer S100 1 FCC NOTICE AND COMPLIANCE STATEMENT Class A Symmetricom, Inc. 3750 Westwind Blvd. Santa Rosa, Ca. 95403 USA Declares that the following Model: MODEL S100 NETWORK TIME SERVER MODEL NO. S100 MODEL NO. S100/GPS MODEL NO. S100/RB MODEL NO. S100/GRB/GPS CONFORM TO THE FOLLOWING FCC NOTICE: This device has been tested and found to fully compliant with the limits with the FCC Part 15, Subpart B, Section 15.109 and ICES-003 Class A Limits, using the CISPR 22:1997 specifications and ANSI C63.
Appendix E 1 Antenna Replacement Please note that the GPS antenna equipment described in this manual has been superseded by the following Standard Antenna Kit, consisting of: • One wide-range 5-12 VDC L1 antenna 2 • One 50 ft. length of Belden 9104 coaxial cable with BNC(m) and TNC(m) connectors • Adaptors are included for GPS receivers that have a non-BNC antenna connector The Antenna Kit can be ordered with optional cable lengths and accessories.
SyncServer S100 1 142 S100 User Guide – Rev.
Index 1 Numerics 1PPS 65 A 2 About This Book 1 Access Control 121 ACTS 103, 121 Operation 104 Add New Relationships panel 58 Address 59 3 Admin Alarms 80 Admin Interface 54 Base Menu 55 Expanded menu 56 Administration 76 Admin Users 77 Logs 81 Restart Web Interface 77 Shutdown/Reboot 76 Time Zones 78, 79 Administrator Log-In 31 Advanced Keys/Certificates 64 ntp.
SyncServer S100 Attribute Certificate 122 1 Audit Trail 122 authdelay 62 Authentication 122 Authentication fields 59 Authorization 122 Autokey 10, 59, 93 Automated Computer Time Service (ACTS) 103 B Base UDP Port 75 Battery Status 70 BC11576-1000 14, 22 bc635/637 PCI board 65, 72 BCD 122 BIPM 3 Boot Log 82 Broadcast client role 59 Broadcast role 59 Broadcastdelay 62 Bureau International de l’Heure (BIPM) 122 Burst 59 C Calibration 122 Cancel Pending Shutdown 76 Case-blind 81 CDMA 122 CDSA 122 Certificat
Client Software 10 Clock Settings 70 1 Clock Value 70 Code Modulation 67 Code Type 66 Collapse 84 Confidentiality 123 Config Wizard 32, 80 Configuration Change alarm 80 2 Configuring NTP 45 Connecting the Rubidium Option 24 Connections 20 Content Filtering 123 Control Settings 71 3 Coordinated Universal Time (UTC) 123 Credential(s) 123 CRM 123 Cross-Certificate 123 Cryptochecksum 93 Cryptography 123 Current Leap Seconds 66 Customer Assistance 137 Customer Service 137, 138 D DAC Value 70 5 Data Encr
SyncServer S100 Denial of Service 124 1 DES 124 DHCP 73, 124 Dial-up 103 Dialup Backup dialog 35 Dialup Settings dialog 35, 39, 46 Diffie-Hellman 10, 124 Digital Analog Converter 70 Digital Certificates 124 Digital Fingerprint 124 Digital Signature 124 Digital Signature Algorithm (DSA) 125 Digital Signature Standard (DSS) 125 Digital time-stamp 125 Directory 125 Disc Control 71 Disc Gain 71 Disciplining control 71 Display only the last __ lines 81 Disposal Instructions 6 DNS Nameservers 73 DSA 125 DSS 125
Event Control 71 Event Edge 71 1 Event Input 22 F Falling edge 71 File System Check on Reboot 76 Filter 81 FIPS 125 2 Firewall 126 Flywheeling alarms 80 Free Running 65 Frequency Output 71 Functionality, network 28 3 G Generate Keys 64 Generator Time Offset 67 Global Positioning System (GPS) 3, 65, 126 Antenna installation 23 Lost time signal 10 Glossary 121 GMT 126 GPS Health 67 GPS Position 69 GPS Receiver 119 GPS Signal Strength 68 5 GPS Time 69 GPS Time Format 66 GPS Week 11 GPS Week Number 69
SyncServer S100 HeartBeat Mode 71 1 Help 84 Host 58, 74, 75 Hostname 73 How do I...
IP address 73 IP Forwarding 73 1 IPSec 127 IRIG 65, 127 IRIG A 66 IRIG B 66, 104 Irrefutable 127 Issue Alarms 80 ITU 127 2 J Jam Control 70 Jam synchronization 70 Jitter 62 3 K Kalman filter 71 Key 59, 127 Key Escrow 127 Key Generation 127 Key Management 127 Key Pair 127 Key Recovery 127 L L1 Band, L2 Band 128 LAN 128 5 LDAP 128 Leap Second 10 Leap Indicator 62 Leap Seconds 128 Line numbers 81 Lithium Battery Disposal Instructions 6 Local area network 128 Local clock phase shifting 71 Local Domain
SyncServer S100 Logging Off 85 1 Logging On 30 Logs 81 M Mail forwarder 80 Mail Log 82 Main Settings 65 Manycast client role 59 Manycast server role 59 Maximum Poll Interval 59 MD5 128 Message 76 Message Authentication Code (MAC) 128 Message Digest 128 MIB 128 Minimum Poll Interval 59 Mode 66 Model Info 72 Modem phone number 35, 39, 46 Modulation Type 66 MTBF 128 Multicast client role 59 Multiplexing 129 N NASA 36 66 National Institute of Standards and Technology (NIST) 103 National Measurement Institut
NMIServer 129, 134 No filter 81 1 NOC 129 Non-repudiation 129 Notarization 129 NTMS 129 NTP 4, 5, 7, 10, 42, 90, 129 Authentication 93 Authenticator 93 How it defines the authentication process 94 Leap Indicator 91 Message Data 91 Mode 92 Network Time Protocol 90 NTP Data Format 90 Originate Timestamp 93 Poll Interval 92 Receive Time stamp 93 Reference Clock Identifier 92 Reference Timestamp 92 Stratum 92 Synchronizing Dispersion 92 Synchronizing Distance 92 Transmit Time stamp 93 Version 91 2 3 NTP Di
SyncServer S100 Oscillator disciplining function gain value 71 1 OSI 130 Out-of-band Authentication 130 outputs 109 P Password, default 31 Paste Certificate 65 PCI 130 Peer role 58 Phase Control 71 Pin Descriptions 120 Ping count 75 PKCS 130 PKI 130 PKI Certificate 130 PKIX 130 Power Connection 19 Precision 62, 92 Prefer 59 Private Key 130 Product Overview 7 product quotes 137 Propagation Delay 66 Prune 81 PSTN 130 Public Domain xNTP Package 94 Public Key 130 Public Key Certificate 131 Q Quiet 75 quotes
Reference ID 62 Reference Time 61, 62 1 Registers 71 Regular expression 81 Remove all but the last __ lines 81 replacement kit, antenna 141 Reset 73, 77 Resolution 131 Response Wait Timeout 75 2 Revocation 131 RFC 1119 10 RFC 1305 4, 90 Rising edge 71 Risk Management 131 3 Role 58 Root CA 131 Root delay 62 Root Dispersion 62 Root Dispersion Version 3 92 Root Distance 62 Root Distance Version 3 92 Root Trust Time Services (RTTS) 131 Route 75 RSA 131 RTC 66 5 S S/MIME 131 Safety Instructions 6 Schedul
SyncServer S100 Server role 59 1 service quotes 137 Setup Complete screen 38, 45, 48 SHA-1 131 Simple Network Time Protocol (RFC 1361) 90 Simple Status screen 30 Skip Name Lookup 76 Smart card 131 SNMP 8, 132 SNTP 10, 90 Solar Time 132 Source Network Interface 75 Special Safety Instructions 6 Spread-spectrum signal 23 SS/NTP 125 ss_profile 88 SSL 132 SSL Client Authentication 132 SSL Server Authentication 132 SSL-LDAP 132 Stability 62 Static IP 73 Stratum 4, 9, 62 Levels 4 Stratum Levels 132 Subnet mask 7
System Information 36 System Information dialog 39, 46 1 System Peer 61 System Peer Mode 61 System Status screen 57 System Tests 37 System Tests dialog 44 T 2 TCCert 132 TCP/IP 10, 132 Technical Support 3, 137, 138 Telnet 132 Test Results dialog 37, 41, 44, 48 TFTP 133 3 Time Sources 7 Time Code Input 22 Time Code Out 67 Time Code Output 22 Time Distribution 10 Time Distribution Model 9 Time Format 66 Time Glossary 121 Time Master Clock (TMC) 134 Time Protocols 87 5 Time Signing 133 Time Source, ch
SyncServer S100 TLS 133 1 TMC 133 Token 133 Tool box 133 TPC 133 TPCA 133 Traceability 134 Transaction 134 Transmission Control Protocol (TCP) 89 Triple-DES 134 Trust 134 TSA 134 TSP 134 TSR 134 U U.S.
Warrant 135 Web-based interface 51 1 When 76 Wide area network 135 Wireless Application Protocol (WAP) 135 WPKI 135 WTLS 135 X 2 X Coordinate 69 X.509 11, 135 X.509 v3 Certificate Extension 136 Y Y Coordinate 69 3 Year 66 Z Z Coordinate 69 5 S100 User Guide – Rev.
SyncServer S100 1 158 S100 User Guide – Rev.