
Installation Guide

2ZV-3247 REV 0
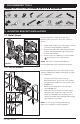
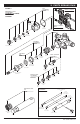
2. MOUNTING BRACKET INSTALLATION
2.1 Metal Straps
Mounting bracket is used to secure valve
between wall studs up to 24 inches, center to
center.
1. Place metal straps (x4) over screws. Screws
will come preassembled to bracket.
2. Pull metal straps tight against bracket ears.
Screws will protrude through small screw
hole in metal straps.
3. Drive screws into bracket to secure straps.
Use caution not to strip screws.
NOTE: Valve will come preassembled to
mounting bracket unless specified otherwise.
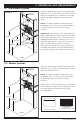
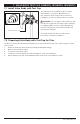
2.2 Install Bracket
Mounting bracket will locate valve body in wall
cavity at appropriate depth (valve body rough-in
is not required).
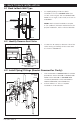
1. Confirm valve body and mounting
bracket are level. Drive (x4) wood screws
through metal straps into wood studs (see
FIGURE 2.2)
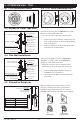
2. Bend excess strap around wood studs.
(see FIGURE 2.3)
3. Drive (4x) wood screws, at inward angle,
through metal straps into sides of wood
studs (see FIGURE 2.4). Installing wood
screws at inward angle will pull metal straps
tight against wood studs.
NOTE: If not using mounting bracket, see
STEP 5.1 for stringer mounts installation.
FIGURE 2.1
FIGURE 2.2
FIGURE 2.3
FIGURE 2.4
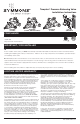
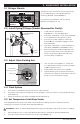
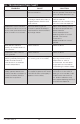
1. RECOMMENDED TOOLS
Copper, IPS, CPVC, PEX (Crimp) & PEX (Cold Expansion)
FIGURE 1
Phillips Screwdriver Flathead Screwdriver
Adjustable Wrench
Safety Glasses Thread Seal Tape Measuring Tape
Torch
SolderPipe Cutter
Drywall Saw
(IPS Only)
Pipe Wrench
(CPVC Only)
CPVC Cement
(PEX Only)
PEX Crimping Tool
(PEX Only)
PEX Cold Expansion Tool
Level
Drill