
Installation Guide

Symmons Industries, Inc. ■ 31 Brooks Drive ■ Braintree, MA 02184 ■ Phone: (800) 796-6667 ■ Fax: (800) 961-9621
Copyright © 2018 Symmons Industries, Inc. ■ symmons.com ■ gethelp@symmons.com ■ ZV-3018 REV G ■ 101918
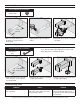
Installation (Thread On)
Installation (Slip Spout)
Troubleshooting Chart
Problem Cause Solution
Finish is spotting.
Elements in water supply may cause
water staining on nish.
Clean nished trim area with a soft
cloth using mild soap and water or a
non-abrasive cleaner and then quickly
rinse with water.
Tools Required for Installation
Allen Wrench:
5/32"
Tools Required for Installation
Plumber Tape
3-7/8"
(98 mm)
1) Male 1/2-14 NPT tting must
protrude 3-7/8" (98 mm) from
nished wall
2) Apply plumber tape to threads on
tting.
1
2
3) Thread tub spout (361TS or 361DTS)
onto tting.
Min. 1-3/4" (44 mm)
Max. 2-3/4" (70 mm)
1) Rigid copper tubing must protrude
1-3/4" (44 mm) - 2-3/4" (70 mm)
from nished wall.
2) Attach tub spout (361TS or 361DTS)
to rigid copper tubing.
3) Install set screw to secure tub spout
to rigid copper tubing.
Caution: Ensure seal is not damaged by making sure outside
of 1/2" diameter rigid copper tubing is free of burrs and
sharp edges prior to installing tub spout.