
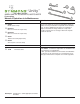
Installation Guide

Symmons Industries, Inc. ■ 31 Brooks Drive ■ Braintree, MA 02184 ■ Phone: (800) 796-6667 ■ Fax: (800) 961-9621
Copyright © 2015 Symmons Industries, Inc. ■ www.symmons.com ■ gethelp@symmons.com ■ ZV-3178 REV A ■ 112515
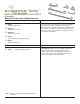
Troubleshooting Chart
Finish is spotting.
Elements in water supply may cause
water staining on nish.
Clean nished trim area with a soft
cloth using mild soap and water or a
non-abrasive cleaner and then quickly
rinse with water.
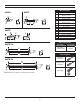
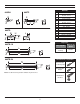
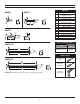
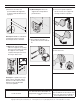
1) Measure and mark centerlines for
mounting bracket installation using
dimensions on page 2.
1
2
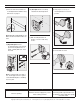
2a) Dry Wall Option: Place
mounting brackets into desired
position. Using brackets as a
guide, carefully drill 5/16” holes
into wall.
1
3
3
2
3) With mounting brackets in
position, secure to wall using
screws.
2
5) Secure with set screw.
2b) Stud Option: Place mounting
brackets into desired position.
1
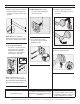
4) Hang top of accessory on
mounting bracket. Lower into
position.
1
2
Installation
Notes: 663TB-18 and 663TB-24 only.
Make sure both centerline
marks are
level.
Note: For plaster walls 1/2” thick or
less, insert toggle tool into toggle to
secure behind wall prior to installing
accessory trim.