
Installation Guide


3
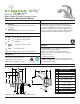
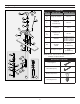
J
H
N
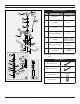
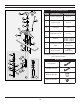
2) Place brackets (K) onto threaded
rods (J) and secure with nuts (L).
1
1
2
J
K
L
If replacing an older faucet
ensure water supply is turned
OFF before removing, then
turn faucet control valve ON to
relieve water pressure.
1) Insert faucet body (H) and
threaded rods (J) through mount-
ing gasket (N) and sink holes.
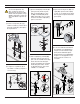
3) Seat ange (M2) into sink (M3
gasket optional). Install gasket
(M4), washer (M5) and nut (M6)
onto ange (M2) from below sink,
but do not secure nut. Screw on
tail piece (M7) and hand tighten.
2
3
M2
M7
PLUMBER
PUTTY
OPTIONAL
M3
M4
M5
M6
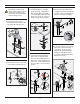
4) Turn tail piece (M7) and ange
(M2) so pivot is facing toward
faucet. Pull assembly down into
drain hole. Secure hardware from
below sink. Install stopper (M1) in
the removable or non-removable
position.
2
3
M7
PIVOT
M2
M1
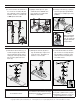
5) Attach inner washer (M8), pivot
rod (M9) and outer washer (M10)
to tailpiece (M7). Hand tighten nut
(M11) to secure pivot rod (M9).
M9
M7
1
M8
M10
M11
2
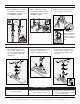
6) Connect lift rod (E) to clevis strap
(M13) and secure with thumb
screw (M14). Insert pivot rod
(M9) through spring clip (M12)
and clevis strap (M13). Secure
with spring clip (M12) and adjust
linkage if necessary.
3
4
4
M12
M9
M13
2
M14
M13
1
E
Installation