
Installation Guide

Installation
3
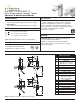
1a) SLS-3612: Insert faucet body (E)
through deck surface.
1b) SLS-3622: Insert faucet
body (E) through deck plate (Z)
and deck surface.
2) Slide mounting gasket (G) and
metal washer (H) on to fasteners (X).
Secure with mounting nuts (I).
Note: Hoses removed for clarity.
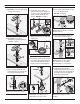
3) Install teon tape to inlets of
shut-off valves. Attach supply lines
to shut-off valves and hand tighten.
Using a wrench, nish with one-
half turn. DO NOT overtighten.
4) Apply plumber putty to underside
of ange (L).
5) Insert ange (L) into drain opening.
From below, attach drain body (Q)
with gasket (M) and washer (N) to
ange (2-3 turns until hand tight).
Note: Make sure drain cavity (on
drain body) faces rear of sink.
6) From below, tighten ange nut (O)
to secure drain body (Q).
DO NOT overtighten.
Note: Make sure ange is centered
in drain opening.
7) Insert stopper (K) into ange (L)
and rotate to proper position.
Note: Stopper can be installed
removable or non-removable
determined by eye hole position.
8) Insert pivot rod (T) into drain
body (Q) against gasket (P) and inner
seat (R). Install outer seat (S) against
pivot ball and secure assembly by
tightening retaining nut (U).
Note: Pivot rod passes under
stopper.
1
2
G
X
H
I
1
1
2
E
E
Z
L
3
1
2
L
Q
M
N
OPTIONAL
O
Q
Removable
K
Removable
K
Non Removable
K
L
1
T
S
U
Q
R
P
2