
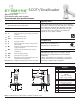
Installation Guide


3
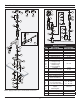
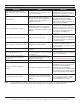
Installation / Tools Required
Water lines MUST be thoroughly ushed BEFORE and AFTER installing the faucet to prevent foreign matter i.e.
copper chips, sand, stones, etc. from clogging and possibly damaging the sealing surfaces of the cartridge.
Notes: 1) Recommended minimum operating water supply pressure is 40 psi.
2) Supply stop valves must have 3/8" O.D. compression outlet.
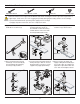
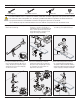
1) Apply a bead of silicone to the
underside of escutcheon (J).
3) Install faucet body (H) and
escutcheon (J) to deck surface.
J
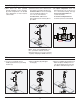
4) Place mounting washer (P) and
locknut (Q) onto faucet body (H).
Secure hardware by tightening
mounting nut (R) clockwise.
H
1
2
S
U
3
4
6) Remove aerator (G). Open cold
supply, holding down handle (A) for
10 seconds. Open hot supply and
repeat above procedure. Allow fau-
cet to shut off and replace aerator.
H
J
OPTIONAL
Adjustable Wrench Allen Wrench: 2.5 mm Plumber Tape
5) Connect washer (S) and mechanical
mixing valve (U) to bottom of faucet
body (H). Make connection to water
supplies using appropriate ttings.
H
1
2
3
P
Q
R
4
A
G
1
2
Silicone
2) Optional: Install mounting gasket (L)
and deck plate (K) to deck sur-
face with at in center hole facing
towards back of sink. Secure with
mounting hardware (M, N & O).
L
M
N
O
2
1
1
3
3
K