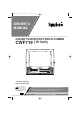
TD861CM(p1-35).QX33 03.9.27 1:52 PM Page 1 OWNER’S MANUAL COLOR TV/DVD/VCR TRIPLE COMBO CWF719 (19 inch) This Owner’s Manual is made of recycled paper. As an ENERGY STAR ® Partner, our company has determined that this product meets the ENERGY STAR ® guidelines for energy efficiency. ENERGY STAR ® is a U.S. registered mark. If you need additional assistance for set-up or operating after reading owner’s manual, please call TOLL FREE : 1-800-242-7158. Or visit our WEB SITE at http://www.funai-corp.
TD861CM(p1-35).QX33 03.9.27 1:52 PM Page 2 WARNING: TO REDUCE THE RISK OF FIRE OR ELECTRIC SHOCK, DO NOT EXPOSE THIS APPLIANCE TO RAIN OR MOISTURE. RISK OF ELECTRIC SHOCK DO NOT OPEN THIS SYMBOL INDICATES THAT DANGEROUS VOLTAGE CONSTITUTING A RISK OF ELECTRIC SHOCK IS PRESENT WITHIN THIS UNIT. CAUTION: TO REDUCE THE RISK OF ELECTRIC SHOCK, DO NOT REMOVE COVER (OR BACK). NO USER SERVICEABLE PARTS INSIDE. REFER SERVICING TO QUALIFIED SERVICE PERSONNEL.
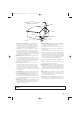
TD861CM(p1-35).QX33 03.9.27 1:52 PM Page 3 F IGURE A EXAMPLE OF ANTENNA GROUNDING AS PER NATIONAL ELECT RICAL CODE ANTE NNA L EAD I N WI RE GROUND CLAMP A NTENNA DI SCHARG E UN I T (NEC SECTION 8 10 -2 0) EL ECT RI C SE RV I CE EQ U I PM EN T G RO UNDI NG CO NDUCT ORS (NEC SECTION 8 10 -2 1) G RO UND CL AM PS NEC - NATI O NAL EL ECTRI CAL CO DE POWER SERVI C E G RO UNDI NG EL EC TR O DE SYST EM (NEC ART 2 50 , PART H) S2 8 9 8 A 13.
TD861CM(p1-35).QX33 03.9.27 1:52 PM Page 4 PRECAUTIONS LASER SAFETY This unit employs a laser. Only a qualified service person should remove the cover or attempt to service this device, due to possible eye injury. IMPORTANT COPYRIGHT INFORMATION Unauthorized copying, broadcasting, public performance and lending of discs are prohibited. FCC WARNING- This equipment may generate or use radio frequency energy.
TD861CM(p1-35).QX33 03.9.27 1:52 PM Page 5 SUPPLIED ACCESSORY LOCATION For safe operation and satisfactory performance of your TV/DVD/VCR, keep the following in mind when selecting a place for its installation: • Shield it from direct sunlight and keep it away from sources of intense heat. • Avoid dusty or humid places. • Avoid places with insufficient ventilation for proper heat dissipation. Do not block the ventilation holes at the top and bottom of the unit.
TD861CM(p1-35).QX33 03.9.27 1:52 PM Page 6 TABLE OF CONTENTS C IMPORTANT SAFEGUARDS . . . .2, 3 SELECTING THE MTS SYSTEM . . .24 C PRECAUTIONS . . . . . . . . . . . . . . . .4 LOCATION . . . . . . . . . . . . . . . . . . .5 AVOID THE HAZARDS OF ELECTRICAL SHOCK AND FIRE . . .5 WARNING . . . . . . . . . . . . . . . . . . . .5 SUPPLIED ACCESSORY . . . . . . . .5 SYMBOLS USED IN THIS MANUAL . . . . . . . . . . . . . . . . . . . . .5 C VIDEO CASSETTE . . . . . . . . . . . . .25 C TABLE OF CONTENTS . . .
TD861CM(p1-35).QX33 03.9.27 1:52 PM Page 7 FEATURES TV/VCR Mode • Hi-Fi system–The Hi-Fi stereo recording system • 2 Step picture search operation–You can view a • • Three different playback tape speeds : SP/LP/SLP • Two different recording tape speeds : SP/SLP • Auto Head Cleaner–Automatically cleans video • • offers you excellent sound quality with a dynamic range of 80dB, frequency response from 20Hz to 20kHz, and 0.005% wow and flutter.
TD861CM(p1-35).QX33 03.9.27 1:52 PM Page 8 DVD Mode ¡On-screen display ¡Dolby Digital sound This player can handle Dolby Digital surround sound having 5.1 channels when connected to a Dolby Digital decoder. Information about the current operation can be displayed on a TV screen, allowing you to confirm the currently active functions (such as program playback), on the TV screen using the remote control.
TD861CM(p1-35).QX33 03.9.27 1:52 PM Page 9 OPERATING CONTROLS AND FUNCTIONS - TV/DVD/VCR FRONT PANEL - [Fig.1] DVD buttons POWER VOLUME SKIP PLAY SKIP STOP TV/VCR buttons OPEN/CLOSE SELECT DVD CHANNEL REC/OTR REW PLAY F.FWD STOP/EJECT HEADPHONE VIDEO L AUDIO R TV/VCR SEARCH 7 8 9 10 1112 13 14 4 15 16 17 18 19 20 21 5. STOP Button [P.37] [Fig. 2] - REMOTE CONTROL Stops operation of the disc. (Front Panel) Stops operation of the disc or tape. (Remote control) 6.
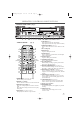
TD861CM(p1-35).QX33 03.9.27 1:52 PM Page 10 - TV/DVD/VCR REAR PANEL - [Fig.3] ANT. COAXIAL 46 47 20. AUDIO L/R input Jacks Connect to the audio output jacks of a video camera or VCR. 21. Cassette compartment 22. PICTURE Button Press to adjust the picture. 23. Number Buttons 48 31. MODE Button [DVD P.41] Activates program playback or random playback mode. 32. SEARCH MODE Button [DVD P.39] Press to locate a desired point. 33. AUDIO Button [DVD P.
TD861CM(p1-35).QX33 03.9.27 1:52 PM Page 11 46. ANT. in Jack Connect to an antenna, cable system, or satellite system. 47. Power cord Connect to a standard AC outlet (120V/60Hz). NOTE: Remove the power cord from the hook to avoid breaking a wire before you connect to a standard AC outlet. 48. COAXIAL digital audio out Jack Connect to the digital input of an external amplifier or decoder for DVD audio only.
TD861CM(p1-35).QX33 03.9.27 2:39 PM Page 12 TO RECORD A SCRAMBLED/UNSCRAMBLED CHANNEL 1. Set the TV/DVD/VCR channel selector to the output channel of the Cable Converter Box or Satellite Box. (Ex. CH3) 2.Select the channel to record from your Cable Converter Box or Satellite Box.
TD861CM(p1-35).QX33 03.9.27 1:52 PM Page 13 CONNECTING TO A STEREO AMPLIFIER EQUIPPED WITH DIGITAL INPUT JACKS SUCH AS MD DECK OR DAT DECK (for DVD) Use an audio coaxial digital cable available at retail for the audio connections. Connecting to an amplifier equipped with digital input jacks such as MD Deck or DAT Deck. ANT. COAXIAL Amplifier equipped with digital input jacks, MD deck, DAT deck, etc.
TD861CM(p1-35).QX33 03.9.27 1:52 PM Page 14 CONNECTING TO A DOLBY DIGITAL DECODER (for DVD) If using this TV/DVD/VCR to play a DVD disc in a 5.1 channel Dolby Digital surround format, the TV/DVD/VCR outputs a DOLBY DIGITAL Data stream from its COAXIAL digital audio out jack. By hooking the player up to a Dolby Digital decoder, you can enjoy a more convincing, realistic ambience with powerful and high-quality surround sound as enjoyed in movie theaters.
TD861CM(p1-35).QX33 03.9.27 1:52 PM Page 15 TV/VCR SECTION SET UP FOR USE You can program the tuner to scan all the channels you receive in your area. NOTE: Channel memory programming is NOT needed when connected to a cable box or satellite box. Just select the TV/DVD/VCR channel selector to the output channel of the cable box or satellite box (Ex CH3). Then select the channel to be viewed on the Cable Box or Satellite Box.
TD861CM(p1-35).QX33 03.9.27 1:52 PM Page 16 CHANNEL SET UP AGAIN TV/VCR Make sure ... • Press the POWER button to turn on the TV/DVD/VCR. 1 Select “CHANNEL SET UP” Press the SETUP button on the remote control. Press the Arrow button K or L to point to “CHANNEL SET UP”. Then, press the ENTER button. 2 Begin auto preset Press the Arrow button K or L to point to “AUTO PRESET”. Then, press the ENTER button. The tuner scans and memorizes all the active channels in your area.
TD861CM(p1-35).QX33 03.9.27 1:52 PM Page 17 CLOCK SET UP (AUTO / MANUAL) 6 TV/VCR The TV/DVD/VCR clock must be set correctly before VCR timer recording is possible. It is suggested that the clock be set manually when first setting up the TV/DVD/VCR. Then, setup auto clock correction which will periodically correct the setting if necessary. NOTE: If you cannot receive a station with time signals, auto clock setting cannot be performed. Use manual setting only.
TD861CM(p1-35).QX33 03.9.27 1:52 PM Page 18 AUTOMATIC CLOCK SETTING Make sure ... • The TV/DVD/VCR is turned on. • Confirm the TV/DVD/VCR is receiving a RF (Radio Frequency) signal from either an antenna or cable system connection using the ANT IN jack on the rear of the TV/DVD/VCR. NOTE: • If a cable converter box is being used, make sure it is powered on. • You must use the TV/DVD/VCR remote control to perform the clock setting procedure.
TD861CM(p1-35).QX33 03.9.27 1:52 PM Page 19 TV OPERATION WATCHING A TV PROGRAM PICTURE CONTROL TV/VCR 1 Turn on the TV/DVD/VCR Press the POWER button to turn on the TV/DVD/VCR. 2 Select the channel number Press the CHANNEL button K or L to select your desired channel number or press the number on the remote control. Note for using the Number button on the remote control: ¡When selecting cable channels which are higher than 99, press +100 first, then, press the last two digits.
TD861CM(p1-35).QX33 03.9.27 1:52 PM Page 20 CLOSED CAPTION SYSTEM 1 TV/VCR You can view specially labeled (cc) TV programs, movies, news, pre-recorded tapes with either a dialogue caption or text display. CAPTION mode: By choosing the caption mode, you can watch dramas, movies and news while captioning the dialogues and the contents of news. TEXT mode: By choosing the text mode, you can watch half screen text information if you want.
TD861CM(p1-35).QX33 03.9.30 6:34 PM Page 21 V-CHIP SET UP SUB RATINGS V-CHIP SET UP TV/VCR V-CHIP SET UP 1 Make sure ... • TV/DVD/VCR is turned on. 1 Select “V-CHIP SET UP” Press the SETUP button on the remote control. Press the Arrow button K or L to select “V-CHIP SET UP”. Then, press the ENTER button. 2 Enter Access code When you select the ratings of TV-Y7,TV-PG,TV-14 or TV-MA you will have the option of selecting sub rating categories. Press the SETUP button on the remote control.
TD861CM(p1-35).QX33 03.9.27 1:52 PM Page 22 CHANGING V-CHIP BLOCKED PROGRAMMING Note: To change the rating, the TV must be turned to a station that is not protected. If the (PROTECTED) appears on the screen, please change the channel to a station that is not protected. 1)Follow steps [1] and [2]. 2)Press the Arrow button K or L to select "TV RATING". Then, press the ENTER button. Select a TV rating to be unblocked by pressing the Arrow button K or L. Then press the ENTER button to unblock the rating.
TD861CM(p1-35).QX33 03.9.27 1:52 PM Page 23 MTS(Multi-Channel Television sound)SYSTEM You can record or listen to a program in MTS stereo. CHECKING THE SELECTED MTS MODE TV/VCR When you play a VHS tape, or receive a broadcast on the TV/DVD/VCR tuner channel you are watching, the status shown below will appear when you press the DISPLAY button on the remote control.
TD861CM(p1-35).QX33 03.9.27 1:52 PM Page 24 SELECTING THE MTS SYSTEM TV/VCR TO SELECT MONO MODE Make sure ... • TV/DVD/VCR power must be turned on. You can change the selection to “MONO” if you want to listen to HIFI tapes in normal audio playback. 1) Press the SETUP button on the remote control. Press the Arrow button K or L to point to “USER’S SET UP”.Then, press the ENTER button. 2) Press the Arrow button K or L to point to “VCR AUDIO”. 3) Press the ENTER button until [MONO] appears.
TD861CM(p1-35).QX33 03.9.27 1:52 PM Page 25 VIDEO CASSETTE This TV/DVD/VCR will operate with any cassette that has the mark. For best results, we recommend the use of high-quality tapes. Do not use poor quality or damaged tapes. PRECAUTIONS INSERTING A CASSETTE • Avoid moisture. Moisture condensation may occur Insert the cassette in the direction as shown. Push in gently, but continuously, on the center-back of the cassette until it is drawn into the TV/DVD/VCR.
TD861CM(p1-35).QX33 03.9.27 1:52 PM Page 26 PLAYBACK NORMAL PLAYBACK TV/VCR NOTE: If it is left in the Slow mode for more than five minutes, the TV/DVD/VCR will automatically go into the Stop mode. Make sure ... • TV/DVD/VCR power must be turned on. 1 PICTURE SEARCH TV/VCR Insert a prerecorded tape If the erase-protection tab has been removed, the TV/DVD/VCR will start playback automatically. 2 To begin playback PLAY B Press the PLAY button.
TD861CM(p1-35).QX33 03.9.27 1:52 PM Page 27 SPECIAL PLAYBACK Make sure ... • TV/DVD/VCR power must be turned on. • Insert a prerecorded tape. AUTO REPEAT PLAYBACK TV/VCR RENTAL PLAYBACK TV/VCR This function enables you to improve the picture quality when playing back worn cassettes such as rented tapes. 1 Select “USER’S SET UP” Press the SETUP button on the remote control. Press the Arrow button K or L to point to “USER’S SET UP”. Then, press the ENTER button.
TD861CM(p1-35).QX33 03.9.27 1:52 PM Page 28 SEARCH Make sure ... • TV/DVD/VCR power must be turned on. • Insert a tape. • This function will not operate in recording mode. • This function is not operative when a cassette tape ZERO RETURN TV/VCR This function allows you to search easily a beginning point that you want to review by rewinding or fast forwarding. NOTE: Zero Return WILL NOT work on a blank tape or a blank portion of a tape.
TD861CM(p1-35).QX33 03.9.27 1:52 PM Page 29 INDEX SEARCH 1 TV/VCR This feature provides a method of indexing the starting point so that it can be easily returned to in either fast forward or rewind mode. • The index mark will be made automatically when the REC button is pressed. It will also be marked at the starting point of Timer recording and OTR. • The index mark will not be recorded if the PAUSE button is pressed and released during recording.
TD861CM(p1-35).QX33 03.9.27 1:52 PM Page 30 RECORDING Make sure ... • TV/DVD/VCR power must be turned on. • Insert a cassette tape with its erase prevention tab in place. (If necessary, rewind or fast forward the tape to the point at which you want to begin recording.) NOTES: • This TV/DVD/VCR will ONLY record and view the same channel. • This TV/DVD/VCR CANNOT record the contents from the built-in DVD.
TD861CM(p1-35).QX33 03.9.27 1:52 PM Page 31 OTR (One Touch Recording) TV/VCR This function enables you to set a recording length simply by pressing the REC/OTR button on the TV/DVD/VCR. Make sure ... • TV/DVD/VCR power must be turned on. • Insert a cassette tape with its erase prevention tab in place. (If necessary, rewind or fast forward the tape to the point at which you want to begin recording.) NOTES: • This function CANNOT be done from the remote control.
TD861CM(p1-35).QX33 03.9.27 1:52 PM Page 32 TIMER AUTOMATIC TIMER RECORDING 1 Select “TIMER PROGRAMMING” Press the SETUP button on the remote control. Confirm “TIMER PROGRAMMING” is pointed by pressing the Arrow button K. And press the ENTER button. • If you have not yet set the clock, “MANUAL CLOCK SET” appears. If so, follow stops [3] to [8] on page 17. Then set the timer recording. - TV/VCR SETUP - TV/VCR You may set the TV/DVD/VCR to start and end a recording while you are away.
TD861CM(p1-35).QX33 5 03.9.27 1:52 PM Set beginning hour Press the Arrow button K or L until the desired hour appears. (Example: “ 7, PM” for 7:30PM) Then, press the Arrow button B. 6 Set beginning minute Press the Arrow button K or L until the desired minute appears. (Example: “30” for 7:30PM) Then, press the Arrow button B. 7 Set end hour Press the Arrow button K or L until the desired hour appears. (Example: “8, PM” for 8:50PM) Then, press the Arrow button B.
TD861CM(p1-35).QX33 03.9.27 1:52 PM Page 34 3 TO CHECK THE BEGIN/END TIME 1)Press the POWER button so that the RECORDING indicator goes off. 2)Press the SETUP button on the remote control. 3)Confirm “TIMER PROGRAMMING” is pointed. 4)Press the ENTER button. The details of programs appear on the TV screen. 5)Press the SETUP button on the remote control to return to TV mode. HINTS FOR AUTOMATIC TIMER RECORDING • Make sure the channel you want to record is prop• • • • • 4 erly set in advance.
TD861CM(p1-35).QX33 03.9.27 1:52 PM Page 35 ON SCREEN DISPLAY To check the Counter, Clock and Channel number on the TV screen, press the DISPLAY button on the remote control. Each time you press the DISPLAY button on the remote control, the TV screen will change as follows: When the Closed Caption mode is OFF: When the Closed Caption mode is ON: • Counter mode: After 5 seconds, only the counter • The On Screen Display disappear after 5 seconds.
TD861CM(p36-52).QX33 03.9.27 2:05 PM Page 36 DVD SECTION ABOUT THE DISCS PLAYABLE DISCS DISC TYPES The following discs can be played back on this TV/DVD/VCR. ¡DVD video ¡DVD-R/RW* ¡DVD+R/RW* ¡Audio CD ¡CD-R/RW* ¡MP3* * Depending on the types or the writing method of the medium some discs can not be played. [DVD] Data on a DVD is divided into sections called "titles", and then into subsections called "chapters", each of which is given a title or chapter number.
TD861CM(p36-52).QX33 03.9.27 2:05 PM Page 37 PLAYING A DISC BASIC PLAYBACK DVD-V GENERAL FEATURES CD Getting started ¡Turn on the power of amplifier and any other com- ponents, if necessary. 1 Press the POWER button. ¡The power will turn on. 2 Press the OPEN/CLOSE button to open disc DVD may contain menus to navigate the disc and access special features.
TD861CM(p36-52).QX33 03.9.27 2:05 PM Page 38 SLOW FORWARD / SLOW REVERSE RESUME DVD-V CD DVD-V 1 During playback, press the STOP button. ¡Resume message will appear on the TV screen. 1 During playback, press the PAUSE button. 2 Press and hold down the FWD g or REV 2 Press the PLAY button, playback will resume h button for a few seconds. from the point at which playback was stopped. 3 Each press and hold down the FWD g or ¡To cancel resume, press the STOP button twice.
TD861CM(p36-52).QX33 03.9.27 2:05 PM Page 39 SEARCH FUNCTION TRACK SEARCH TIME SEARCH CD DVD-V There are three ways to begin playback on an Audio CD at a specific Track. CD 1 During playback, press the SEARCH MODE button three times (CD: twice) to display the Time Search on the TV screen. Using the Number buttons on the remote control 2 Within 30 seconds, enter a desired disc 1 Press the Number buttons to enter the time using the Number buttons on the remote control. desired Track number.
TD861CM(p36-52).QX33 03.9.27 2:05 PM Page 40 SPECIAL PLAYBACK FUNCTION REPEAT PROGRAM REPEAT is available only during playback. REPEAT TITLE / CHAPTER CD DVD-V To activate the repeat function, press the REPEAT button during playback. ¡The repeat mode changes as described below every time you press the button. You may determine the order in which tracks will play. 1 In stop mode, press the MODE button. ¡The PROGRAM screen will appear.
TD861CM(p36-52).QX33 03.9.27 2:05 PM Page 41 PLAYING A MP3 DISC MP3 PLAYBACK TRACK SELECTION MP3 MP3 When a CD with MP3 files is in the TV/DVD/VCR, the MP3 menu will appear on the TV screen in stop mode. 1 Press the SEARCH MODE button during playback. ¡The FILE LIST will appear. 1 In stop mode, press the Arrow buttons (K/L) to select the 2 Select a desired track using the Arrow buttons (K/L/s/B). desired group track.
TD861CM(p36-52).QX33 03.9.27 2:05 PM Page 42 CHANGING THE SETTINGS SUBTITLE LANGUAGE CAMERA ANGLE DVD-V DVD-V The DVD allows you to select a language for subtitles during DVD disc (if available) playback. Some DVD discs contain scenes which have been shot simultaneously from various angles. You can change the camera angle when the ( ) icon appears on the screen. 1 Press the SUBTITLE button during playback. 2 Press the SUBTITLE button repeatedly to select your desired subtitle language.
TD861CM(p36-52).QX33 03.9.27 2:05 PM Page 43 THE ON-SCREEN INFORMATION DVD-V CD MP3 You can check the information about the current disc by pressing the DISPLAY button on the remote control. For DVD-Vs For audio CDs 1 Press the DISPLAY button during playback to show current Chapter. to show the current Track. ¡The elapsed and remaining playing time of the cur- ¡The elapsed and remaining playing time of the current chapter will be displayed.
TD861CM(p36-52).QX33 03.9.27 2:05 PM Page 44 CHANGING THE DVD SETUP ITEMS LANGUAGE SETTING DVD-V Language options are not available with some discs. 1 Press the SETUP button twice in STOP mode so that the DVD SETUP menu appears. ¡ If the menu does not appear, press the PLAY button, the STOP button, then the SETUP button twice. QUICK SETUP TV MODE DOLBY DIGITAL 4:3 LETTER BOX ON 2 Press the Arrow button B to select CUSTOM, then press the ENTER button. ¡CUSTOM mode will appear.
TD861CM(p36-52).QX33 03.9.27 2:05 PM Page 45 DISPLAY SETTING AUDIO SETTINGS DVD-V You can change certain aspects of the DVD display screens and on-screen messages on the TV screen. 1 Press the SETUP button twice in STOP mode so that the DVD SETUP menu appears. ¡ If the menu does not appear, press the PLAY button, Choose the appropriate Audio settings for your equipment as it only affect during the playback of DVD discs. 1 Press the SETUP button twice in STOP mode so that the DVD SETUP menu appears.
TD861CM(p36-52).QX33 03.9.27 2:05 PM Page 46 PARENTAL CONTROL DVD-V CONTROL LEVELS ¡ALL Parental Control limits the disc viewing that exceed your settings. (with a password or playback will stop.) This feature allows you to prevent discs with alternative scenes from being played by your children. All parental lock is cancelled. ¡Level 8 DVD software of any grade (adult/general/children) can be played back.
TD861CM(p36-52).QX33 03.9.27 2:05 PM Page 47 TROUBLESHOOTING GUIDE If the TV/DVD/VCR does not perform properly when operated as instructed in this Owner’s Manual, check the player, consulting the following checklist. PROBLEM No power. The TV/DVD/VCR does not respond to the remote control. CORRECTIVE ACTION • Make sure the power plug is connected to an AC outlet. • Make sure the power is turned on. • Check if the power plug is connected to an AC outlet. • Check the batteries in the remote control.
TD861CM(p36-52).QX33 03.9.27 2:05 PM PROBLEM Picture OK, Sound Poor Page 48 No picture but the audio is OK in playback. CORRECTIVE ACTION Try a new channel, if OK, then possible station trouble. • Check for local interference. • • Make sure the timer recording is set correctly. • Make sure the power is off. • Make sure the TV/DVD/VCR clock is set correctly. • Make sure the tape has an erase-prevention tab. If need, cover the • hole with plastic tape.
TD861CM(p36-52).QX33 03.9.30 6:40 PM Page 49 DVD Mode PROBLEM No picture. Disc cannot be played. No sound. No DTS audio is output. Distorted picture.
TD861CM(p36-52).QX33 03.9.27 2:05 PM Page 50 MAINTENANCE CABINET CLEANING • Wipe the front panel and other exterior surfaces of • the TV/DVD/VCR with a soft cloth immersed in lukewarm water and wrung dry. Never use a solvent or alcohol. Do not spray insecticide liquid near the TV/DVD/VCR. Such chemicals may cause damage and discoloration to the exposed surfaces. AUTO HEAD CLEANING SERVICING • Automatically cleans video heads as you insert or • 1.
TD861CM(p36-52).QX33 03.9.27 2:05 PM Page 51 SPECIFICATIONS GENERAL SPECIFICATIONS Sound output: TV/VCR CRT 19 inch in-line gun, 90˚ deflection tube Television system : NTSC-M Closed caption system :§15.119/FCC Video Heads : Rotary four-head Tape width : 1/2 inch Tape speed SP : 33.40mm/sec. LP : 16.67mm/sec. SLP : 11.12mm/sec.
TD861CM(p36-52).QX33 03.9.27 2:05 PM Page 52 FUNAI CORPORATION LIMITED WARRANTY FUNAI CORP. will repair this product, free of charge in CANADA in the event of defect in materials or workmanship as follows: DURATION: PARTS: FUNAI CORP. will provide parts to replace defective parts without charge for one (1) year from the date of original retail purchase. Two (2) years for Picture Tube. Certain parts are excluded from this warranty. FUNAI CORP.