E9501CD_EN/FR_v3.qx3 04.8.10 12:01 Page 1 Before you start Owner’s Manual OPEN/CLOSE POWER REW F.
E9501CD_EN/FR_v3.qx3 04.8.10 12:01 Page 2 Before you start Precautions WARNING: TO REDUCE THE RISK OF FIRE OR ELECTRIC SHOCK, DO NOT EXPOSE THIS APPLIANCE TO RAIN OR MOISTURE. CAUTION RISK OF ELECTRIC SHOCK DO NOT OPEN CAUTION: TO REDUCE THE RISK OF ELECTRIC SHOCK, DO NOT REMOVE COVER (OR BACK). NO USER SERVICEABLE PARTS INSIDE. REFER SERVICING TO QUALIFIED SERVICE PERSONNEL.
E9501CD_EN/FR_v3.qx3 04.8.10 12:01 Page 3 Before you start Important Safeguards porting structure, grounding of the lead-in wire to an antenna discharge unit, size of grounding conductors, location of antenna-discharge unit, connection to grounding electrodes, and requirements for the grounding electrode. (Fig.
E9501CD_EN/FR_v3.qx3 04.8.10 12:01 Page 4 Before you start Precautions (cont’d) Installation Location Maintenance For safety and optimum performance of this unit: • Install the unit in a horizontal and stable position. Do not place anything directly on top of the unit. Do not place the unit directly on top of the TV. • Shield it from direct sunlight and keep it away from sources of intense heat.Avoid dusty or humid places. Avoid places with insufficient ventilation for proper heat dissipation.
E9501CD_EN/FR_v3.qx3 04.8.10 12:01 Page 5 Before you start Before you start . . . . . . . . . . . . . . . . . . .2 Connections . . . . . . . . . . . . . . . . . . . . .13 Getting started . . . . . . . . . . . . . . . . . . .16 Recording . . . . . . . . . . . . . . . . . . . . . . .26 . . . . . . . . . . . . . . . . . . . . . . . . . . . . . . . . . . . . . . . . . . . . . . . . . . . . . . . . . . . . . . . . . .85 .86 .88 .90 .92 VCR functions . . . . . . . . . . . . . . . . . . .
E9501CD_EN/FR_v3.qx3 04.8.10 12:01 Page 6 Before you start Features Followings are what you can do with this unit. Recording DVD mode VCR mode This unit is compatible with both DVD-RW, which is rewritable repeatedly and DVD-R, which is available for recording once. Also, this unit allows to record to the video cassette tape. You can choose either one for your convenience. Up to 8 programs recording: You can program the unit to record up to 8 programs, up to a year in advance.
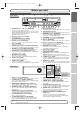
E9501CD_EN/FR_v3.qx3 04.8.10 12:01 Page 7 Before you start Before you start Functional overview Front Panel 1 2 3 4 5 OPEN/CLOSE POWER REW F.FWD STOP/EJECT PLAY RECORD CHANNEL DUBBING VCR SELECT SELECT STOP PLAY RECORD DVD 22 20 18 21 19 17 16 1. 15 14 13 12 11 10 9 8 L - AUDIO - R 7 6 2 3 4 5 6 DVD S-VIDEO COMPONENT VIDEO OUT Y CB L COAXIAL IN R DVD/VCR AUDIO IN AUDIO OUT ANTENNA IN L L R R VIDEO IN VIDEO OUT OUT CR 1. 2. 3. 5. 7. useful only in DVD mode.
E9501CD_EN/FR_v3.qx3 04.8.10 12:01 Page 8 Before you start Functional overview (cont’d) Remote Control POWER REC SPEED AUDIO .@/: 1 ABC DEF 2 3 GHI JKL MNO OPEN/CLOSE 1 2 15 4 5 6 PQRS TUV WXYZ 7 8 9 SPACE CH VIDEO/TV DISPLAY 18 19 VCR DVD PAUSE 3 21 PLAY 5 23 STOP REC/OTR 6 7 8 SETUP TIMER PROG.
E9501CD_EN/FR_v3.qx3 04.8.10 12:01 Page 9 Before you start Install two AA batteries (supplied) matching the polarity indicated inside battery compartment of the remote control. Keep in mind the following when using the remote control: • Make sure that there is no obstacle between the remote control and the remote sensor on the unit. • Use within the operating range and angle as shown.
E9501CD_EN/FR_v3.qx3 04.8.10 12:01 Page 10 Before you start Functional overview (cont’d) Guide to On Screen Menu The unit uses the following types of display for most operations. SETUP/DISC/CD menu,Title list, and DISPLAY, which allows you to change the playing status of disc during play. DISPLAY also gives you some disc information for checking the status of the disc.
E9501CD_EN/FR_v3.qx3 04.8.10 12:01 Page 11 Before you start Before you start Functional overview (cont’d) DISPLAY menu DVD Details are on page 41. 4 1 1 1 00:00:00 DVD-RW Video mode CH 1 : Audio : Subtitle : Angle (except VR mode) : Repeat : Marker : Noise Reduction : Zoom 2 3 Recording SP 1:25 Rem. 5 : Search Getting started Press DISPLAY button to call up the display menu.This menu will give you the information on the playing disc. Some operations are available while disc is playing.
E9501CD_EN/FR_v3.qx3 04.8.10 12:01 Page 12 Before you start Functional overview (cont’d) Guide to Displays on the front panel 4 2 1 3 6 5 1. Current status of the unit : Appears when a disc or a tape play is paused. : Appears when playing a disc or a tape. : Appears when the timer programming has been set and is proceeding. : Appears during recording process. : Appears during repeat play. : Appears when a tape is in the unit. 2.
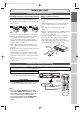
E9501CD_EN/FR_v3.qx3 04.8.10 12:01 Page 13 Connections Before you start Connection to a TV Antenna Antenna (Back of TV) Cable Signal 3 or Connections (Back of TV) Cable Signal or Connect RF Cable (supplied) Disconnect DIGITAL AUDIO AUDIO OUT OUT DVD S-VIDEO COMPONENT VIDEO OUT Y CB L COAXIAL IN R Getting started 1 DVD/VCR AUDIO IN AUDIO OUT ANTENNA IN L L R R VIDEO IN VIDEO OUT 2 OUT CR Connect OUT (Back of this unit) Recording 4 Plug in the AC power cord of this unit.
E9501CD_EN/FR_v3.qx3 04.8.10 12:01 Page 14 Connections Connection to a cable box or satellite box Connection A (Back of this unit) (Cable box or Satellite box) IN OUT DVD/VCR ANTENNA IN OUT RF Cable Cable Signal E (supplied) (Back of TV) Select this connection when you want to view or record a scrambled channel.With this connection, channels cannot be changed on this unit.You can view or record ONLY the channels you have selected on the cable box or the satellite box.
E9501CD_EN/FR_v3.qx3 04.8.10 12:01 Page 15 Connections Before you start Connection to an Audio System • When you change the connections, all devices should be turned off. • Refer to each owner’s manual for further information on other devices.
E9501CD_EN/FR_v3.qx3 04.8.10 12:01 Page 16 Getting started Easy DVD recording The following will help you to understand easily how to record to DVD discs. Note: Make sure batteries are in the remote control and you have connected this unit and the TV correctly. Step 1: Choose a disc type There are several types of recordable DVD discs to choose from. Choose a recordable DVD disc type based on your playing/recording/editing requirements. See “DVD disc type” below.
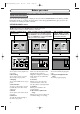
E9501CD_EN/FR_v3.qx3 04.8.10 12:01 Page 17 Getting started Before you start Easy DVD recording (Cont’d) Step 4: Select the desired channel Step 5: Record to DVD discs Step 6: Stop the Record PQRS 7 TUV WXYZ 8 9 VIDEO/TV SPACE REC SPEED AUDIO .@/: 1 ABC 2 3 GHI JKL MNO 2 3 JKL MNO 4 5 6 PQRS TUV WXYZ 7 8 9 OPEN/CLOSE 4 5 6 TUV WXYZ 7 8 9 SPACE DVD PAUSE VIDEO/TV SPACE SLOW 0 CH DISPLAY STOP DVD VCR PAUSE REC/OTR SETUP TIMER PROG.
E9501CD_EN/FR_v3.qx3 04.8.10 12:01 Page 18 Getting started Channel setting All channels are stored in the unit when purchased.We recommend that you program available channels in your area using “Auto Preset” in the Channel Preset of the SETUP menu. 4 Select SETUP using { / B buttons, then press ENTER button. SETUP menu will appear. Getting channels automatically 1 POWER REC SPEED AUDIO .
E9501CD_EN/FR_v3.qx3 04.8.10 12:01 Page 19 Getting started Before you start Channel setting (cont’d) Adding/deleting channels 4 Select “Manual Preset” using K / L buttons, then press ENTER button. Manual Preset menu will appear. 1 POWER REC SPEED .@/: 1 ABC 2 3 GHI JKL MNO 4 5 6 TUV WXYZ 8 9 SPACE DISPLAY SLOW DVD VCR PAUSE PLAY 1 7 STOP REC/OTR SETUP TIMER PROG.
E9501CD_EN/FR_v3.qx3 04.8.10 12:01 Page 20 Getting started Selecting the TV stereo or SAP You can select a sound channel to output from TV. “Stereo” has been selected as the default. 1 Press SETUP button to display SETUP/DISC menu. SETUP/DISC menu will appear. Screen: 4 Select “TV Audio Select” using K / L buttons, then press ENTER button. Option window will appear. Setup > Channel Preset VCR POWER REC SPEED .
E9501CD_EN/FR_v3.qx3 04.8.10 12:01 Page 21 Getting started Before you start Clock setting Auto Clock Setting 4 Select “Auto Clock Setting” using K / L buttons, then press ENTER button. Option window will appear. Setup > Clock POWER REC SPEED .@/: 1 ABC 2 3 GHI JKL MNO 4 5 6 TUV WXYZ 8 9 SPACE Clock Setting Auto Clock Setting Daylight Saving Time CH VIDEO/TV SLOW 0 OFF Auto Auto Manual Off DISPLAY DVD VCR PAUSE PLAY 1 6 1 STOP REC/OTR SETUP TIMER PROG.
E9501CD_EN/FR_v3.qx3 04.8.10 12:01 Page 22 Getting started Clock setting (cont’d) Manual Clock Setting 4 1 Press SETUP button to display SETUP/DISC menu. SETUP/DISC menu will appear. Screen: Select “Clock Setting” using K / L buttons, then press ENTER button. A clock setting window will appear. POWER REC SPEED .
E9501CD_EN/FR_v3.qx3 04.8.26 16:58 Page 23 Getting started Before you start Clock setting (cont’d) 8 Press K / L buttons to select AM or PM, then press ENTER button. Clock menu will appear, then the settings will be activated. Press SETUP button to exit. Although seconds are not displayed, they begin counting from zero. POWER REC SPEED .
E9501CD_EN/FR_v3.qx3 04.8.10 12:01 Page 24 Getting started Clock setting (cont’d) Setting the daylight saving time When Daylight Saving Time is ON, the unit clock will automatically move forward one hour on the first Sunday in April and move back one hour on the last Sunday in October. 4 Select “Daylight Saving Time” using K / L buttons, then press ENTER button. Daylight Saving Time options will appear. POWER REC SPEED .
E9501CD_EN/FR_v3.qx3 04.8.10 12:01 Page 25 Getting started Before you start Selecting the TV aspect ratio Playback menu will appear. Setup > Playback TV Aspect Parental Lock Disc Menu Language Audio Language Subtitle Language DVD 4:3 Letter Box All English Original OFF Digital Out Dynamic Range Control Fast Forward with Audio ON OFF POWER REC SPEED .
E9501CD_EN/FR_v3.qx3 04.8.10 12:01 Page 26 Recording Information on DVD recording Information Recording speed This unit can record to DVD-R and DVD-RW discs. When recording, you will need to select a recording format between Video mode and VR mode depending on the disc format.The disc format for DVD-R is always “Video format,” so a recording format will be “Video mode”.
E9501CD_EN/FR_v3.qx3 04.8.10 12:01 Page 27 Recording Information on copy control Some satellite broadcasts include copy-protected information. For recording these, refer to the following. VR DVD-RW After recording, you must finalize a disc in order to play on any other unit. (Refer to page 44.) Copy-free Copy-once Copyprohibited ver.1.1 ver.1.1 CPRM compatible Playable OPEN/CLOSE POWER REW F.
E9501CD_EN/FR_v3.qx3 04.8.10 12:01 Page 28 Recording Formatting a disc Settings for the recording format to a blank disc Video VR DVD-RW DVD-RW When inserting a blank disc, the unit starts to initialize the blank disc. After that,You can record to the disc with the recording format selected in SETUP menu. You are allowed to set a specified time for chapter marks. 3 Select “Recording” using K / L / { / B buttons, then press ENTER button. Recording menu will appear. POWER REC SPEED .
E9501CD_EN/FR_v3.qx3 04.8.10 12:01 Page 29 Recording Before you start Formatting a disc (cont’d) 6 POWER REC SPEED .@/: 1 ABC 2 3 GHI JKL MNO AUDIO DEF 4 5 6 PQRS TUV WXYZ 8 9 7 SPACE Setup > Recording DVD Timer Programming Dubbing Mode VR mode OFF 5 minutes 10 minutes 10 minutes 15 minutes VCR DVD 30 minutes 60 minutes SLOW DVD VCR PAUSE PLAY 8 STOP REC/OTR SETUP TIMER PROG. ENTER REC MONITOR MENU/LIST TOP MENU “10 minutes” has been selected as the default.
E9501CD_EN/FR_v3.qx3 04.8.10 12:01 Page 30 Recording Formatting a disc (cont’d) Reformatting a disc Video VR DVD-RW DVD-RW If you are using a DVD-RW disc, by default it will be Video mode. You can change this to VR mode from SETUP menu. 1 4 Select “Yes” using { / B buttons, then press ENTER button. Option window will appear. POWER REC SPEED .
E9501CD_EN/FR_v3.qx3 04.8.10 12:01 Page 31 Recording Before you start Basic recording DVD-R Video VR DVD-RW DVD-RW DVD 4 Select a desired channel to record using CH K / L buttons or number buttons. 1 2 4 POWER REC SPEED .@/: 1 ABC 2 3 GHI JKL MNO AUDIO DEF 4 5 6 PQRS TUV WXYZ 8 9 7 SPACE CH 1 DISPLAY SLOW DVD VCR PAUSE 5 PLAY STOP 5 REC/OTR SETUP TIMER PROG.
E9501CD_EN/FR_v3.qx3 04.8.10 12:01 Page 32 Recording Basic recording (cont’d) Checking the recording picture quality DVD-R Video VR DVD-RW DVD-RW You can confirm the recording picture quality with the recording speed you have selected before attempting to record to a DVD disc. First: 2 1 Press REC MONITOR button again to exit. POWER REC SPEED .
E9501CD_EN/FR_v3.qx3 04.8.10 12:01 Page 33 Recording Before you start One-touch timer recording DVD-R Video VR DVD-RW DVD-RW 1 2 POWER REC SPEED .@/: 1 ABC 2 3 GHI JKL MNO OPEN/CLOSE DEF 4 5 6 PQRS TUV WXYZ 8 9 7 5 AUDIO SPACE CH 4 VIDEO/TV SLOW 0 Press REC/OTR button, then press REC/OTR button repeatedly until a desired recording time (30 minutes to 8 hours) appears on the TV screen. Recording will start.
E9501CD_EN/FR_v3.qx3 04.8.10 12:01 Page 34 Recording Timer recording DVD-R Video VR DVD-RW DVD-RW VCR You can program the unit to record up to 8 programs, up to a year in advance. Daily or weekly program recordings are also available. • Be sure to set the clock before making a timer programming. • Insert a recordable disc or a tape with a safety tab. 4 Select “Timer Programming” using K / L buttons, then press ENTER button. Timer Programming list will appear.
E9501CD_EN/FR_v3.qx3 04.8.10 12:01 Page 35 Recording Before you start Timer recording (cont’d) 8 10 Select the channel number to Select a recording speed Setup > Recording > Timer Programming Date Start JAN/12 10:00PM --- Setup > Recording > Timer Programming Date Start JAN/12 10:00PM --- DVD End CH VCR Speed 10:30PM CH8 DVD To record from external input, L1 or L2. using K / L buttons, then press B button.
E9501CD_EN/FR_v3.qx3 04.8.19 14:24 Page 36 Recording Timer recording (cont’d) Hints for timer recording • If there is a power failure or this unit has been unplugged for more than 30 seconds, the clock setting and all timer settings will be lost. • If a disc is not on the tray, the DVD indicator on the front panel flashes and timer recording cannot be performed. Please insert a recordable disc.
E9501CD_EN/FR_v3.qx3 04.8.10 12:01 Page 37 Recording Connection to an external source Connect the external source properly to the unit by using input jacks either LINE2 (Front) or LINE1 (Rear). S-VIDEO input is useful only in DVD mode. Use commercially available S-Video or Video cable and an Audio cable for this connection. L OUTPUT Another source (VCR camcorder etc.
E9501CD_EN/FR_v3.qx3 04.8.10 12:01 Page 38 Recording Settings for an external source (cont’d) Recording from an external source DVD-R Video VR DVD-RW DVD-RW VCR Before recording from an external source, see the instruction for the connection on page 37. 1. Turn the TV and the unit on, and be sure to select the input of the TV to which the unit is connected. DVD 4 1 2.
E9501CD_EN/FR_v3.qx3 04.8.10 12:01 Page 39 Recording Before you start Dubbing Mode DVD-R Video VR DVD-RW DVD-RW VCR Select SETUP using { / B buttons, then press ENTER button. SETUP menu will appear. Setup REC SPEED .@/: 1 ABC 2 3 GHI JKL MNO AUDIO OPEN/CLOSE DEF 4 5 6 PQRS TUV WXYZ 8 9 7 SPACE CH VIDEO/TV SLOW 0 DISPLAY DVD VCR PAUSE 1 STOP REC/OTR SETUP 3 TIMER PROG.
E9501CD_EN/FR_v3.qx3 04.8.10 12:01 Page 40 Recording Dubbing Mode (cont’d) VCR to DVD DVD to VCR 5 5 Select “VCR ⇒ DVD” using K / L buttons, then press ENTER button. Select “VCR ⇐ DVD” using K / L buttons, then press ENTER button. POWER REC SPEED .
E9501CD_EN/FR_v3.qx3 04.8.10 12:01 Page 41 Recording Before you start Finalizing the discs DVD-R Video VR DVD-RW DVD-RW 6 PQRS TUV WXYZ 8 9 7 SPACE CH VIDEO/TV SLOW 0 Edit DVD VCR DISPLAY PAUSE Format Finalize Disc Protect OFF ON Yes PLAY No STOP REC/OTR 1 TIMER PROG. ENTER MENU/LIST TOP MENU CLEAR/C-RESET ZOOM SEARCH MODE Select “Yes” using { / B buttons, then press ENTER button. Finalizing will start.
E9501CD_EN/FR_v3.qx3 04.8.10 12:01 Page 42 Recording Setting a disc to protect VR DVD-RW To prevent accidental recording, editing or erasing the titles, you can protect them from DISC menu. 3 Select “Disc Protect OFF ➔ ON” using K / L buttons, then press ENTER button. Option window will appear. POWER REC SPEED .
E9501CD_EN/FR_v3.qx3 04.8.10 12:01 Page 43 Playing discs Before you attempt to play DVD discs, read the following information. Region codes This unit is compatible to play the following discs. To play a DVD, make sure that it meets the requirements for Region Codes and Color Systems as described below. Discs that have the following logos will play on the unit. Other Disc types are not guaranteed to play. This unit has been designed to play DVD discs with Region One (1).
E9501CD_EN/FR_v3.qx3 04.8.10 12:01 Page 44 Playing discs Basic playback Playback DVD-R Video VR DVD-RW DVD-RW VR mode: Original 1 1 1 2 3 1 POWER REC SPEED AUDIO .@/: 1 ABC DEF 2 3 GHI Press POWER button, then press DVD button. When you are playing a DVD, turn the TV on and be sure to select the input to which the unit is connected.
E9501CD_EN/FR_v3.qx3 04.8.10 12:01 Page 45 Playing discs DVD-V CD MP3 1 Press POWER button, then ton to open the disc tray. The disc tray will open. 1 POWER REC SPEED AUDIO .@/: 1 ABC DEF 2 3 GHI If you are playing a DVD-Video disc, a menu may appear. Refer to pages 46-47 for details about a disc menu. JKL MNO 4 5 6 PQRS TUV WXYZ 8 9 7 SPACE OPEN/CLOSE 2 CH VIDEO/TV SLOW 0 DVD VCR DISPLAY PAUSE PLAY 5 Press STOP C button to stop STOP REC/OTR playing.
E9501CD_EN/FR_v3.qx3 04.8.10 12:01 Page 46 Playing discs Basic playback (cont’d) Playing discs using the disc menu DVD-V A DVD disc contains a disc menu that describes the contents or allows you to customize the playback. For example, the menu may offer choices for subtitle languages, special features, or chapter selection. Sometimes these are displayed automatically when you start playback, otherwise only appear when you press MENU / LIST button. First: DVD 1 Press MENU / LIST button.
E9501CD_EN/FR_v3.qx3 04.8.10 12:01 Page 47 Playing discs Before you start Basic playback (cont’d) Playing discs using the title menu DVD-V DVD Press TOP MENU button. The title menu will appear. If the feature is not available, may appear on the TV screen. Select a title to play using the K / L / { / B buttons, then press ENTER button. Playback will begin at the title you selected. 2 POWER REC SPEED .
E9501CD_EN/FR_v3.qx3 04.8.10 12:01 Page 48 Playing discs Special playback Resume play Video DVD-V DVD-R DVD-RW 2 VR CD DVD-RW MP3 Press PLAY B button. In a few seconds, playback will resume from the point at which it stopped last.You can resume play at the same point even if you turn off the unit. You can resume play from where you stopped playing the disc last. 1 During playback, press STOP C button. The resume message will appear. Screen: POWER REC SPEED .
E9501CD_EN/FR_v3.qx3 04.8.10 12:01 Page 49 Playing discs Before you start Special playback (cont’d) Skipping TV commercials during play DVD-R Video VR DVD-RW DVD-RW e.g. Press CM SKIP button once 7 8 9 SPACE You can skip TV commercials by pressing CM SKIP button, so that you can enjoy the recorded programs without interrupting. SLOW 0 VCR DISPLAY DVD PAUSE Connections PLAY STOP REC/OTR CM Skip 30 sec. 1 SETUP TIMER PROG.
E9501CD_EN/FR_v3.qx3 04.8.10 12:01 Page 50 Playing discs Special playback (cont’d) Step by step playback Video DVD-V DVD-R DVD-RW 2 VR DVD-RW 1 During playback, press PAUSE F button. Playback will pause and sound will be muted. SPACE SLOW 0 VCR DISPLAY Press SKIP G button repeatedly. The playback will advance one frame (or step) at a time when you press the skip button with the sound muted. DVD PAUSE PLAY 1 3 STOP REC/OTR SETUP TIMER PROG.
E9501CD_EN/FR_v3.qx3 04.8.10 12:01 Page 51 Playing discs Zoom STOP REC/OTR Video DVD-V DVD-R DVD-RW VR DVD-RW During playback, press ZOOM button. Zoom menu will appear. Screen: 1 x1.2 01:23:45 x1.5 MENU/LIST TOP MENU 1 SEARCH MODE 3 2 3 CM SKIP Select a desired zoom position using K / L / { / B buttons, then press ENTER button. The zoom play will start. • When selecting a smaller factor than the current one, the zoom area will not be displayed.
E9501CD_EN/FR_v3.qx3 04.8.10 12:01 Page 52 Playing discs Search Title/Chapter search Video DVD-V DVD-R DVD-RW VR DVD-RW Using SKIP H / G buttons Using DISPLAY button 1 1 During playback, press SKIP G button to skip the current title or chapter and move to the next. The title or chapter will move forward by one at a time. During playback, press DISPLAY button. The display menu will appear. Screen: 2 POWER REC SPEED .
E9501CD_EN/FR_v3.qx3 04.8.10 12:01 Page 53 Playing discs Before you start Search (cont’d) Track search CD MP3 Using SKIP H / G buttons Using DISPLAY button During playback, press DISPLAY button. The display menu will appear. Screen: 1 01:23:45 Audio CD REC SPEED .@/: 1 ABC 2 3 GHI JKL MNO AUDIO DEF 4 5 6 PQRS TUV WXYZ 8 9 7 OPEN/CLOSE SPACE CH VIDEO/TV SLOW 0 1 DVD VCR DISPLAY PAUSE PLAY STOP To go back to the previous track, press SKIP H button.
E9501CD_EN/FR_v3.qx3 04.8.10 12:01 Page 54 Playing discs Repeat/Random/Program play Repeat play Video DVD-V DVD-R DVD-RW VR CD DVD-RW MP3 1 During playback, press DISPLAY button. The display menu will appear. 1 1 01:23:45 DVD-Video Title: The current title will be played repeatedly. (DVD only) Chapter: The current chapter will be played repeatedly. (DVD only) POWER REC SPEED .
E9501CD_EN/FR_v3.qx3 04.8.10 12:01 Page 55 Playing discs Before you start Repeat/Random/Program play (cont’d) Program play CD DVD 1 3 Select “Program Play” using K / L buttons, then press ENTER button. Program play list will appear. 4 POWER REC SPEED .
E9501CD_EN/FR_v3.qx3 04.8.10 12:01 Page 56 Playing discs Selecting the format of audio and video You can select an audio and video format as you prefer depending on the contents of the disc you are playing. Switching audio soundtrack VR DVD-V DVD-RW When playing a DVD-Video disc recorded with two or more soundtracks (these are often in different languages), you can switch between them anytime during playback.
E9501CD_EN/FR_v3.qx3 04.8.23 12:43 Page 57 Playing discs Before you start Selecting the format of audio and video (cont’d) CD MP3 1 2 Select icon using { / B buttons, then press ENTER button. Audio menu will appear. POWER REC SPEED .@/: 1 ABC 2 3 GHI JKL MNO AUDIO DEF 4 5 6 PQRS TUV WXYZ 8 9 7 OPEN/CLOSE Connections When playing Audio CDs or MP3 files you can switch between stereo, just the left channel or just the right channel.
E9501CD_EN/FR_v3.qx3 04.8.10 12:01 Page 58 Playing discs Selecting the format of audio and video (cont’d) Switching camera angles DVD-V Some DVD Video discs feature scenes shot from two or more angles–check the case for details: it should be marked with an angle icon if it contains multi-angle scenes. 2 Select icon using { / B buttons, then press ENTER button. Angle will switch each you press ENTER button. 1 1 1 01:23:45 REC SPEED .
E9501CD_EN/FR_v3.qx3 04.8.10 12:01 Page 59 Editing Editing discs in Video mode Title list allows you to check the titles recorded on the disc easily.You can choose a title to play from this screen and easily edit the titles as you prefer. You can edit discs in Video mode for the following items. Be sure that once you edit titles, they will not remain as recorded originally.
E9501CD_EN/FR_v3.qx3 04.8.10 12:01 Page 60 Editing Information on disc editing (cont’d) Editing discs in VR mode For discs in VR mode, you can edit from “Original” menu or “Playlist” menu, which is created from the original. Editing original titles Editing playlists The following items can be used to edit the original titles.
E9501CD_EN/FR_v3.qx3 04.8.10 12:01 Page 61 Editing Before you start Editing DVD-RW discs in Video mode Deleting titles Video DVD-RW 3 Select a desired title using K / L / { / B buttons, then press ENTER button. Edit menu will appear.
E9501CD_EN/FR_v3.qx3 04.8.10 12:01 Page 62 Editing Editing DVD-RW discs in Video mode (cont’d) Putting names on titles Video DVD-RW You can put title names on the titles and change the names from this menu. The names you put on the titles will be displayed on a titlelist. First: DVD 4 Select “Edit Title Name” using K / L buttons, then press ENTER button. A window for entering a title name will appear. 5 POWER REC SPEED .
E9501CD_EN/FR_v3.qx3 04.8.10 12:01 Page 63 Editing Before you start Editing DVD-RW discs in Video mode (cont’d) 6 POWER REC SPEED .@/: 1 ABC 2 3 GHI JKL MNO AUDIO DEF 4 5 6 PQRS TUV WXYZ 8 9 7 OPEN/CLOSE Connections Select “Yes” using { / B buttons, then press ENTER button. The name you entered will be activated for the title. SPACE CH VIDEO/TV SLOW 0 DISPLAY DVD VCR PAUSE Disc > Edit > Edit Title Name ABC abc 123 @!? Yes No PLAY 7 STOP REC/OTR SETUP TIMER PROG.
E9501CD_EN/FR_v3.qx3 04.8.10 12:01 Page 64 Editing Editing DVD-RW discs in Video mode (cont’d) Setting or clearing chapter markers Video DVD-RW You can put chapter markers in each title. Once a chapter is marked, you can use it for the chapter search feature. You can set chapter markers at a specified time you selected for titles with more than 5 minutes. First: Disc > Edit 1 JAN/ 1 1:00AM CH12 Title Delete Edit Title Name Chapter Mark POWER REC SPEED .
E9501CD_EN/FR_v3.qx3 04.8.10 12:01 Page 65 Editing Before you start Editing DVD-RW discs in VR mode (Original) Deleting titles VR DVD-RW 4 Select a desired title using K / L / { / B buttons, then press ENTER button. Original menu will appear. 3 MNO DEF 4 5 6 PQRS TUV WXYZ 8 9 CH VIDEO/TV SLOW Title Delete Scene Delete Edit Title Name Chapter Mark Index Picture Set Protect OFF ON XP 0:01:25 DVD VCR PLAY 1 7 STOP REC/OTR SETUP TIMER PROG.
E9501CD_EN/FR_v3.qx3 04.8.10 12:01 Page 66 Editing Editing DVD-RW discs in VR mode (Original) (cont’d) Deleting parts of titles VR DVD-RW You can delete part of a title, the disc space to record will be increased. Be advised that the parts once deleted cannot be brought back to the disc. First: 4 Select a desired title using K / L / { / B buttons, then press ENTER button. Original menu will appear.
E9501CD_EN/FR_v3.qx3 04.8.10 12:01 Page 67 Editing Before you start Editing DVD-RW discs in VR mode (Original) (cont’d) 8 Select “Delete” using K / L buttons, then press ENTER button. Option window will appear. Select “Yes” using { / B buttons, then press ENTER button. Part of a title will be deleted. POWER REC SPEED AUDIO .
E9501CD_EN/FR_v3.qx3 04.8.10 12:01 Page 68 Editing Editing DVD-RW discs in VR mode (Original) (cont’d) 3 6 Select “Original” using { / B buttons, then press ENTER button. Original list will appear. To enter a title name, follow the steps of "Guide to edit title name" on this page. character set 6 POWER REC SPEED .
E9501CD_EN/FR_v3.qx3 04.8.10 12:01 Page 69 Editing Before you start Editing DVD-RW discs in VR mode (Original) (cont’d) Setting or clearing chapter markers VR DVD-RW 1 1 1 2 3 JAN/1 1:00AM JAN/1 2:00AM JAN/1 3:00AM 4 5 POWER REC SPEED .@/: 1 ABC 2 3 GHI JKL MNO 4 5 6 TUV WXYZ 8 9 SPACE JAN/1 5:00AM OPEN/CLOSE DEF PQRS 7 JAN/1 4:00AM AUDIO CH VIDEO/TV SLOW 0 DISPLAY 4 DVD VCR PLAY Select a desired title using K / L / { / B buttons, then press ENTER button.
E9501CD_EN/FR_v3.qx3 04.8.10 12:01 Page 70 Editing Editing DVD-RW discs in VR mode (Original) (cont’d) : Disc > Edit > Original 1 Chapter 2/2 Title Delete Scene Delete Edit Title Name ChapterAdd Mark Delete Index Picture Protect OFF ON : The chapter marker which you selected will be deleted. Disc > Edit > Original POWER REC SPEED AUDIO .
E9501CD_EN/FR_v3.qx3 04.8.10 12:01 Page 71 Editing Before you start Editing DVD-RW discs in VR mode (Original) (cont’d) 6 Select “Original” using { / B buttons, then press ENTER button. Original list will appear. Select “Yes” using { / B buttons, then press ENTER button. A picture for thumbnail will be set. 1 2 2 3 JKL MNO 4 5 6 PQRS TUV WXYZ 8 9 OPEN/CLOSE DEF SPACE CH VIDEO/TV SLOW 0 DVD VCR PAUSE 5 PLAY 7 No STOP REC/OTR SETUP TIMER PROG.
E9501CD_EN/FR_v3.qx3 04.8.10 12:01 Page 72 Editing Editing DVD-RW discs in VR mode (Original) (cont’d) Setting titles to protect VR DVD-RW To prevent accidental editing or erasing the titles, you can protect them from the original menu. First: DVD 4 Select a desired title using K / L / { / B buttons, then press ENTER button. Original menu will appear. POWER REC SPEED .
E9501CD_EN/FR_v3.qx3 04.8.10 12:01 Page 73 Editing Before you start Editing DVD-RW discs in VR mode (Original) (cont’d) Releasing titles from protecting VR DVD-RW First: DVD 4 Select a desired title using K / L / { / B buttons, then press ENTER button. Original menu will appear. 1 POWER REC SPEED .@/: 1 ABC 2 3 GHI JKL MNO 4 5 6 PQRS TUV WXYZ 8 9 7 AUDIO OPEN/CLOSE Connections You are allowed to release the titles protecting feature once protected.
E9501CD_EN/FR_v3.qx3 04.8.10 12:01 Page 74 Editing Editing DVD-RW discs in VR mode (Playlist) Deleting titles VR DVD-RW In VR mode, even when a title is deleted from a Playlist, the original title will remain in an Original list. The disc space to record will not be increased. First: 4 Select a desired title using K / L / { / B buttons, then press ENTER button. Playlist menu will appear. POWER REC SPEED .
E9501CD_EN/FR_v3.qx3 04.8.10 12:01 Page 75 Editing Before you start Editing DVD-RW discs in VR mode (Playlist) (cont’d) Deleting parts of titles VR DVD-RW 4 Select a desired title using K / L / { / B buttons, then press ENTER button. Playlist menu will appear. REC SPEED .@/: 1 ABC 2 3 GHI JKL MNO 4 5 6 PQRS TUV WXYZ 8 9 7 AUDIO OPEN/CLOSE DEF SPACE CH VIDEO/TV SLOW 0 Disc > Edit > Playlist DVD 1 Press SETUP button.
E9501CD_EN/FR_v3.qx3 04.8.10 12:01 Page 76 Editing Editing DVD-RW discs in VR mode (Playlist) (cont’d) Part of a title will be deleted. 7 Disc > Edit > Playlist Select “Delete” using K / L buttons, then press ENTER button. Option window will appear. Yes JAN/ 1 1:00AM CH12 Yes JAN/ 1 1:00AM CH12 0:01:25 5 6 PQRS TUV WXYZ 8 9 DEF CH VIDEO/TV SLOW DVD VCR No PAUSE PLAY XP STOP 9 REC/OTR SETUP TIMER PROG. ENTER REC MONITOR This operation may take a while to be completed.
E9501CD_EN/FR_v3.qx3 04.8.26 16:58 Page 77 Editing Before you start Editing DVD-RW discs in VR mode (Playlist) (cont’d) 7 Select a desired title using K / L / { / B buttons, then press ENTER button. Playlist menu will appear. Select “Yes” using { / B buttons, then press ENTER button. The name you entered will be activated for the title. 6 .
E9501CD_EN/FR_v3.qx3 04.8.10 12:01 Page 78 Editing Editing DVD-RW discs in VR mode (Playlist) (cont’d) Setting or clearing chapter markers VR DVD-RW You can put chapter markers in each title. Once a chapter is marked, you can use it for the chapter search feature. You can put a chapter marker anywhere you want. When the number of chapter markers in the playlist comes to 999 in total, you cannot add any more chapter markers.
E9501CD_EN/FR_v3.qx3 04.8.10 12:01 Page 79 Editing Before you start Editing DVD-RW discs in VR mode (Playlist) (cont’d) : Disc > Edit > Playlist 1 Disc > Edit > Playlist F Yes JAN/ 1 1:00AM CH12 No 1 XP Chapter 2/2 0:01:25 Title Delete Scene Delete Edit Title Name ChapterAdd Mark DeleteSet Index Picture POWER REC SPEED .
E9501CD_EN/FR_v3.qx3 04.8.10 12:01 Page 80 Editing Editing DVD-RW discs in VR mode (Playlist) (cont’d) 3 6 Select “PlayList” using { / B buttons, then press ENTER button. Playlist will appear. Select “Yes” using { / B buttons, then press ENTER button. A picture for thumbnail will be set.
E9501CD_EN/FR_v3.qx3 04.8.10 12:01 Page 81 Editing Before you start Editing DVD-RW discs in VR mode (Playlist) (cont’d) Adding titles to a Playlist VR DVD-RW DVD 4 Select “Add New Title” using K / L / { / B buttons, then press ENTER button. Original list will appear. POWER REC SPEED .@/: 1 ABC 2 3 GHI JKL MNO 4 5 6 PQRS TUV WXYZ 8 9 7 AUDIO OPEN/CLOSE Connections You can add or delete a title in the playlist as you prefer. You can add titles to a Playlist up to 99.
E9501CD_EN/FR_v3.qx3 04.8.10 12:01 Page 82 Editing Editing DVD-RW discs in VR mode (Playlist) (cont’d) Deleting a Playlist VR DVD-RW A Playlist can be deleted if no longer needed. First: DVD 1 4 Select “Delete Playlist” using K / L / { / B buttons, then press ENTER button. Option window will appear. POWER REC SPEED .@/: 1 ABC 2 3 GHI JKL MNO 4 5 6 PQRS TUV WXYZ 8 9 7 AUDIO OPEN/CLOSE DEF SPACE CH VIDEO/TV SLOW 0 Press SETUP button.
E9501CD_EN/FR_v3.qx3 04.8.10 12:01 Page 83 Editing Before you start Editing DVD-R discs Deleting titles DVD-R Disc > Edit 1 JAN/ 1 1:00AM CH12 Title Delete Edit Title Name Chapter Mark XP POWER REC SPEED .@/: 1 ABC 2 3 GHI JKL MNO 4 5 6 PQRS TUV WXYZ 8 9 7 0:01:25 AUDIO OPEN/CLOSE Connections You can delete titles which you do not need, however the disc space to record on the disc will not be changed.
E9501CD_EN/FR_v3.qx3 04.8.10 12:01 Page 84 Editing Editing DVD-R discs (cont’d) Putting names on titles DVD-R You can put names on the titles and change the names from this menu. The names you put on the titles will be displayed on a titlelist. First: 4 Select “Edit Title Name” using K / L buttons, then press ENTER button. A window for entering a title name will appear. 5 POWER REC SPEED .@/: 1 ABC 2 3 GHI JKL MNO 4 5 6 PQRS TUV WXYZ 8 9 7 DVD DEF 1 Press SETUP button.
E9501CD_EN/FR_v3.qx3 04.8.10 12:01 Page 85 Changing the SETUP menu Before you start Tour of the SETUP menu The following table is the contents which you can set and the default settings. Refer to the following table for useful operation. 1.Language setting Pages 86-87 Audio Language Original English French Set the language for audio. Subtitle Language OFF English French Set the language for subtitle. OSD Background Transparency 100% Set the background transparency of OSD screen.
E9501CD_EN/FR_v3.qx3 04.8.10 12:01 Page 86 Changing the SETUP menu Settings for Language Press STOP button if you are playing a disc. 1 Press SETUP button to display SETUP/DISC menu. SETUP/DISC menu will appear. 4 POWER REC SPEED AUDIO .@/: 1 ABC DEF 2 3 GHI JKL MNO 4 5 6 TUV WXYZ 8 9 PQRS 7 SPACE OPEN/CLOSE CH VIDEO/TV SLOW 0 DISPLAY DVD VCR PAUSE PLAY 1 5 Setup Menu STOP REC/OTR SETUP TIMER PROG.
E9501CD_EN/FR_v3.qx3 04.8.10 12:01 Page 87 Changing the SETUP menu Before you start Settings for Language (cont’d) Disc Menu Language (Default : English) Set the language for Disc Menu.
E9501CD_EN/FR_v3.qx3 04.8.10 12:01 Page 88 Changing the SETUP menu Settings for Display Press STOP button if you are playing a disc. 1 Press SETUP button to display SETUP/DISC menu. SETUP/DISC menu will appear. POWER REC SPEED AUDIO .@/: 1 ABC DEF 2 3 GHI JKL MNO 4 5 6 TUV WXYZ 8 9 PQRS 7 SPACE OPEN/CLOSE CH VIDEO/TV SLOW 0 DISPLAY DVD VCR PAUSE PLAY 1 5 Setup Menu STOP REC/OTR SETUP TIMER PROG.
E9501CD_EN/FR_v3.qx3 04.8.10 12:01 Page 89 Changing the SETUP menu Setup > Display DVD OSD Background Transparency 35% OSD Language 1 English Screen Saver 10 minutes DVD OSD Background Transparency 35%100% 85% OSD Background Color 1 70% OSD Language English 50% Screen Saver 10 minutes 35% 25% 10% 0% • Select a setting using K / L buttons, then press ENTER button. Your setting will be activated.
E9501CD_EN/FR_v3.qx3 04.8.10 12:01 Page 90 Changing the SETUP menu Settings for Audio Choose the appropriate Audio settings for your equipment. It will only affect DVD discs during playback. Press STOP button if you are playing a disc. 1 POWER REC SPEED AUDIO .@/: 1 ABC DEF 2 3 GHI JKL MNO 4 5 6 TUV WXYZ 8 9 PQRS 7 Press SETUP button to display SETUP/DISC menu. SETUP/DISC menu will appear.
E9501CD_EN/FR_v3.qx3 04.8.10 12:01 Page 91 Changing the SETUP menu Before you start Settings for Audio (cont’d) Digital Out Set the digital audio output.
E9501CD_EN/FR_v3.qx3 04.8.10 12:01 Page 92 Changing the SETUP menu Settings for Parental lock level Some DVD-Video discs feature a Parental Lock level. Playback will stop if the ratings exceed the levels you set, it will require you to enter a password before the disc will playback.This feature prevents your children from viewing inappropriate materials. Press STOP button if you are playing a disc. 4 POWER REC SPEED AUDIO .
E9501CD_EN/FR_v3.qx3 04.8.10 12:01 Page 93 Changing the SETUP menu Before you start Settings for Parental lock level (cont’d) Parental Lock (Default : All) Set the Parental Lock level.
E9501CD_EN/FR_v3.qx3 04.8.10 12:01 Page 94 VCR functions Playback VCR 3 1 During playback, press PAUSE F button. Playback will pause and sound will be muted. Press POWER button on the remote control or the front panel of the unit. When you are playing a tape, turn the TV on and be sure to select the input to which the unit is connected. Press: Press PLAY B button to resume play. 2 5 Insert a prerecorded tape, then press PLAY B button to begin playback. Press STOP C button to stop playback.
E9501CD_EN/FR_v3.qx3 04.8.10 12:01 Page 95 VCR functions Before you start Recording and One-touch timer recording (cont’d) One-touch timer recording VCR PQRS TUV WXYZ 7 8 9 SPACE VCR SLOW 0 (Normal recording) (0:30) (1:00) (8:00) VCR DISPLAY (7:30) DVD PLAY When one-touch timer recording is finished, the unit will turn off automatically. STOP 1 REC/OTR SETUP TIMER PROG. To cancel the one-touch timer recording within the specified time, press STOP C button.
E9501CD_EN/FR_v3.qx3 04.8.10 12:01 Page 96 VCR functions Search (cont’d) Time search VCR TIME SEARCH 2:50 This feature allows you to go to a specific point on a tape by entering the exact amount of time you wish to skip in order to reach the point. First: 2 POWER REC SPEED .
E9501CD_EN/FR_v3.qx3 04.8.10 12:01 Page 97 Others Before you start Troubleshooting Before requesting service for this unit, check the table below for a possible cause of the problem you are experiencing. Some simple checks or a minor adjustment on your part may eliminate the problem and restore proper operation. Symptom Remedy • Re-connect the connecting cord securely. • The connecting cords are damaged. • The Setup Display appears. Press SETUP or RETURN button to turn off the display.
E9501CD_EN/FR_v3.qx3 04.8.10 12:01 Page 98 Others Troubleshooting (cont’d) Symptom Playback The disc does not play. The disc does not start playback from the beginning. The unit starts playing from the disc automatically. Some functions such as Stop, Search, or Slow-motion Play cannot be performed. The language for the sound track cannot be changed. • No disc is inserted. • A blank disc is inserted. • No cassette tape is inserted. • The disc is upside down.
E9501CD_EN/FR_v3.qx3 04.8.10 12:01 Page 99 Others Symptom Remedy Remote control The remote control does not function. Connections • Batteries are weak. • There are obstacles between the remote control and the unit. • The remote control is far from the unit. • There are no batteries in the remote control. • Turn on the unit. • The remote control is not pointed at the remote sensor on the unit. • Press the DVD or VCR button, whichever you need. Then, try again.
E9501CD_EN/FR_v3.qx3 04.8.10 12:01 Page 100 Others Troubleshooting (cont’d) Error message Recording Error Disc is full. Cause Solution Insert the recordable disc with enough recording space. (No area for new recording) You are trying to record onto the disc which has no space for recording. Recording Error You cannot record more than 99 titles on one disc. (The maximum is 99) You are trying to record onto the disc on which the number of recording titles comes up to the maximum (99).
E9501CD_EN/FR_v3.qx3 04.8.
E9501CD_EN/FR_v3.qx3 04.8.10 12:01 Page 102 Others Glossary Analog audio An electrical signal that directly represents sound. Compare this to digital audio which can be an electrical signal, but is an indirect representation of sound. See also Digital audio. Aspect ratio The width of a TV screen relative to its height. Conventional TVs are 4:3 (in other words, the screen is almost square); widescreen models are 16:9 (the screen is almost twice as wide as it is high).
E9501CD_EN/FR_v3.qx3 04.8.16 10:48 Page 103 Others Before you start Specifications General System Connections VCR video heads Power requirements Power consumption Weight Dimensions (width x height x depth) Operating temperature Operating humidity TV format DVD-Video, DVD-R/RW, CD-DA, CD-R/RW, Video Cassette Tape Four heads AC120 V, 60 Hz 37 W (standby: 4.3 W) 9.5 lbs ( 4.
E9501CD_EN/FR_v3.qx3 04.8.10 12:50 Page 104 Français Enregistrement simple de DVD Ce qui suit permettra de comprendre facilement comment enregistrer sur des disques DVD. Remarque : Vérifier la présence de piles dans la télécommande et le raccordement correct de cet appareil et du téléviseur. Étape 1 : Choisir un type de disque Il y a plusieurs types de disques DVD enregistrables. Choisir un type de disque DVD enregistrable sur la base de ses propres besoins de lecture/enregistrement/montage.
E9501CD_EN/FR_v3.qx3 04.8.10 12:01 Page 105 Français Étape 4 : Sélectionner la chaîne souhaitée Étape 5 : Enregistrer sur des disques DVD Étape 6 : Arrêter l’enregistrement. PQRS TUV WXYZ 8 9 SPACE POWER REC SPEED AUDIO .
E9501CD_EN/FR_v3.qx3 04.8.10 12:01 Page 106 Français Lecture avec magnétoscope VCR 3 1 Pendant la lecture, appuyer sur la touche PAUSE F. L’appareil passera en pause et le son sera assourdi. Appuyer sur la touche POWER sur la télécommande ou sur le panneau avant de l’appareil. Pour lire une cassette, allumer le téléviseur et bien sélectionner l’entrée à laquelle l’appareil est raccordé. Appuyer sur : Appuyer sur la touche PLAY B pour reprendre la lecture.
E9501CD_EN/FR_v3.qx3 04.8.16 10:16 Page 107 Français Before you start Enregistrement avec magnétoscope Enregistrement D’abord: VCR Mode SP Mode SLP • Stéréo ou SAP est sélectionné : 6 WXYZ 8 9 1 7 VIDEO/TV SPACE SLOW 0 Appuyer sur la touche REC/OTR pour démarrer l’enregistrement. Pour temporairement arrêter l’enregistrement ou le reprendre, appuyer sur la touche PAUSE F.
E9501CD_EN/FR_v3.qx3 04.8.10 12:01 Page 108 FUNAI CORPORATION LIMITED WARRANTY FUNAI CORP. will repair this product, free of charge in CANADA in the event of defect in materials or workmanship as follows: DURATION: PARTS: LABOR: FUNAI CORP. will provide parts to replace defective parts without charge for one (1) year from the date of original retail purchase. Two (2) years for Picture Tube. Certain parts are excluded from this warranty. FUNAI CORP.