T5200 _VA 00.10.11 6:43 PM Page 1 OWNER’S MANUAL COLOR TV/VCR SC313B (13 inch) SC319B (19 inch) This Owner’s Manual is made of recycled paper. As an ENERGY STAR ® Partner, our company has determined that this product meets the ENERGY STAR ® guidelines for energy efficiency. ENERGY STAR ® is a U.S. registered mark. INSTRUCCIONES EN ESPAÑOL INCLUIDAS. If you need additional assistance for set-up or operating after reading owner’s manual, please call TOLL FREE : 1-800-242-7158.
T5200 _VA 00.10.11 6:43 PM Page 2 WARNING: TO REDUCE THE RISK OF FIRE OR ELECTRIC SHOCK, DO NOT EXPOSE THIS APPLIANCE TO RAIN OR MOISTURE. RISK OF ELECTRIC SHOCK DO NOT OPEN THIS SYMBOL INDICATES THAT DANGEROUS VOLTAGE CONSTITUTING A RISK OF ELECTRIC SHOCK IS PRESENT WITHIN THIS UNIT. CAUTION: TO REDUCE THE RISK OF ELECTRIC SHOCK, DO NOT REMOVE COVER (OR BACK). NO USER SERVICEABLE PARTS INSIDE. REFER SERVICING TO QUALIFIED SERVICE PERSONNEL.
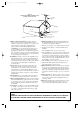
T5200 _VA 00.10.11 6:43 PM Page 3 F IGURE A EXAMPLE OF ANTENNA GROUNDING AS PER NATIONAL ELECT RICAL CODE ANTE NNA L EAD I N WI RE GROUND CLAMP A NTENNA DI SCHARG E UN I T (NEC SECTION 8 10 -2 0) EL ECT RI C SE RV I CE EQ U I PM EN T G RO UNDI NG CO NDUCT ORS (NEC SECTION 8 10 -2 1) G RO UND CL AM PS NEC - NATI O NAL EL ECTRI CAL CO DE POWER SERVI C E G RO UNDI NG EL EC TR O DE SYST EM (NEC ART 2 50 , PART H) S2 8 9 8 A 13.
T5200 _VA 00.10.11 6:43 PM Page 4 PRECAUTIONS LOCATION For safe operation and satisfactory performance of your TV/VCR, keep the following in mind when selecting a place for its installation: • Shield it from direct sunlight and keep it away from sources of intense heat. • Avoid dusty or humid places. • Avoid places with insufficient ventilation for proper heat dissipation. Do not block the ventilation holes at the top and bottom of the unit.
T5200 _VA 00.10.11 6:43 PM Page 5 TABLE OF CONTENTS C IMPORTANT SAFEGUARDS . . . . . . . . . . . . .2 C PRECAUTIONS . . . . . . . . . . . . . . . . . . . . . . . .4 LOCATION . . . . . . . . . . . . . . . . . . . . . . . . . . . .4 AVOID THE HAZARDS OF ELECTRICAL SHOCK AND FIRE . . . . . . . . . . . . . . . . . . . . . .4 WARNING . . . . . . . . . . . . . . . . . . . . . . . . . . . .4 C FEATURES . . . . . . . . . . . . . . . . . . . . . . . . . . . .6 C SUPPLIED ACCESSORIES . . . . . . . . . . . . . . .
T5200 _VA 00.10.11 6:43 PM Page 6 FEATURES • Infrared remote control • Bilingual on screen menu display selectable in • • Zero Return–The tape returns to counter of 0:00:00 by rewinding or fast forwarding. • Still–“Freeze” the picture at any time, for close English or Spanish Real time counter–This shows the elapsed record- ing or playback time in hours, minutes, and seconds. The “–” indication will appear when the tape is rewound further than the tape counter position “0:00:00”.
T5200 _VA 00.10.11 6:43 PM Page 7 OPERATING CONTROLS AND FUNCTIONS This manual covers 13" and 19". The operation of the two models are exactly the same except the appearance. 19" model is illustrated in this manual. NOTE: • We do not recommend the use of universal remote controls. Not all of the functions may be controlled with a universal remote control. If you decide to use a universal remote control with this unit, please be aware that the code number given may not operate this unit.
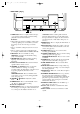
T5200 _VA 00.10.11 6:43 PM Page 8 - REAR VIEW - [Fig.3] ANT. 26 27 7 F.FWD button– Press to rapidly advance the tape, or to view the picture rapidly in forward during playback mode. (Forward Search) B button– • When setting program (for example: setting clock or timer program), press to determine your selection and proceed to the next step you want to input. • Press to determine setting modes from on screen menu. • Press to select a mode from a particular menu.
T5200 _VA 00.10.11 6:43 PM Page 9 PREPARATION FOR USE ANTENNA/CABLE CONNECTIONS Satellite Box or OUT Cable Box (Not supplied) From Cable System or Satellite Dish Rod Antenna (Supplied with 13” model only) IN VHF/UHF Antenna (Not supplied) VHF Antenna (Not supplied) From Cable System UHF Antenna (Not supplied) or ANT. VHF/UHF or Combiner or 75-ohm Coaxial Cable (Not supplied) (Not supplied) ANT.
T5200 _VA 00.10.11 6:43 PM Page 10 TO RECORD A SCRAMBLED/UNSCRAMBLED CHANNEL 1. Set the TV/VCR channel selector to the output channel of the Cable Converter Box or Satellite Box. (Ex. CH3) 2.Select the channel to record from your Cable Converter Box or Satellite Box. EXTERNAL INPUT MODE INSTALLING THE BATTERIES 1)Open the battery compartment cover by pressing the cover on the remote unit in the direction of the arrow.
T5200 _VA 00.10.11 6:43 PM Page 11 1 TO SELECT ADESIRED CHANNEL You can select the desires channel by using the CHANNEL K or L button on or directly pressing the number buttons on the remote control. Note for using the number buttons: • When selecting cable channels which are higher than 99, press the +100 button first, then, press the last tw odigts. (Example: to select channel 125, first press the +100 button then press “2” and “5”).
T5200 _VA 00.10.11 6:43 PM Page 12 1 NOTE: When unplugging the AC cord or if there is a power failure for more than 30 seconds, you may have to reset the clock. Select “SETTING CLOCK” Press the MENU button on the remote control. Press the PLAY/K or STOP/L button to point to “SETTING CLOCK”. Then, press the F.FWD/B button.
T5200 _VA 00.10.11 6:43 PM Page 13 1 2 2 Select “CHANNEL SET UP” Press the MENU button on the remote control. Press the PLAY/K or STOP/L button to point to “CHANNEL SET UP”. Then, press the F.FWD/B button. Select “ADD/DELETE CH” Press the PLAY/K or STOP/L button to point to “ADD/DELETE CH”. Press the F.FWD/B button. Select “ENGLISH” or “ESPAÑOL” Select “ENGLISH” or “ESPAÑOL”= Spanish using the F.FWD/B or REW/s button.
T5200 _VA 00.10.11 6:43 PM Page 14 TV OPERATION WATCHING A TV PROGRAM 1 PICTURE CONTROL Turn on the TV/VCR Press the POWER button to turn on the TV/VCR. 2 Select the channel number Press the CHANNEL K or L button to select your desired channel number or press the number buttons on the remote control. Remember: If the TV/VCR is connected to a cable box or satellite box, the TV/VCR must be on CH3 or CH4, then the channel to be viewed must be selected on the cable box or satellite box.
T5200 _VA 00.10.11 6:43 PM Page 15 TO CANCEL THE CLOSED CAPTION SYSTEM CLOSED CAPTION SYSTEM You can view specially labeled (cc) TV programs, movies, news, pre-recorded tapes with either a dialogue caption or text display. CAPTION mode: By choosing the caption mode, you can watch dramas, movies and news while captioning the dialogues and the contents of news. TEXT mode: By choosing the text mode, you can watch half screen text information if you want.
T5200 _VA 00.10.11 6:44 PM Page 16 3 4 Select your desired item Press the PLAY/K or STOP/L button to point to your desired item. Then, press the F.FWD/B button to select [BLOCK] or [VIEW]. • When you select the rating cate- B TV–Y TV–Y7 ( TV–G TV–PG ( TV–14 ( TV–MA ( ) ) ) ) MPAA RATING SET UP [VIEW] [VIEW] [VIEW] [VIEW] [VIEW] [VIEW] Make sure ... • TV/VCR power must be turned on. gory and turn it [BLOCK], the higher rating will turn [BLOCK] automatically.
T5200 _VA 00.10.11 6:44 PM Page 17 PLAYBACK This TV/VCR will operate with any cassette that has the mark. For best results, we recommend the use of high-quality tapes. Do not us poor quality or damaged tapes. INSERTING A CASSETTE AUTO REPEAT PLAYBACK Insert the cassette in the direction as shown. Push in gently, but continuously, on the center-back of the cassette until it is drawn into the TV/VCR. The TV/VCR will automatically turn on.
T5200 _VA 00.10.11 6:44 PM Page 18 SEARCH PICTURE SEARCH This feature is very useful in finding or skipping over a particular scene on a tape. In this mode, the sound will be muted. 1)You may view a video tape at a high speed in either a forward or reverse direction by pressing the F.FWD or REW button. (in the SP / LP / SLP modes) 2)Press it again and the TV/VCR will now search in super high speed.
T5200 _VA 00.10.11 6:44 PM Page 19 NOISE CANCEL (in the Still mode) RENTAL PLAYBACK This feature allows you to reposition or reduce the noise lines of a still picture.Press the PAUSE/STILL button so that the noise lines change position on the screen so you can see the picture in its entirety without distracting noise lines. NOTE: This feature can be activated ONLY when viewing a tape recorded in the SLP mode.
T5200 _VA 00.10.11 6:44 PM Page 20 Make sure ... • TV/VCR power must be turned on. • Insert a cassette tape with its erase prevention tab in place. (If necessary, rewind or fast forward the tape to the point at which you want to begin recording.) NOTE: This unit will ONLY record and view the same channel. NORMAL RECORDING OTR (One Touch Recording) You can ONLY watch the same TV program that is being recorded.
T5200 _VA 00.10.11 6:44 PM Page 21 3 Begin OTR Avoid over lap of programs ... There is a chance that a program will not be recorded. when programs overlap; • The program with an earlier start has priority. • Once the earliest program finishes, the overlapping programs will begin recording in sequence. OTR(2 : 30) Press the REC/OTR button on the TV/VCR as many times as needed. The recording length will be determined by the number of times you press the REC/OTR button.
T5200 _VA 00.10.11 6:44 PM Page 22 Press the PLAY/K (up) button until the desired date appears. (Example: “7/06” for July 6th). Then, press the F.FWD/B button. 10 For every day recording : To record a TV program at the same time on the same channel every day. (Example: Monday through Sunday) – TIMER PROGRAMMING – Press the STOP/L (down) button until “EVRY DAY” appears. Then, press the F.FWD/B button.
T5200 _VA 00.10.11 6:44 PM Page 23 TO CANCEL AN AUTOMATIC TIMER RECORDING 2 • After setting a program; • 1)Press the POWER button. 2)Repeat steps [1] ~ [2] on page 21 and select a program you want to cancel. 3)Press the T-PROG. CLEAR button. 4)Press the MENU button on the remote control to return to TV mode. While recording is in progress; 1)Press POWER button. 2)Press the STOP/EJECT button on the TV/VCR. TO CHECK THE BEGIN/END TIME 1)Press the POWER button so that the REC indicator goes off.
T5200 _VA 00.10.11 6:44 PM Page 24 3 1 Set wake up time Press the PLAY/K or STOP/L button until to point to “TIME”. Press the F.FWD/B or REW/s button until your desired wake up time appears. Each additional push will increase (or decrease) the time by 10 minutes. WAKE UP TIMER ON/OFF TV/TAPE B TIME Select “SLEEP TIMER” Press the WAKE UP/SLEEP button on the remote control until “SLEEP TIMER” appears.
T5200 _VA 00.10.11 6:44 PM Page 25 ON SCREEN DISPLAY To check the Counter, Clock and Channel number on the TV screen, press the DISPLAY button on the remote control. Each time you press the DISPLAY button on the remote control, the TV screen will change as follows: WHEN THE CLOSED CAPTION MODE IS OFF: • Counter mode: After 5 seconds, only • the counter remains. To clear it, press the DISPLAY button. Clock mode: After 5 seconds, only the clock and the channel number remain.
T5200 _VA 00.10.11 6:44 PM Page 26 TROUBLESHOOTING GUIDE If you have followed the instructions contained in this manual and have difficulty in operating your TV/VCR, locate the PROBLEM in the left column below. Check the corresponding CORRECTIVE ACTION column to remedy the problem. PROBLEM No power. No picture and sound. No picture or poor picture on TV/VCR. No sound or poor sound. Timer recording is not possible. Cannot go into Record mode. Playback picture is partially noisy.
T5200 _VA 00.10.11 6:44 PM Page 27 SPECIFICATIONS GENERAL SPECIFICATIONS ELECTRICAL SPECIFICATIONS CRT : Video input level : Audio input level : Video S/N ratio : Audio S/N ratio : 13 or 19 inch in-line gun, 90˚ deflection tube Television system : NTSC-M Closed caption system :§15.119/FCC Video Heads : Rotary two-head Tape width : 1/2 inch Tape speed SP : 33.40mm/sec. LP : 16.67mm/sec. SLP : 11.12mm/sec.
T5200ESVA 00.10.11 6:45 PM Page 28 CONTROLES DE OPERACIÓN Y SUS FUNCIONES Este manual sirve para los modelos de 13" y 19". A excepción de la apariencia, la operación de los dos modelos es exactamente la misma. En este manual se muestra el modelo de 19". NOTA: No recomendamos utilizar mandos a distancia universales. No todas las funciones pueden ser controladas mediante un mando a distancia universal.
T5200ESVA 00.10.11 6:45 PM Page 29 8 9 10 11 12 13 14 15 16 17 18 19 ticular. (Por ejemplo: IDIOMA o ADJUST DE USER) Botón de grabación (REC)– Púlselo para iniciar la grabación manual. Botón de grabación de un toque (OTR)– Activa la grabación de un toque. (Sólo en el televisor/videograbadora) Indicador de grabación (RECORD)– Parpadea durante la grabación. Se enciende en el modo de espera de la grabación con temporizador.
T5200ESVA 00.10.11 6:45 PM Page 30 CONEXIONES DE ANTENA/CABLE Caja de CATV o caja de emisiones vía satélite (no incluído) OUT Desde el cable coaxil o caja de emisiones vía satélite de 75 ohm del sistema de Cable Antena de varilla UHF/VHF (incluído para solamente 13”) IN Antena combinada de VHF/UHF (no incluído) Antena VHF (no incluído) Desde el sistema de Cable Antena UHF (no incluído) ANT. Combinador de VHF/UHF (no incluído) Cable coaxil de 75 ohm (no incluído) ANT.
T5200ESVA 00.10.11 6:45 PM Page 31 PREPARACIÓN DE CANALES POR PRIMERA VEZ AJUSTE DEL RELOJ 1) Enchufe el cable de alimentación del televisor/videograbadora en una toma de CA estándar. NOTA: Si aparezcan algunos digitos en el rincón de la pantalla, pulse el botón POWER sin desenchufar el cable de alimentación. 2) Pulse el botón POWER para encender el televisor/videograbadora. 3) Seleccione “ENGLISH” o “ESPAÑOL” utilizando el botón F.FWD/B o REW/s. “[ ]” indica el idioma seleccionado.
T5200BCV.QX33 00.10.12 11:50 AM Page 32 FUNAI CORPORATION LIMITED WARRANTY FUNAI CORP. will repair this product, free of charge in the USA in the event of defect in materials or workmanship as follows: DURATION: PARTS: FUNAI CORP. will provide parts to replace defective parts without charge for one (1) year from the date of original retail purchase. Two (2) years for Picture Tube. Certain parts are excluded from this warranty. LABOR: FUNAI CORP.