
Installation Guide


You will need the following Tools:
Level – at least 4 Ft. Long
Mallet or Hammer
Hacksaw
Tape
Measure
Paper Towels
Glass Cleaner
Phillips &
Straight Blade
Screwdriver
Caulking Gun &
Good Grade of
Clear Silicone
Sealant
Screw-Gun with #2 Tip
(Note Longer Tip
Eliminates Scratching
When Installing Hinges)
Drill with 3/16” Tile Bits
Or Check with your
Hardware Store For
Appropriate Bit for Your
Wall Type
Wood Shims
Available at Most
Hardware Stores
Razor Knife
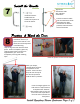
Congratulations on your purchase of a new Symphony Shower Enclosure! These instructions will guide you
thru the safe installation of your new enclosure. Please handle the glass panels carefully as tempered glass
is difficult to break but is vulnerable if the edges, especially the corners, strike a hard object. And remember
the most important safety rule – Always Wear Your Safety Glasses. These instructions will depict a door
hinged off the left wall. A protective coating of Enduro-Shield™ has been applied to both sides of the glass.
The label implies the coating is only on one side – please disregard.
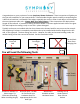
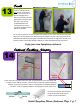
Typically enclosures are installed with the door closest to the shower head for easy access to the controls.
Your Symphony Enclosure is completely reversible and may be installed with the door hinged on the left
wall, or the right wall. The door swings out and in. However, for safety and to meet building codes, the
outward swing of the door cannot be blocked. See the illustration below.
Do Not Block
Door From
Swinging Out
Hinge
From Left
Wall
Hinge
From Right
Wall