
Owner's manual


SYNERGY MFG. 870 INDUSTRIAL WAY, SAN LUIS OBISPO, CA (805) 242-0397
PPM-5011 JK FRONT COIL OVER/AIR BUMP STOP
BRACKET KIT INSTALLATION
Version 1
GENERAL NOTES:
• These instructions are also available on our website; www.synergymfg.com Check
the website before you begin for any updated instructions and additional photos
for your reference.
• We recommend that you use a 2” x 12” travel coil over shock. This will give you
an effective 4” tall bump stop spacer. 14” travel shocks can be used but you will
loose 2” of up travel.
• We recommend that you use some sort of secondary suspension bumpstop. A
foam bumpstop can be add to the shock shaft for a simple installation or you can
upgrade to the Synergy Suspension air bump mounting kit that works in
conjunction with these brackets. You can use most 2” air bumps or use the
budget bump kit with your stock foam bump stops and mounting cups. You can
easily add air bumps at a later time.
• The installation of this bracket requires the complete removal of the stock shock
and coil mounts on the frame and axle. A plasma cutter or oxy-acetylene torch
works but you can also use a sawz-all and cut off wheel. The new bracket must
be welded to the frame and axle tube. An experienced fabricator/welder is
recommended to properly install this bracket.
1. Support frame of the vehicle on jack stands and remove the tires/wheels and shocks
and coils. Leave the suspension components connected so you can cycle the
suspension up and down.
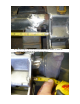
2. Cut the stock shock brackets from the frame. Be careful of the brake lines and any
other components that are directly behind the shock and coil brackets.
a) Cut the rear and top of the shock mount.