
Manual


SYNERGY MFG. 870 INDUSTRIAL WAY, SAN LUIS OBISPO, CA (805) 242-0397
PPM-8012-14 JK WELD ON HD FRONT LOWER
CONTROL ARM BRACKETS, STOCK TUBE
Version 1
GENERAL NOTES:
• These instructions are also available on our website; www.synergymfg.com.
Check the website before you begin for any updated instructions and additional
photos for your reference.
• These heavy duty lower control arm brackets are meant to replace the original
brackets on the stock axle tube
• The installation of this bracket requires the complete removal of the stock lower
control arm bracket with a sawz-all and cut off wheel or plasma cutter or oxy-
acetylene torch. The new brackets must be welded to the axle tube. An
experienced fabricator/welder is recommended to properly install this bracket.
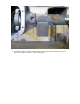
• It is recommended to completely remove the front axle from the vehicle. You can
install these on the vehicle but it is much more difficult.
1. Remove the lower control arms.
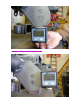
2. Completely remove the factory control arm brackets and grind smooth.
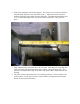
3. Break the lower control arm brackets apart. There is a different left and right bracket.
When you position them to the axle tube, they should angle out so the control arms
are wider at the frame then on the axle. Once you determine which the right and left,
position them on the axle tube.
4. Start with the driver side bracket. Position the bracket as shown, with the inner edge
against the cast diff housing.