
User's Manual


Synology DiskStation User's Guide
Based on DSM 3.0
104 Chapter 10: Host Websites, Email Server, and Print Server
More Information
Install Featured Applications
After you have finished setting up your web environment, you can install applications to enhance the
features of your website using many of the free Open Source applications.
For a list of featured applications tested to be compatible with Synology DiskStation, visit
http://www.synology.com/support/faq_show.php?q_id=404. For the download links and installation
instructions of those applications, visit their official websites.
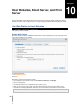
Modify HTTP Service Options
Click the HTTP Service Options tab at Control Panel > Web Services. In addition to the default port number 80,
you can add another port for the use of Photo Station and Web Station.
To configure HTTPS:
1 Click Configure HTTPS.
2 See "Modify HTTP Service Options" on Page 54 for more information.
To add an additional HTTP port:
1 Tick Add additional HTTP port.
2 Enter any port number between 1 and 65535 in the Enter the port number field.
3 Click OK.
Important: You cannot use the following port numbers for HTTP access, because they are reserved for system use.
Port number: 20, 21, 22, 23, 25, 110, 137, 138, 139, 143, 199, 443, 445, 515, 543, 548, 587, 873, 993, 995, 3306,
3689, 5335, 5432, 8080, 8081, 9997, 9998, 9999, 50001, 50002
FTP port range: 55536-55663
BitTorrent port range: 6881-6890
Surveillance Station port range: 55736-55863
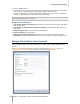
Manage WebDAV
Click the WebDAV tab at Main Menu > Control Panel > Web Services to enable WebDAV. By enabling
WebDAV, you can manage and edit files on DiskStation remotely.