
User's Manual


Synology DiskStation User's Guide
Based on DSM 3.0
105 Chapter 10: Host Websites, Email Server, and Print Server
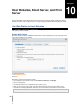
To enable WebDAV:
For HTTP connection:
a Tick the Enable WebDAV checkbox. The default port number for the WebDAV service is 5005.
b Click OK.
For HTTPS connection:
a Tick the Enable WebDAV HTTPS connection checkbox. The default port number for WebDAV HTTPS is
5006.
b Click OK.
Use WebDAV to Manage Files in Different Environments
You can use WebDAV to manage files in different environments. You can set it up as a network drive on your
operating system, or access it via a browser or on a smartphone.
When using WebDAV service, we suggest you use UTF-8-supported WebDAV clients to manage your files. This
can prevent the file names from becoming unreadable characters after uploading.
To use WebDAV on Windows XP/Vista:
1 Right-click on My Computer and select Map Network Drive.
2 Click Connect to a Web site that you can use to store your documents and pictures.
3 Click Next.
4 Click Next.
5 Enter the path for the network drive. The path should include the IP or the DDNS of your DiskStation and the
port number. An example would be http://demo.no-ip.info:5005/.
6 Click Next.
7 Enter your account and password. Click OK.
8 Name this network drive. Click Next.
9 Click Finish to finish the settings.
Note:
Before you start using a WebDAV client software under Windows environment, please check if you have installed
Windows patch Web Folders (KB907306).
When using WebDAV service under Windows environment, if you want to switch to another user account, you
need to log out of Windows system first.
To use WebDAV on Windows 7:
For Windows 7 users, you need to have a client software to use WebDAV. A software like this would be Netdrive.
You can also find other client software on the Internet.
Note: Before you start using WebDAV client software under Windows environment, please check if you have
installed Windows patch Web Folders (KB907306).
To use WebDAV on Mac:
1 Choose Go > Connect to Server from the menu bar.
2 Enter the Address field. The address should include the IP or the DDNS of your DiskStation and the port
number. An example would be http://demo.no-ip.info:5005/.
3 Enter your user name and password.
4 Click Connect.
Note: WebDAV supports Bonjour broadcast.
To use WebDAV on Ubuntu:
1 Click Places > Connect to server.
2 Select WebDAV (HTTP) or WebDAV (HTTPS) from the drop-down menu.