
User's Manual


Synology DiskStation User's Guide
Based on DSM 3.0
108 Chapter 10: Host Websites, Email Server, and Print Server
Note:
You cannot log in to the webmail with a user name that is not in English or without a password.
For more information about using the webmail, see Mail Station User's Guide from Synology's Download Center
at: http://www.synology.com/support/download.php
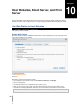
Set Synology DiskStation as the Print Server
Synology DiskStation can become the print server over your local area network by connecting up to 2 USB
printers to your Synology DiskStation.
Set Up the USB Printer
You need to use Synology Assistant to set up your USB printer.
To set up the USB printer:
1 Connect the printer to the USB port of your Synology DiskStation.
2 Open Synology Assistant on your computer.
3 Follow the wizard to complete the setup.
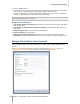
Manage the USB Printer
Go to Main Menu > Control Panel > External Devices to manage the printers.
To eject a USB printer:
1 Disconnect the printer from the USB port of your Synology DiskStation.
2 Click Eject.
To clean up the printer spool space:
Click Clean to cancel the printing jobs for all printers.
Note: For more information about accessing the printer from different platforms, click the Help button (with a question
mark) at the top-right corner.