
User's Manual


Synology DiskStation User's Guide
Based on DSM 3.0
143 Chapter 14: Safeguard Your Environment with Surveillance Station
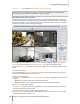
Configure Layout
The administrator can configure layout setting using Internet Explorer. To customize how the live view will be
displayed, click on Configure and follow the steps below:
1 Add a new layout or click on an existing layout to edit.
2 Enter a layout name.
3 Select the corresponding E-Map. If you select None, the E-Map button will be disabled.
Note: For more information about E-map, see "Use E-Map" on Page 149.
4 Select a type of layout. If you have selected sequential layout, You can adjust the speed of camera rotation at
the Interval drop-down menu.
5 Drag cameras from the camera list to the preferred layout position, or drag cameras back to the camera list to
remove them from the layout.
6 If you have added clients in Centralized Management, you can add cameras from your local DiskStation or
from other sources by selecting options from Server.
7 To see a snapshot of the current layout, click Preview. If you would like to set the current layout as the default
page when you enter live view, check Set as default. Finally, click Save.
8 To delete an unwanted layout, select from the layout list and click Delete.
9 Click Close when finished.
Use PTZ Control
If your camera has PTZ (pan/tilt/zoom) support, you can select a camera and use the Controller panel to adjust
the camera's direction. Clicking on the home button will restore the camera back to its original position. If you
have selected a camera with partial PTZ support, the unsupported functions on the Controller panel will be
grayed out.