
User's Manual


Synology DiskStation User's Guide
Based on DSM 3.0
144 Chapter 14: Safeguard Your Environment with Surveillance Station
Note:
1 Depending on the performance of your video card, the live view may not display if the video resolution exceeds the
supported range. Changing the Video Output Module from DirectX to OpenGL at System > Advanced under
Management can sometimes solve the problem.
2 To watch live view of Surveillance Station via internet, please make sure that you have set up proper port
forwarding for MPEG4 streaming ports on your NAS server. Refer to System > Advanced under Management for
the range of MPEG4 streaming ports.
3 Audio output requires the following audio format: G.711, G.726, AAC, and PCM.
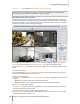
Use Other Functions
On the Live View page, you can also use the following functions:
To digitally zoom in and out, drag the zoom bar or place the mouse over the live view of a selected camera
and then scroll the mouse. You can also zoom digitally by using the scroll button on your mouse, and move by
dragging the picture.
To adjust volume, drag the volume bar.
To see the corresponding preset or patrol, click on the Preset Position or Patrol list.
To save the current image, click on the Snapshot button.
To start manual recording, click on the Manual Recording button.
To see the corresponding E-Map, click the E-Map button.
To see the live view in full screen mode, click the Full Screen button.
Click on Show information, and the status for each camera will be displayed on the corner of each live view
window.
Note: Non-Internet Explorer browsers support limited functions only.
Record and Manage Events
Under the Management tab, you can go to Event > Event List to browse all recorded events, play them with the
Event Player
1
, and delete or download the video files.
About Events
All recorded events will be here. The events are displayed with the latest ones on top. The images displayed
under Mode correspond with the type of recording the event was filmed under.
The gray icon represents Continuous Recording
The blue icon represents Manual Recording
The green icon represents Motion Detection Recording
The orange icon represents Alarm Recording