
User`s guide
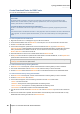
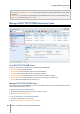
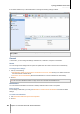
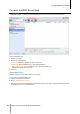
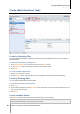
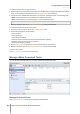
Table Of Contents
- Synology DiskStation User's Guide Based on DSM 4.0
- Chapter 1: Introduction
- Chapter 2: Get Started with Synology DiskStation Manager
- Chapter 3: Modify System Settings
- Chapter 4: Manage Storage Space
- What is Volume and Disk Group?
- Manage Volumes or Disk Groups with Storage Manager
- Manage iSCSI Target with Storage Manager
- Manage iSCSI LUNs with Storage Manager
- Manage Hard Disks with Storage Manager
- Manage External Disks
- Chapter 5: Access your DiskStation from the Internet
- Chapter 6: Enhance Internet Security
- Chapter 7: Set Up File Sharing
- Chapter 8: Access Files from Anywhere
- Access Files within the Intranet
- Access Files via FTP
- Access Files via WebDAV
- Sync Files via Cloud Station
- Access Files via File Station
- File Station Appearance
- Manage File Station Options
- Search for Files or Folders
- Set File Station in Action
- Download Files or Folders from Synology DiskStation
- Upload Files or Folders to Synology DiskStation
- Copy or Move Files or Folders on Synology DiskStation
- Rename a File or Folder on Synology DiskStation
- Create a Folder
- Delete Files or Folders
- Extract an Archive
- Compress Files or Folders
- Open a File in a New Window
- Create My Favorites or Desktop Shortcuts
- Edit the Properties of Files and Subfolders
- Share File Links
- Mount Remote Folders or Virtual Drives
- Edit Music Information
- View Documents, Photos, or Videos
- Edit Photos
- Chapter 9: Back Up Data
- Chapter 10: Host Websites, Email Server, and Print Server
- Install Featured Applications
- Chapter 11: Discover Various Applications with Package Center
- Chapter 12: Share Photos, Videos, and Blogs with Photo Station
- Chapter 13: Play Music with Audio Station
- Chapter 14: Download Files with Download Station
- Chapter 15: Safeguard Your Environment with Surveillance Station
- Chapter 16: Manage Media Server and iTunes Service
- Chapter 17: Perform Advanced Management Tasks
- Check System Information
- Monitor System Resources
- Update DSM
- Receive Event Notifications
- Access Applications with Independent Login
- Index Multimedia Files for Applications
- Reset admin's Password
- Restore Synology DiskStation to Factory Defaults
- Reinstall Synology DiskStation
- Enable SNMP Service
- Enable Terminal Services
- Chapter 18: Communicate with Mobile Devices

Synology DiskStation User's Guide
Based on DSM 4.0
125 Chapter 14: Download Files with Download Station
To enable desktop notification:
1 Tick Display desktop notification upon task completion.
2 Click OK.
Protocol Obfuscation
When this function is enabled, the server will accept incoming connections that is using protocol obfuscation.
Administrators can also choose to use obfuscation for outgoing connections or only accept obfuscated
connections.
Connection
In this section, you can set up connection for eMule downloads.
Port
By default, the eMule TCP port is 4662 and the UDP port is 4672. It can also be set from 1 to 65535.
Note: The TCP port should exclude the following ports:
Port Number: 20, 21, 22, 23, 25, 80, 110, 137, 138, 139, 143, 199, 443, 445, 515, 543, 548, 587, 873, 993, 995,
3306, 3689, 5000, 5001, 5005, 5006, 5335, 5432, 6881, 8080, 7000, 7001, 8081, 9997, 9998, 9999, 50001, 50002
FTP default port range: The actual range may vary depending on different models.
Connection
When this function is enabled, the server will limit the maximum TCP/IP and UDP connections. A connection will
be established only when there are tasks in progress such as: data transferring, file searching or source
exchanging.
Note: The max. connections should be between 100 and 500. A large number of max. connections will consume
more system resources and a small number of min. connections will lower the overall downloading performance.
Location
In this section, you can set the default destination folder for eMule, and share your files on the ED2K network.
To set the download destination folder for eMule:
1 Click Select and choose a folder.
2 Click Select.
3 Click OK.
To specify folders you want to share with other eMule clients:
1 Click Select and choose a folder.
2 Click Select.
3 Click OK.
Bandwidth
In this section, you can set upload and download rates and download schedule to limit download and upload
bandwidths.
To set upload and download rates:
Enter the maximum upload and download rate for eMule downloads and uploads. ("0" means unlimited.)
To set the download schedule:
Like BT/HTTP/FTP/NZB’s download schedule, eMule’s download schedule is set up in the same manner. See
"Download Schedule" on Page 116 for more information.