Synology DiskStation DS2015xs Quick Installation Guide
Table of Contents Chapter 1: Before You Start Package Contents Synology DiskStation at a Glance Safety Instructions 3 4 5 Chapter 2: Hardware Setup Tools and Parts for Drive Installation Install Drives Start Up Your DiskStation Add a RAM Module on DiskStation Replace System Fan 6 6 9 10 12 Chapter 3: Install DSM on DiskStation Install DSM with Web Assistant Learn More Appedix A: Specifications Appedix B: LED Indicator Table Synology_QIG_DS2015xs_20140922 2 15 15
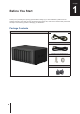
1 Chapter Before You Start Thank you for purchasing this Synology product! Before setting up your new DiskStation, please check the package contents to verify that you have received the items below. Also, make sure to read the safety instructions carefully to avoid harming yourself or damaging your DiskStation. Package Contents Main unit x 1 AC power cord x 1 RJ-45 LAN cable x 2 Screws for 2.
Synology DiskStation at a Glance 1 4 No. Article Name Location 1 Status Indicator Displays the status of the system. For more information, see "Appendix B: LED Indicator Table". 2 Alert Indicator Displays warnings regarding fan or temperature. For more information, see "Appendix B: LED Indicator Table". 3 Power Button 1. Press to power on the DiskStation. 2. To power off the DiskStation, press and hold until you hear a beep sound and the Power LED starts blinking.
Safety Instructions Keep away from direct sunlight and away from chemicals. Make sure the environment does not experience abrupt changes in temperature or humidity. Place the product right side up at all times. Do not place near any liquids. Before cleaning, unplug the power cord. Wipe with damp paper towels. Do not use chemical or aerosol cleaners. To prevent the unit from falling over, do not place on carts or any unstable surfaces. The power cord must plug in to the correct supply voltage.
2 Chapter Hardware Setup Tools and Parts for Drive Installation • A screwdriver (only for 2.5" drives) • At least one 3.5” or 2.5” SATA drive (please visit www.synology.com for compatible drive models.) Warning: If you install a drive that contains data, the system will format the drive and erase all existing data. Please back up any important data before installation. Install Drives 1 Press the lower part of the hard drive tray to pop out the handle.
3 Load drives in the drive trays. • For 3.5” drives: Remove the fastening panels from the sides of the drive tray. Place the drive in the drive tray. Then insert the fastening panels to secure the drive in place. • For 2.5” drives: Remove the fastening panels from the sides of the drive tray and store them in a safe place. Place the drive in the blue area (shown below) of the drive tray. Turn the tray upside down and tighten the screws to secure the drive in place.
4 Insert the loaded hard drive tray into the empty hard drive bay. Note: Make sure the tray is pushed in all the way. Otherwise, the drive might not be able to function properly. 5 Press the handle in flush with the front panel to hold the hard drive tray in place. 6 Insert the hard drive tray key into the hard drive tray lock, turn the key clockwise (to the "I" position) to lock the handle of the hard drive tray, and then remove the key.
Start Up Your DiskStation 1 Use the LAN cable to connect the DiskStation to your switch, router or hub. 2 Connect one end of the AC power cord to the power port of the DiskStation, and the other to the power outlet. 3 Press the power button. Congratulations! Your DiskStation is now online and detectable from a network computer.
Add a RAM Module on DiskStation The optional Synology DDR3 RAM module is designed for DiskStation memory expansion. Follow the steps below to install, check, or remove a RAM module on your DiskStation. To install the RAM module: 1 Shut down your DiskStation. Disconnect all cables connected to your DiskStation to prevent any possible damages. 2 Remove the 6 screws that secure the top case. Lift off the case and place it to the side.
To make sure DiskStation recognizes the new memory capacity: 1 Install DiskStation Manager (DSM). (See the next chapter for more information.) 2 Log in to DSM as admin or a user belonging to the administrators group. 3 Check Total Physical Memory in Control Panel > Info Center. If your DiskStation does not recognize the memory or does not start up successfully, confirm that the memory is installed correctly.
Replace System Fan Your DiskStation will play beep sounds if either of the system fans is not working. Follow the steps below to replace the malfunctioning fan with a good one. To replace the system fan: 1 Shut down your DiskStation. Disconnect all cables connected to your DiskStation to prevent any possible damages. 2 Fans are numbered as follows: 3 Remove the 4 screws that secure the fan panel.
4 Remove the malfunctioning fan: a Pull the fan panel from your DiskStation. b Disconnect the 2 fan cables from the connectors located near the bottom of the fan socket, and then remove the fan panel. c Remove the 4 screws that secure the malfunctioning fan, and then remove the fan.
5 Install the new fan: a Replace the malfunctioning fan with a good one (with the fan cable within the fan pointing at the bottom-right corner), and then tighten the 4 screws to secure the new fan. b Connect the 2 fan cables to the connectors located near the bottom of the fan socket, and then replace the fan panel. 6 Replace and tighten the 4 screws you removed in step 2. 7 Reconnect the cables you removed in step 1, and then press and hold the power button to turn on your DiskStation.
3 Chapter Install DSM on DiskStation After hardware setup is finished, please install DiskStation Manager (DSM) – Synology’s browser-based operating system – on your DiskStation. Install DSM with Web Assistant Your DiskStation comes with a built-in tool called Web Assistant that helps you download the latest version of DSM from the Internet and install it on your DiskStation. To use Web Assistant, please follow the steps below. 1 Power on the DiskStation.
A Appendix Specifications Item DS2015xs Internal Drives 3.5" or 2.5" SATA (III) x 8 Max. Capacity 48 TB (8 x 6 TB hard drives) External Device Ports USB 3.0 x 2 LAN Ports • 10GbE (SFP+) x 2 • 1GbE (RJ-45) x 2 Size (H x W x D) (mm) 157 x 340 x 233 Weight (kg) 5.31 Supported Clients • Mac OS X 10.5 onward • Windows XP onward • Ubuntu 9.
B Appendix LED Indicator Table LED Indicator Color Status Description Green Static Volume normal Volume degraded or crashed STATUS Orange Blinking Volume not created DSM not installed Off ALERT Power Orange HDD hibernation Blinking Off Blue System normal Static Powered on Blinking Booting up or shutting down Off Front LAN Green Powered off Static Network connected Blinking Network active Off Rear 1GbE LAN (on upper side of jack) No network Green Static Gigabit connection Ora
SYNOLOGY, INC. END USER LICENSE AGREEMENT IMPORTANT–READ CAREFULLY: THIS END USER LICENSE AGREEMENT ("EULA") IS A LEGAL AGREEMENT BETWEEN YOU (EITHER AN INDIVIDUAL OR A SINGLE ENTITY) AND SYNOLOGY, INC. AND ITS AFFILIATES, INCLUDING SYNOLOGY AMERICAN CORP AND SYNOLOGY UK LTD., (COLLECTIVELY, "SYNOLOGY") FOR ANY SYNOLOGY SOFTWARE, TOGETHER WITH ANY OTHER ASSOCIATED FIRMWARE, MEDIA, PRINTED MATERIALS AND "ONLINE" OR ELECTRONIC DOCUMENTATION (COLLECTIVELY, THE "SOFTWARE") AVAILABLE FOR DOWNLOAD AT WWW.
INABILITY TO USE THE SOFTWARE OR OTHERWISE UNDER OR IN CONNECTION WITH THIS EULA OR THE SOFTWARE, WHETHER BASED ON CONTRACT, TORT (INCLUDING NEGLIGENCE), STRICT LIABILITY OR OTHER THEORY EVEN IF SYNOLOGY HAS BEEN ADVISED OF THE POSSIBILITY OF SUCH DAMAGES. Section 13. Limitation of Liability.
SYNOLOGY, INC. LIMITED PRODUCT WARRANTY THIS LIMITED WARRANTY ("WARRANTY") APPLIES TO THE PRODUCTS (AS DEFINED BELOW) OF SYNOLOGY, INC. AND ITS AFFILIATES, INCLUDING SYNOLOGY AMERICA CORP, (COLLECTIVELY, "SYNOLOGY"). YOU ACCEPT AND AGREE TO BE BOUND BY THE TERMS OF THIS WARRANTY BY OPENING THE PACKAGE CONTAINING AND/OR USING THE PRODUCT. IF YOU DO NOT AGREE TO THE TERMS OF THIS WARRANTY, DO NOT USE THE PRODUCT.
Products may be available from Synology upon written request. 2.6 Exclusions.
between Customer and Synology. The arbitration, or any portion of it, will not be consolidated with any other arbitration and will not be conducted on a class-wide or class action basis. The arbitration shall be held in King County, Washington, U.S.A. by submission of documents, by telephone, online or in person as determined by the arbitrator at the request of the parties.