Synology DiskStation DS218 Hardware Installation Guide
Table of Contents Chapter 1: Before You Start Synology DiskStation at a Glance Safety Instructions 4 5 Chapter 2: Hardware Setup Tools and Parts for Drive Installation Install Drives Start Up Your DiskStation 6 6 9 Chapter 3: Install DSM on DiskStation Install DSM with Web Assistant Learn More Appendix A: Specifications Appendix B: LED Indicator Table Synology_HIG_DS218_20170823 2 10 10
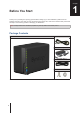
1 Chapter Before You Start Thank you for purchasing this Synology product! Before setting up your new DiskStation, please check the package contents to verify that you have received the items below. Also, make sure to read the safety instructions carefully to avoid harming yourself or damaging your DiskStation. Note: All images below are for illustrative purposes only, and may differ from the actual product.
Synology DiskStation at a Glance 4 No. Article Name Location Description 1 Status Indicator 2 LAN Indicator Displays the status of the network connection. For more information, see "Appendix B: LED Indicator Table". 3 Disk Indicator Displays the status of the installed drives. For more information, see "Appendix B: LED Indicator Table". 4 USB 2.0 Port 5 Copy Button Lights up when you connect a USB device (e.g. digital camera, USB storage device, etc.).
Safety Instructions Keep away from direct sunlight and away from chemicals. Make sure the environment does not experience abrupt changes in temperature or humidity. Place the product right side up at all times. Do not place near any liquids. Before cleaning, unplug the power cord. Wipe with damp paper towels. Do not use chemical or aerosol cleaners. To prevent the unit from falling over, do not place on carts or any unstable surfaces. The power cord must plug in to the correct supply voltage.
2 Chapter Hardware Setup Tools and Parts for Drive Installation • A screwdriver (only for 2.5” drives) • At least one 3.5” or 2.5” SATA drive (please visit www.synology.com for compatible drive models) Warning: If you install a drive that contains data, the system will format the drive and erase all existing data. Please back up any important data before installation. Install Drives 1 Remove the drive bay cover from the front panel.
3 Load drives in the drive trays. • For 3.5” drives: Remove the fastening panels from the sides of the drive tray. Place the drive in the drive tray. Then insert the fastening panels to secure the drive in place. • For 2.5” drives: Remove the fastening panels from the sides of the drive tray and put them in a safe place. Place the drive in the blue area (shown below) of the drive tray, turn the tray upside down, and then tighten the screws provided to secure the drive.
6 Drives are numbered as shown below. 7 Replace the hard drive bay cover to finish the installation. Note: If you want to create a RAID volume, we recommend that all installed drives are of the same size to make the best use of drive capacity.
Start Up Your DiskStation 1 Use the LAN cable to connect the DiskStation to your switch, router, or hub. 2 Connect the AC adapter to the power port of the DiskStation. Connect one end of the AC power cord to the AC power adapter, and the other to the power outlet. 3 Press the power button to turn on your DiskStation. Your DiskStation is now online and detectable from a network computer.
3 Chapter Install DSM on DiskStation After hardware setup is finished, please install DiskStation Manager (DSM) – Synology’s browser-based operating system – on your DiskStation. Install DSM with Web Assistant Your DiskStation comes with a built-in tool called Web Assistant that helps you download the latest version of DSM from the Internet and install it on your DiskStation. To use Web Assistant, please follow the steps below. 1 Power on the DiskStation.
A Appendix Specifications Item DS218 Compatible Drive Type 3.5" / 2.5" SATA x 2 Maximum Internal Raw Capacity 20TB (2 x 10TB hard drives) External Ports USB 3.0 x 2, USB 2.0 x 1 LAN Port 1GbE (RJ-45) x 1 Size (H x W x D) (mm) 165 x 108 x 233.2 Weight (kg) 1.30 Supported Clients File Systems Supported RAID Types • Windows 7 and 10 • Mac OS X 10.
B Appendix LED Indicator Table LED Indicator Color Status Description Green Static Volume normal Volume degraded / Volume crashed STATUS Orange Blinking Volume not created DSM not installed Off LAN Green HDD hibernation Static Network connected Blinking Network active Off Green Disk 1-2 Orange No network Static Drive ready and idle Blinking Accessing drive Static Drive error / Port disabled1 Off Copy2 Green No internal drive Static Device detected Blinking Copying data Off
SYNOLOGY, INC. END USER LICENSE AGREEMENT IMPORTANT–READ CAREFULLY: THIS END USER LICENSE AGREEMENT ("EULA") IS A LEGAL AGREEMENT BETWEEN YOU (EITHER AN INDIVIDUAL OR A LEGAL ENTITY) AND SYNOLOGY, INC. ("SYNOLOGY") FOR THE SYNOLOGY SOFTWARE INSTALLED ONTO THE SYNOLOGY PRODUCT PUCHASED BY YOU (THE "PRODUCT"), OR LEGALLY DOWNLOADED FROM WWW.SYNOLOGY.COM, OR ANY OTHER CHANNEL PROVIDED BY SYNOLOGY ( "SOFTWARE").
request. Section 11. Disclaimer of Warranties. EXCEPT AS EXPRESSLY SET FORTH ABOVE, THE SOFTWARE IS PROVIDED "AS IS" AND WITH ALL FAULTS. SYNOLOGY AND ITS SUPPLIERS HEREBY DISCLAIM ALL OTHER WARRANTIES, EXPRESS, IMPLIED OR STATUTORY, ARISING BY LAW OR OTHERWISE, INCLUDING BUT NOT LIMITED TO ANY IMPLIED WARRANTIES OF MERCHANTABILITY, FITNESS FOR A PARTICULAR PURPOSE OR USE, TITLE AND NONINFRINGEMENT, WITH REGARD TO THE SOFTWARE.
SYNOLOGY, INC. LIMITED PRODUCT WARRANTY THIS LIMITED WARRANTY ("WARRANTY") APPLIES TO THE PRODUCTS (AS DEFINED BELOW) OF SYNOLOGY, INC. AND ITS AFFILIATES, INCLUDING SYNOLOGY AMERICA CORP, (COLLECTIVELY, "SYNOLOGY"). YOU ACCEPT AND AGREE TO BE BOUND BY THE TERMS OF THIS WARRANTY BY OPENING THE PACKAGE CONTAINING AND/OR USING THE PRODUCT. IF YOU DO NOT AGREE TO THE TERMS OF THIS WARRANTY, DO NOT USE THE PRODUCT.
("RMA") number by Synology before shipment and must be returned in accordance with Synology's then current RMA procedures. Customer may contact any authorized Synology distributor or reseller or Synology Support to obtain assistance in obtaining an RMA, and must provide proof of purchase and product serial number when asking for such assistance. For warranty claims, Customer must return the complete Product to Synology in accordance with this Section 3.3 to be eligible for coverage under this Warranty.
USE OR INABILITY TO USE THE PRODUCT, ANY ACCOMPANYING DOCUMENTATION OR SOFTWARE AND ANY OTHER GOODS OR SERVICES PROVIDED UNDER THIS WARRANTY IS LIMITED TO THE AMOUNT ACTUALLY PAID BY CUSTOMER FOR THE PRODUCT REGARDLESS OF THE AMOUNT OF DAMAGES CUSTOMER MAY INCUR AND WHETHER BASED ON CONTRACT, TORT (INCLUDING NEGLIGENCE), STRICT LIABILITY OR OTHER THEORY. The foregoing disclaimer of certain damages and limitation of liability will apply to the maximum extent permitted by applicable law.
5.8 Severability. If any provision of this Warranty is held by a court of competent jurisdiction to be invalid, illegal, or unenforceable, the remainder of this Warranty will remain in full force and effect. 5.9 Entire Agreement. This Warranty constitutes the entire agreement, and supersedes any and all prior agreements, between Synology and Customer related to the subject matter hereof.
FCC Declaration of Conformity This device complies with Part 15 of the FCC Rules. Operation is subject to the following two conditions: (1) this device may not cause harmful interference, and (2) this device must accept any interference received, including interference that may cause undesired operation.