
User's Manual


Synology DiskStation User's Guide
Based on DSM 4.0
102 Chapter 12: Share Photos, Videos, and Blogs with Photo Station
4 If you want to upload the photos to a new album, choose Create a new album and name the new album. If
you want to upload the photos to an existing album, choose Upload to an existing album and choose the
album from the drop-down menu.
5 Click OK and click Close when the upload process is done.
Now you can log in to Facebook to see the uploaded photos.
To authorize with Facebook before syncing albums:
1 Go to Settings and click the Photos tab.
2 Click Connect with Facebook, authorize using your Facebook account info, and then click Log In.
If the account is successfully authorized, the status will be changed to "[Facebook account name] is
authorized".
3 Tick Sync with Facebook regularly if you want Photo Station to sync albums with Facebook regularly.
4 If you want to cancel Facebook authorization, click Cancel authorization and then click Yes.
To sync a Photo Station album with Facebook:
1 Make sure you have completed Facebook authorization (see above).
2 When you are within an album, choose More > Sync with Facebook.
3 In the window that appears, name the new Facebook album, and then click OK.
4 If you want to sync the album immediately, choose More > Sync with Facebook right now.
Now you can login to Facebook to see the synced album. You can also see synced albums by going to Photo
Station's home page and clicking Albums synced with Facebook.
To stop syncing with Facebook:
When you are within a synced album, choose More > Don't sync with Facebook.
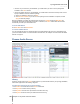
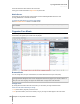
View and Edit Photos and Videos
After the album is created, you can log in to Photo Station and go to the Photos page, where you can see the
albums you uploaded. Click the album cover to browse photos or play videos within the album.
To manage a photo or video, click the following links:
Information: See the metadata information of the photo or video.
Slideshow: Start a slideshow of the album.
Map or Geotag: See where the photo is taken (for Map) or set the photo's geotag information by right-clicking
on the map and setting the coordinates (for Geotag).
Share > Blog it: Embed the photo or video into a new blog post.
Share > Link to > Facebook, Twitter or Plurk: Share the photo or video’s link to the social networks.
Share > Upload to Facebook or Upload to Picasa: Upload the photo or video to the social networks.
Share > Get photo link: Share the link of the photo by pasting it to email or instant message.
Share > Facebook, Twitter or Plurk: Share the photo or video’s link to the social networks.
Share > Upload to Facebook (photo only): Upload the photo to Facebook.
Edit: Choose a web-based external photo editor to edit the photo. .
Note: Before sharing a link or editing a photo, make sure you have configured port forwarding of Photo Station on
your router. If the public HTTP port is not 80, set the router port number at Settings > General.
Add Comments: Add comments to the photo or video.
Download (video only): Download the video to your computer.
Note: This option is available only if you have ticked Allow users to download video files at Settings > Photos.
Set as Album Cover (top-right corner): Set the photo or video as the album cover.
Rotate (top-right corner; photo only): Rotate the photo.
Delete (top-right corner): Delete the photo or video.