
User's Manual


Synology DiskStation User's Guide
Based on DSM 4.0
19 Chapter 3: Modify System Settings
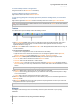
Change Network Settings
Go to Main Menu > Control Panel > Network to modify the following network settings of your
Synology DiskStation.
General
In this section, you can change your DiskStation identification on the network by entering a server name. You can
also set up the domain name server and default gateway here.
To rename DiskStation:
Enter the new server name in the Server Name field, and click Apply.
To set up domain name server and default gateway:
Enter the IP address in the DNS server and Default gateway fields, and click Apply.
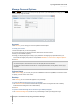
Note: The DNS Server and Default Gateway fields will not be available for modification if all of your network
interfaces are configured automatically, or if your DiskStation is connected to the Internet via PPPoE.
Network Interface
In this section, you can connect your DiskStation to the network via any of the following network interfaces.
LAN
If your DiskStation is connected to a local area network, you can click LAN or LAN [number] (for DiskStations
with multiple LAN ports) on the left side to configure the network interface.
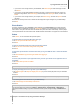
To decide how your DiskStation obtains IP address:
1 Choose either of the following:
Get network configuration automatically (DHCP): Get IP address automatically via DHCP.
Use manual configuration: Manually enter the IP address, subnet mask, DNS, and gateway.
2 Click Apply.