
Installation Manual


9
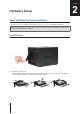
Chapter 2: Hardware Setup
Important:
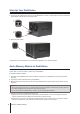
Hold the memory module by its edge, and do not touch the gold contacts.
Note:
Synology will not provide complete product warranty or technical support if a non-Synology memory module is
used for memory upgrade.
5
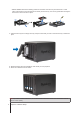
Insert the four drive trays back into the drive bays.
6
Reconnect the cables you removed in step 1, and then press and hold the power button to turn on your
DiskStation.
To make sure DiskStation recognizes the new memory capacity:
1
Install DiskStation Manager (DSM). Please see the next chapter for more information.
2
Log into DSM as
admin
or a user belonging to the
administrators
group.
3
Check
Total Physical Memory
in
Control Panel
>
Info Center
.
If your DiskStation does not recognize the memory or does not start up successfully, please make sure that the
memory module is installed correctly.
To remove the memory module:
1
Shut down your DiskStation. Disconnect all cables connected to your DiskStation to prevent any possible
damages.
2
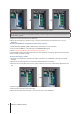
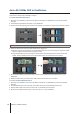
Remove the four drive trays and you will see the installed module to be removed.
3
Pull the levers on both sides of the memory module outwards. The memory module will be released from the
slot.
4
Hold the memory module by its notches and remove it from the slot.
5
Insert the drive trays back into the drive bays.
6
Reconnect the cables removed in step 1. Now you may turn on your DiskStation.