Synology NAS DS920+ Hardware Installation Guide
Table of Contents Chapter 1: Before You Start Package Contents Synology DS920+ at a Glance LED Indicator Table Hardware Specification Optional Accessories Spare Parts Safety Instructions 3 4 5 6 7 7 8 Chapter 2: Hardware Setup Tools and Parts for Component Installation Install Drives Start Up Your Synology NAS Add a Memory Module to Synology NAS Add an M.
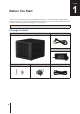
1 Chapter Before You Start Thank you for purchasing this Synology product! Before setting up your new Synology NAS, please check the package contents to verify that you have received the items below. Also, make sure to read the safety instructions carefully to avoid harming yourself or damaging your Synology NAS. Note: All images below are for illustrative purposes only, and may differ from the actual product. Package Contents Main unit x 1 AC power cord x 1 AC power adapter x 1 Screws for 2.
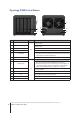
Synology DS920+ at a Glance 1 2 3 4 5 11 7 8 9 10 12 13 6 1 4 No. Article Name 1 Status Indicator Displays the status of the system. For more information, see "LED Indicator Table". 2 Drive Status Indicator Displays the status of each drive. For more information, see "LED Indicator Table". 3 Drive Tray Lock 4 USB 3.0 Port 5 Power Button 6 Drive Tray Install drives (hard disk drives or solid state drives) here. 7 LAN Port Connect network cable here.
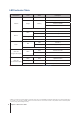
LED Indicator Table LED Indicator Color Status Description Green Static Volume normal Volume degraded/Volume crashed STATUS Orange Blinking Volume not created DSM not installed Off Green Disk 1-4 Orange HDD hibernation Static Drive ready and idle Blinking Accessing drive Static Drive error/Port disabled1 Off Blue Power No internal drive/Advanced HDD hibernation Static Powered on Blinking Booting up/Shutting down Off Rear LAN (on upper side of jack) Green Powered off Static Netwo
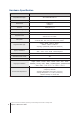
Hardware Specification Item DS920+ Compatible Drive Type • 3.5"/2.5" SATA x 4 • M.2 2280 NVMe SSD x 2 Maximum Internal Raw Capacity 64 TB (4 x16 TB HDD) External Port • USB 3.0 x 2 • eSATA x 1 LAN Port 1GbE (RJ-45) x 2 Size (H x W x D) (mm) 166 x 199 x 223 Weight (kg) 2.24 Supported Client • Windows 7 and 10 • Mac OS X 10.
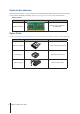
Optional Accessories With Synology accessories, you can customize your Synology NAS to fit different business environments without worrying about compatibility and stability. Visit www.synology.com/compatibility for more information. • Memory Module Model Name Picture Description DDR4 non-ECC unbuffered SO-DIMM 4GB D4NESO-2666-4G Spare Parts Visit www.synology.com/products/spare_parts if you need to replace system fans, disk trays, or power supply units.
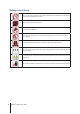
Safety Instructions Keep away from direct sunlight and from chemicals. Make sure the environment does not experience abrupt changes in temperature or humidity. Place the product right side up at all times. Do not place near any liquids. Before cleaning, unplug the power cord. Wipe with damp paper towels. Do not use chemical or aerosol cleaners. To prevent the unit from falling over, do not place on carts or any unstable surfaces. The power cord must plug in to the correct supply voltage.
2 Chapter Hardware Setup Tools and Parts for Component Installation Please prepare the following tools and parts before setting up your Synology NAS: • A screwdriver (only for 2.5" drives) • At least one 3.5" or 2.5" SATA drive (please visit www.synology.com/compatibility for compatible drive models) Warning: If you install a drive that contains data, the system will format the drive and erase all existing data. Please back up any important data before installation.
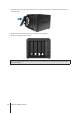
3 Insert the loaded drive tray into the empty drive bay and push it back until you hear a click when the tray is locked into place. 4 Repeat the steps above to install the other drives you have prepared. 5 Drives are numbered as shown below. 1 2 3 4 Note: If you plan to create a RAID volume, we recommend installing drives of identical size to make the best use of drive capacity.
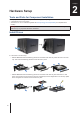
Start Up Your Synology NAS 1 Use the LAN cable to connect the Synology NAS to your switch, router, or hub. 2 Connect one end of the AC power adapter to the power port of your Synology NAS. Connect one end of the AC power cord to the AC power adapter, and the other to the power outlet. 1 2 3 Press the power button to turn on your Synology NAS. Congratulations! Your Synology NAS is now online and detectable from a network computer.
Add a Memory Module to Synology NAS Optional Synology memory modules are designed to expand the memory of your Synology NAS. Follow the steps below to install, check, or remove a memory module on your Synology NAS. To install the memory module 1 Shut down your Synology NAS. Disconnect all cables from your Synology NAS to prevent possible damage. 2 Remove the hard drive trays from the drive bays. An empty memory slot is located on the inner right side of your Synology NAS.
To remove the memory module 1 Follow step 1 and 2 of the "To install the memory module" section to shut down your Synology NAS, disconnect the cables and remove the drive trays. 2 Push the levers on both sides of the memory module outward. The memory module will be released from its slot. 3 Hold the memory module by its edges and remove it from the slot. 4 Insert the drive trays back into the drive bays. 5 Reconnect the cables removed in step 1, then press the power button to turn on your Synology NAS.
Add an M.2 NVMe SSD to Synology NAS You can install up to two M.2 NVMe 2280 SSDs on your Synology NAS to create an SSD cache volume. Follow the steps below for SSD module installation and removal. To install an M.2 NVMe SSD module 1 Shut down your Synology NAS. Disconnect all cables from your Synology NAS to prevent possible damage. 2 The SSD slots are located at the bottom of your Synology NAS. 3 Remove the two covers protecting the modules. You will see two empty slots that are numbered as shown below.
3 Chapter System Maintenance Initial Troubleshooting Guide We have selected several helpful articles on frequently asked questions to help you perform initial troubleshooting on your Synology NAS.
4 Chapter Install DSM on Synology NAS After hardware setup is completed, please install DiskStation Manager (DSM) – Synology's browser-based operating system – on your DS920+. Install DSM with Web Assistant Your DS920+ comes with a built-in tool called Web Assistant that helps you download the latest version of DSM from the Internet and install it on your DS920+. To use Web Assistant, please follow the steps below. 1 Power on your DS920+.
SYNOLOGY, INC. END USER LICENSE AGREEMENT IMPORTANT–READ CAREFULLY: THIS END USER LICENSE AGREEMENT ("EULA") IS A LEGAL AGREEMENT BETWEEN YOU (EITHER AN INDIVIDUAL OR A LEGAL ENTITY) AND SYNOLOGY, INC. ("SYNOLOGY") FOR THE SYNOLOGY SOFTWARE INSTALLED ONTO THE SYNOLOGY PRODUCT PURCHASED BY YOU (THE "PRODUCT"), OR LEGALLY DOWNLOADED FROM WWW.SYNOLOGY.COM, OR ANY OTHER CHANNEL PROVIDED BY SYNOLOGY ( "SOFTWARE").
request. Section 11. Disclaimer of Warranties. EXCEPT AS EXPRESSLY SET FORTH ABOVE, THE SOFTWARE IS PROVIDED "AS IS" AND WITH ALL FAULTS. SYNOLOGY AND ITS SUPPLIERS HEREBY DISCLAIM ALL OTHER WARRANTIES, EXPRESS, IMPLIED OR STATUTORY, ARISING BY LAW OR OTHERWISE, INCLUDING BUT NOT LIMITED TO ANY IMPLIED WARRANTIES OF MERCHANTABILITY, FITNESS FOR A PARTICULAR PURPOSE OR USE, TITLE AND NONINFRINGEMENT, WITH REGARD TO THE SOFTWARE.
SYNOLOGY, INC.LIMITED PRODUCT WARRANTY THIS LIMITED WARRANTY ("WARRANTY") APPLIES TO THE PRODUCTS (AS DEFINED BELOW) OF SYNOLOGY, INC. AND ITS AFFILIATES, INCLUDING SYNOLOGY AMERICA CORP, (COLLECTIVELY, "SYNOLOGY"). YOU ACCEPT AND AGREE TO BE BOUND BY THE TERMS OF THIS WARRANTY BY OPENING THE PACKAGE CONTAINING AND/OR USING THE PRODUCT.
3.3 Warranty Support and Exclusive Remedy. If Customer gives notice of noncompliance with any of the warranties set forth in Section 3.
the Synology end user license agreement accompanying any Software furnished by Synology or an authorized Synology distributor or reseller; and (b) not attempt to reverse engineer any Product or component thereof or accompanying Software or otherwise misappropriate, circumvent or violate any of Synology's intellectual property rights. 5.2 Assignment. Customer will not assign any of its rights under this Warranty directly, by operation of law or otherwise, without the prior written consent of Synology. 5.
FCC Declaration of Conformity This device complies with Part 15 of the FCC Rules. Operation is subject to the following two conditions: (1) this device may not cause harmful interference, and (2) this device must accept any interference received, including interference that may cause undesired operation.
この装置は、クラス B 機器です。この装置は、住宅環境で使用することを 目的 としていますが、この装置がラジオやテレビジョン受信機に近接して使 用され ると、受信障害を引き起こすことがあります。 取扱説明書に従って正しい取り扱いをして下さい。 VCCI 一 B