DX213 User’s Guide Syno_UsersGuide_DX213_20121009
TOC Table of Contents 1 Chapter 1: Get Started with DX213 1 Package Contents 2 Hardware Specifications 3 Appearance 4 Default/Manual Switch Behavior 4 LED Indication Table 5 Safety Instructions 7 7 9 10 11 12 Chapter 2: Set Up DX213 Tools and Parts for Hard Disk Installation Install Hard Disks Connect with Synology DiskStation Work with Synology DiskStation Learn More i
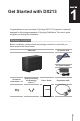
1 Get Started with DX213 Congratulations on your purchase of Synology DX213. This product is specially designed for the storage expansion of Synology DiskStation. This user’s guide will guide you through the installation. Package Contents Before installation, please check the package contents to verify that you have received the items below.
Hardware Specifications Internal HDD Expansion Port # Max Capacity (Internal HDD) Size (HxWxD) (mm) Weight System Fan Noise Level (Fan-only) Power Recovery AC Input Power Voltage Power Frequency 2X SATA(II) 1 2X 4TB 165 X 100 X 225.5mm 0.87 kg 1X (92x92mm) 19.
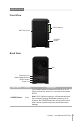
Appearance Front View LED Indicators HDD Tray Cover POWER Button Back View Fan Expansion Port Default/Manual Switch RESET Button Power Port Article Name Location Description The POWER button is used to turn DX213 on or off. Press and hold the button for 7 seconds to shut down DX213. POWER Button Front Note: DX213 will be turned on or off automatically when the connected Synology DiskStation powers on or off.
Article Name Location LED Indicators Front Description The LED indicators are used to display the status of the internal disks and the system. For complete details, please refer to the table: LED Indication Table. Default/Manual Switch Back In the default mode, DX213 can auto power on/off with the connected Synology DiskStation, while in the manual mode, DX213 cannot auto power on with the DiskStation when using its independent volume.
Safety Instructions To use your Synology product safely, please follow these instructions and warnings at all time. Keep away from direct sunlight and away from chemicals. Make sure the environment does not experience abrupt changes in temperature or humidity. Keep Synology product upright. Do not lay it down horizontally. Do not place the Synology product close to any liquid. Before cleaning, unplug the power cord first. Wipe Synology product with damp paper towels.
Note 6 Chapter 1: Get Started with DX213
Set Up DX213 2 Tools and Parts for Hard Disk Installation • A screwdriver • At least one 3.5” or 2.5” SATA hard disk (Please visit www.synology.com for compatible hard disk models.) Warning: If you install a hard disk that contains data, system will format the hard disk and erase all data. If you need the data in the future, please back it up before installation. Install Hard Disks 1 Push the upper case in the direction as shown below. Lift the upper case and set it aside.
• For 2.5” Hard Disk: a Place the hard disk in the 2.5" Disk Holder (Type C, sold separately), and then tighten the 2.5" screws to secure the hard disk. b Slide the 2.5" Disk Holder into the hard drive bay, and push it all the way until the hard disk is connected to the SATA connector. Secure the Disk Holder with the provided screws. The disks’ positions are numbered as shown below. 1 2 Important: Make sure the tray is pushed in all the way.
Connect with Synology DiskStation 1 Connect one end of the power cord to the power port of DX213, and the other to the power outlet. Power Port 2 Connect the expansion cable to the expansion ports of DX213 and Synology DiskStation. You can connect up to 2 expansion units by expansion ports to DS1512+/DS1812+. eSA TA DX213 DS1812+ The side inscribed with “eSATA” should face up.
Work with Synology DiskStation 1 Open your DiskStation Manager with a web browser. Go to Main Menu > Control Panel > External Devices to confirm DX213 is connected to your DiskStation. 2 Go to Main Menu > Storage Manager to manage DX213 for storage creation or expansion. • If you want to create a new volume with DX213, click Create and follow the Volume Creation Wizard to complete the creation.
• If you want to expand the existing volume with DX213, select the volume you want to expand from the volume list, click Manage, and follow the Volume Manager Wizard to complete the expansion. For detailed information about volume management, please go to Main Menu > Storage Manager and see the help page by clicking the help button at the top-right corner. Important: Before starting to use DiskStation with DX213, please see the following limitations of DX213.
COPYRIGHT NOTICE All title, copyright and other intellectual property rights in and to any Synology Products, the “Products” or “Product” (including but not limited to product design and appearance, firmware, and any relevant media, images, photographs, animations, video, audio, music, text, and applets incorporated into the Products), the accompanying manuals and other documents, and on-line or electronic documents, if any, are owned by Synology Inc. Unless otherwise expressly licensed by Synology Inc.
TO ANY IMPLIED WARRANTIES AND CONDITIONS OF MERCHANTABILITY AND FITNESS FOR A PARTICULAR PURPOSE. NO OTHER WARRANTIES, WHETHER EXPRESS OR IMPLIED, WILL APPLY AFTER THE LIMITED WARRANTY PERIOD HAS EXPIRED. SOME STATES OR JURISDICTIONS DO NOT ALLOW THE EXCLUSION OF CERTAIN IMPLIED WARRANTIES OR CONDITIONS, OR LIMITATIONS ON HOW LONG AN IMPLIED WARRANTY OR CONDITION LASTS, SO THIS LIMITATION MAY NOT APPLY TO YOU.
P/N: 15-06D0100B0 Printed in Taiwan