Synology RackStation RS2418+/RS2418RP+ Hardware Installation Guide
Table of Contents Chapter 1: Before You Start Package Contents Synology RackStation at a Glance Safety Instructions 3 4 6 Chapter 2: Hardware Setup Tools and Parts for Drive Installation Install Drives Add a RAM Module on RackStation Attach Network Interface Cards to the RackStation Replace System Fan Replace Redundant PSU1 on RackStation Start Up Your RackStation 7 7 9 12 13 14 15 Chapter 3: Install DSM on RackStation Install DSM with Web Assistant Learn More Appedix A: Specifications Appedix B: LED I
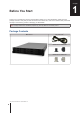
1 Chapter Before You Start Thank you for purchasing this Synology product! Before setting up your new RackStation, please check the package contents to verify that you have received the items below. Also, make sure to read the safety instructions carefully to avoid harming yourself or damaging your RackStation. Note: All images below are for illustrative purposes only, and may differ from the actual product. Package Contents Main unit x 1 AC power cord1 Screws for 2.5” drives x 52 Screws for 3.
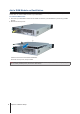
Synology RackStation at a Glance RS2418+ RS2418RP+ 1 4 No. Article Name Location 1 Power Button and Indicator 1. Press to power on the RackStation. 2. To power off the RackStation, press and hold until you hear a beep sound and the Power LED starts blinking. 2 Status Indicator Displays the status of the system. For more information, see "Appendix B: LED Indicator Table".
No. Article Name 8 Power Port 9 PSU Indicator and Beep Off Button 10 PSU Fan 11 Power Supply On/Off Switch 12 Console Port 5 Description Connect power cords here. 1. Displays the status of the power supply unit (PSU). For more information, see "Appendix B: LED Indicator Table". 2. Press to deactivate the beeping sound that is emitted when a malfunction occurs. Disposes of excess heat and cools the PSU. Press to turn on/off the power supply. This port is used for manufacturing use only.
Safety Instructions Keep away from direct sunlight and away from chemicals. Make sure the environment does not experience abrupt changes in temperature or humidity. Place the product right side up at all times. Do not place near any liquids. Before cleaning, unplug the power cord. Wipe with damp paper towels. Do not use chemical or aerosol cleaners. To prevent the unit from falling over, do not place on carts or any unstable surfaces. The power cord must plug in to the correct supply voltage.
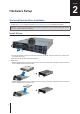
2 Chapter Hardware Setup Tools and Parts for Drive Installation • A screwdriver • At least one 3.5” or 2.5” SATA drive (please visit www.synology.com for compatible drive models.) Warning: If you install a drive that contains data, the system will format the drive and erase all existing data. Please back up any important data before installation. Install Drives 1 Open the drive tray. a Find the small button located on the left side of the drive tray handle.
3 Insert the loaded drive tray into the empty drive bay. Note: Make sure the tray is pushed in all the way. Otherwise, the drive might not be able to function properly. 4 Push the handle inward to secure the drive tray. 5 Push the switch on the drive tray handle to the left to lock the drive tray. 6 Repeat the steps above to assemble the other drives you have prepared. 7 Drives are numbered as shown below.
Add a RAM Module on RackStation The optional Synology RAM module is designed for RackStation memory expansion. Follow the steps below to install, check, or remove a RAM module on your RackStation. To install the RAM module: 1 Shut down your RackStation. Disconnect all cables connected to your RackStation to prevent any possible damage. 2 Remove the rear top cover: a Remove the screw on the back of RackStation. b Pull the rear top cover, and put it aside.
3 Insert the new memory module in the slot: a Push the retaining clips on the slot out to the sides. b Align the notch on the gold edge of the module with the notch in the memory slot. c Push down on the memory module with firm and even pressure. The retaining clips will snap into position as the module is correctly inserted. Important: • For normal operations, you must insert your memory modules into the white slots first. • You must utilize the same type of memory on all slots.
To remove the RAM Module: 1 Follow step 1 and 2 of the “To install the RAM module” section to shut down your RackStation, disconnect the cables, and then remove the rear top cover. 2 Push the levers on the sides of the memory module in an outward direction to release the module from the memory card slot. 3 Hold the memory module by its notches and remove it from the slot. 4 Follow step 4 of the “To install the RAM module” section to put back the rear top cover.
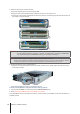
Attach Network Interface Cards to the RackStation Your RackStation supports one PCIe x8 add-on network interface card.1 You need to replace the long bracket (suited for PC) in your network interface card with the short bracket before installing the card on your RackStation. To install the network interface card: 1 Shut down your RackStation. Disconnect all cables connected to your RackStation to prevent any possible damages. 2 Open the RackStation by following step 2 of Add a RAM Module on RackStation.
Replace System Fan If a system fan malfunctions, please see the instructions below to open the RackStation and replace the malfunctioning fan. 1 Press the small buttons located on the sides of the RackStation. 2 Lift to remove the fan cover. 3 Fans are numbered as indicated below: 4 Find the malfunctioning fan. Lift the fan upward to remove it.
5 Prepare a new fan, and slide it into the RackStation. Make sure the fan is aligned properly as illustrated below. 6 Put back the fan cover you removed in step 2. Replace Redundant PSU on RackStation If a PSU1 or its fan malfunctions, please see the instructions below to replace the malfunctioning PSU. 1 Unplug the power cord from the PSU to be replaced. Note: By pressing the Beep Off button, you can silence the long beeping sound when you hear it.
Start Up Your RackStation 1 Connect one end of each power cord to the power ports located on the back of the RackStation and the other end to a power outlet. 2 Connect at least one LAN cable to one of the LAN ports and the other end to your switch, router, or hub. 3 Make sure the Power Supply On/Off Switch2 is turned on (“─”). 4 Press the power button to turn on the RackStation. Congratulations! Your RackStation is now online and detectable from a network computer. 2 15 Only for RS2418+.
3 Chapter Install DSM on RackStation After hardware setup is finished, please install DiskStation Manager (DSM) – Synology’s browser-based operating system – on your RackStation. Install DSM with Web Assistant Your RackStation comes with a built-in tool called Web Assistant that helps you download the latest version of DSM from the Internet and install it on your RackStation. To use Web Assistant, please follow the steps below. 1 Power on the RackStation.
A Appendix Specifications Item RS2418+ / RS2418RP+ Internal Drive 3.5” / 2.5” SATA x 12 Maximum Raw Capacity External Device Port LAN Port PCIe Slot • 144 TB (12 x 12 TB HDD) • 288 TB with RX1217 / RX1217RP (expansion unit) x 1 • USB 3.0 x 2 • Infiniband x 1 1GbE (RJ-45) x 4 PCIe Gen3 x8 slot (x4 link) for add-on card (optional) x 1 • RS2418+: 88 x 430.
B Appendix LED Indicator Table LED Indicator Power Color Blue Status Description Static Powered on Blinking Booting up / Shutting down Off Green Powered off Static Volume normal Volume degraded / Volume crashed STATUS Orange Blinking Volume not created DSM not installed Off ALERT Orange Blinking Off Green Drive Status Indicator (on tray) HDD hibernation Red System normal Static Drive ready and idle Blinking Accessing drive Static Drive error1 Off PSU Indicator2 Rear LAN (on lef
SYNOLOGY, INC. END USER LICENSE AGREEMENT IMPORTANT–READ CAREFULLY: THIS END USER LICENSE AGREEMENT ("EULA") IS A LEGAL AGREEMENT BETWEEN YOU (EITHER AN INDIVIDUAL OR A LEGAL ENTITY) AND SYNOLOGY, INC. ("SYNOLOGY") FOR THE SYNOLOGY SOFTWARE INSTALLED ONTO THE SYNOLOGY PRODUCT PUCHASED BY YOU (THE "PRODUCT"), OR LEGALLY DOWNLOADED FROM WWW.SYNOLOGY.COM, OR ANY OTHER CHANNEL PROVIDED BY SYNOLOGY ( "SOFTWARE").
request. Section 11. Disclaimer of Warranties. EXCEPT AS EXPRESSLY SET FORTH ABOVE, THE SOFTWARE IS PROVIDED "AS IS" AND WITH ALL FAULTS. SYNOLOGY AND ITS SUPPLIERS HEREBY DISCLAIM ALL OTHER WARRANTIES, EXPRESS, IMPLIED OR STATUTORY, ARISING BY LAW OR OTHERWISE, INCLUDING BUT NOT LIMITED TO ANY IMPLIED WARRANTIES OF MERCHANTABILITY, FITNESS FOR A PARTICULAR PURPOSE OR USE, TITLE AND NONINFRINGEMENT, WITH REGARD TO THE SOFTWARE.
SYNOLOGY, INC. LIMITED PRODUCT WARRANTY THIS LIMITED WARRANTY ("WARRANTY") APPLIES TO THE PRODUCTS (AS DEFINED BELOW) OF SYNOLOGY, INC. AND ITS AFFILIATES, INCLUDING SYNOLOGY AMERICA CORP, (COLLECTIVELY, "SYNOLOGY"). YOU ACCEPT AND AGREE TO BE BOUND BY THE TERMS OF THIS WARRANTY BY OPENING THE PACKAGE CONTAINING AND/OR USING THE PRODUCT. IF YOU DO NOT AGREE TO THE TERMS OF THIS WARRANTY, DO NOT USE THE PRODUCT.
("RMA") number by Synology before shipment and must be returned in accordance with Synology's then current RMA procedures. Customer may contact any authorized Synology distributor or reseller or Synology Support to obtain assistance in obtaining an RMA, and must provide proof of purchase and product serial number when asking for such assistance. For warranty claims, Customer must return the complete Product to Synology in accordance with this Section 3.3 to be eligible for coverage under this Warranty.
USE OR INABILITY TO USE THE PRODUCT, ANY ACCOMPANYING DOCUMENTATION OR SOFTWARE AND ANY OTHER GOODS OR SERVICES PROVIDED UNDER THIS WARRANTY IS LIMITED TO THE AMOUNT ACTUALLY PAID BY CUSTOMER FOR THE PRODUCT REGARDLESS OF THE AMOUNT OF DAMAGES CUSTOMER MAY INCUR AND WHETHER BASED ON CONTRACT, TORT (INCLUDING NEGLIGENCE), STRICT LIABILITY OR OTHER THEORY. The foregoing disclaimer of certain damages and limitation of liability will apply to the maximum extent permitted by applicable law.
5.8 Severability. If any provision of this Warranty is held by a court of competent jurisdiction to be invalid, illegal, or unenforceable, the remainder of this Warranty will remain in full force and effect. 5.9 Entire Agreement. This Warranty constitutes the entire agreement, and supersedes any and all prior agreements, between Synology and Customer related to the subject matter hereof.
FCC Declaration of Conformity This device complies with Part 15 of the FCC Rules. Operation is subject to the following two conditions: (1) this device may not cause harmful interference, and (2) this device must accept any interference received, including interference that may cause undesired operation.