RX1211/RX1211RP User’s Guide For Synology RackStation RS2211+/RS2211RP+ RX121120120507
5 5 6 6 6 8 9 Chapter 1: Get Started with RX1211/RX1211RP 11 11 11 13 15 16 Chapter 2: Set Up RX1211/RX1211RP TOC Table of Contents Package Contents Hardware Specifications Operating Requirements Appearance LED Behavior Safety Instructions Tools and Parts for Hard Disk Installation Install Hard Disks Connect with RS2211+/RS2211RP+ Work with RS2211+/RS2211RP+ Learn More 3
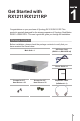
1 Get Started with RX1211/RX1211RP Congratulations on your purchase of Synology RX1211/RX1211RP. This product is specially designed for the storage expansion of Synology RackStation RS2211+/RS2211RP+. This user’s guide will guide you through the installation. Package Contents Before installation, please check the package contents to verify that you have received the items below. Main Unit x 1 AC Power Cord (RX1211: x1; RX1211RP: x2) User’s Guide x 1 Screws for 3.5” Hard Drives x 56 Screws for 2.
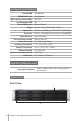
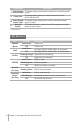
Hardware Specifications Internal HDD 12X SATA(II) EXPANSION Port # 1X Infiniband Max Capacity (Internal HDD) Hot Swappable HDD Size (HxWxD) (mm) Weight 12X 3TB Yes 88x445x570mm RX1211: 11.9 kg; RX1211RP: 14.
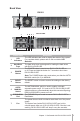
Back View 8 7 9 RX1211 3 7 8 10 11 1 7 8 10 9 Article Name 1 LED Indicators 2 Hard Drive Trays 1 4 5 1 6 1 4 5 1 6 RX1211RP 3 Description The LED indicators are used to display the status of the system. For complete details, please refer to the next table: LED Behavior. The hard drive trays are designed for loading the hard drives with RX1211/RX1211RP. 3 POWER Button The POWER button is used to turn RX1211/RX1211RP on or off.
Article Name Description Power Supply The power supply on/off switch is used to turn on/off the power 8 On/Off Switch supply. 9 Power Port 10 11 The power port is where you connect the power cord to RX1211/RX1211RP. Power Supply The power supply safety latch is used to secure the power Safety Latch* supply in place. Beep Off Button* The beep off button is used to turn off the beeping sound that warns of power failure. * RX1211RP only.
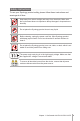
Safety Instructions To use your Synology product safely, please follow these instructions and warnings at all time. Keep away from direct sunlight and away from chemicals. Make sure the environment does not experience abrupt changes in temperature or humidity. Do not place the Synology product close to any liquid. Before cleaning, unplug the power cord first. Wipe Synology product with damp paper towels. Do not use chemical or aerosol cleaners to clean it.
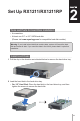
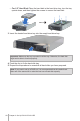
Set Up RX1211/RX1211RP 2 Tools and Parts for Hard Disk Installation • A screwdriver • At least one 3.5” or 2.5” SATA hard disk (Please visit www.synology.com for compatible hard disk models.) Warning: If you install a hard disk that contains data, system will format the hard disk and erase all data. If you need the data in the future, please back it up before installation. Install Hard Disks 1 Pull the clip in the direction as indicated below to remove the hard drive tray.
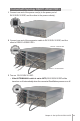
• For 2.5” Hard Disk: Place the hard disk in the hard drive tray, turn the tray upside down, and then tighten the screws to secure the hard disk. 3 Insert the loaded hard drive tray into the empty hard drive bay. Important: Make sure the tray is pushed in all the way. Otherwise, the hard disk might not be able to function properly. 4 Push the clip to fix the hard disk tray. 5 Repeat the steps above to assemble all hard disks you have prepared.
Connect with Synology RS2211+/RS2211RP+ 1 Connect one end of the power cord(s) to the power port of RX1211/RX1211RP, and the other to the power outlet(s). 2 Connect one end of the expansion cable to RX1211/RX1211RP, and the other to RS2211+/RS2211RP+. RX1211 or RX1211RP RS1211+ or RS1211RP+ 3 Turn on RX1211/RX1211RP: • If the AUTO/MANUAL switch is set to AUTO, RX1211/RX1211RP will be turned on or off automatically when the connected RackStation powers on or off.
• If the AUTO/MANUAL switch is set to MANUAL, press the POWER button to turn on RX1211/RX1211RP. Note: To prevent unexpected volume crash, it is recommended that you set the AUTO/MANUAL switch to AUTO.
Work with RS2211+/RS2211RP+ 1 Log in to DiskStation Manager with a web browser. Go to Main Menu > Control Panel > External Devices to confirm RX1211/RX1211RP is connected to your RS2211+/RS2211RP+. 2 Go to Main Menu > Storage Manager to manage RX1211/RX1211RP for storage creation or expansion. • If you want to create a new volume with RX1211/RX1211RP, click Create and follow the Volume Creation Wizard to complete the creation.
• If you want to expand the existing volume with RX1211/RX1211RP, select the volume you want to expand from the volume list, click Manage, and follow the Volume Manager Wizard to complete the expansion. For detailed information about volume management, go to Main Menu > Storage Manager and see the help page by clicking the Help button at the top-right corner. Limitations: Before starting to use RS2211+/RS2211RP+ with RX1211/RX1211RP, please see the following limitations of RX1211/RX1211RP.
SYNOLOGY, INC. END USER LICENSE AGREEMENT IMPORTANT–READ CAREFULLY: THIS END USER LICENSE AGREEMENT ("EULA") IS A LEGAL AGREEMENT BETWEEN YOU (EITHER AN INDIVIDUAL OR A SINGLE ENTITY) AND SYNOLOGY, INC. AND ITS AFFILIATES, INCLUDING SYNOLOGY AMERICAN CORP, (COLLECTIVELY, "SYNOLOGY") FOR ANY SYNOLOGY SOFTWARE, TOGETHER WITH ANY OTHER ASSOCIATED FIRMWARE, MEDIA, PRINTED MATERIALS AND "ONLINE" OR ELECTRONIC DOCUMENTATION (COLLECTIVELY, THE "SOFTWARE") AVAILABLE FOR DOWNLOAD AT WWW.SYNOLOGY.
anyone other than Synology; (y) combination of the Software with any product, services or other items provided by anyone other than Synology; or (z) your failure to comply with this EULA. Section 10. Support. During the Warranty Period, Synology will make available to you the support services. Following the expiration of the applicable Warranty Period, support for Software may be available from Synology upon written request. Section 11. Disclaimer of Warranties.
by arbitration conducted by three neutral arbitrators in accordance with the procedures of the R.O.C. Arbitration Law and related enforcement rules. The arbitration shall take place in Taipei, Taiwan, R.O.C., and the arbitration proceedings shall be conducted in English or, if both parties so agree, in Mandarin Chinese. The arbitration award shall be final and binding on the parties and may be enforced in any court having jurisdiction.
SYNOLOGY, INC. LIMITED PRODUCT WARRANTY THIS LIMITED WARRANTY ("WARRANTY") APPLIES TO THE PRODUCTS (AS DEFINED BELOW) OF SYNOLOGY, INC. AND ITS AFFILIATES, INCLUDING SYNOLOGY AMERICA CORP, (COLLECTIVELY, "SYNOLOGY"). YOU ACCEPT AND AGREE TO BE BOUND BY THE TERMS OF THIS WARRANTY BY OPENING THE PACKAGE CONTAINING AND/OR USING THE PRODUCT. IF YOU DO NOT AGREE TO THE TERMS OF THIS WARRANTY, DO NOT USE THE PRODUCT.
box. Customer is responsible for insurance and risk of loss with respect to returned items until they are properly received by Synology. A Product issued a RMA number must be returned within fifteen (15) days after issuance of the applicable RMA number. 2.5 Replacement by Synology. If Synology elects to replace any Product under this Warranty set forth in Section 2.
extent that those laws apply to the Product, the exclusions and limitations set forth above may not apply to Customer. Section 4. Miscellaneous 4.1 Proprietary Rights. The Product and any accompanying Software and documentation provided with the Product include proprietary and intellectual property rights of Synology and its third party suppliers and licensors.
P/N 15-06C010042 Printed in Taiwan