RX1214/RX1214RP User’s Guide
5 5 6 8 9 10 Chapter 1: Getting Started 11 11 11 13 15 16 Chapter 2: Setting Up 17 17 Chapter 3: Maintenance TOC Table of Contents Package Contents Expansion Unit at a Glance LED Indicator Behavior Hardware Specifications Safety Instructions Tools and Parts for Drive Installation Install Drives Connect with Synology RackStation Confirm Connection and Manage Storage Spaces Learn More Replace Malfunctioning Fan Synology_UG_RX1214_20141127 3
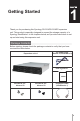
1 Getting Started Thank you for purchasing this Synology RX1214/RX1214RP expansion unit. This product is specially designed to expand the storage capacity of a Synology RackStation. In the chapters below, we'll provide instructions to set up and start using this expansion unit. Package Contents Before starting, please check the package contents to verify that you have received the items below. Expansion unit x 1 AC power cord (RX1214: x 1; RX1214RP: x 2) User’s guide x 1 Screws for 3.
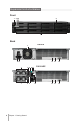
Expansion Unit at a Glance Front 5 1 234 6 Back RX1214 7 8 12 6 7 8 9 10 11 7 8 9 Chapter 1: Getting Started 13 14 15 13 14 15 RX1214RP 12
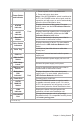
Article Name Location Description 1. Press to power on the expansion unit. 2. Press and hold to shut down. Note: If the AUTO/MANUAL switch is switched to AUTO, the POWER button will not work, and the expansion unit will power on and off automatically when the linked RackStation does. 1 Power Button and Indicator 2 STATUS Indicator 3 ALERT Indicator 4 Beep Off Button Press to deactivate the beeping sound that is emitted when a malfunction occurs.
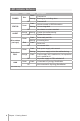
LED Indicator Behavior Indicator POWER Color Blue Status Static Description Powered on Blinking Booting up or shutting down Off STATUS Powered off Static Green Blinking Off ALERT Drive status (on trays) Orange Blinking Blinking Static Off Redundant PSU* Blinking Orange Static Off LINK Green * RX1214RP only.
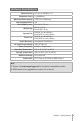
Hardware Specifications Internal Drives Expansion Port # Maximum Raw Capacity Hot Swappable Drive Size (HxWxD) (mm) 3.5” or 2.
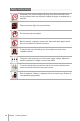
Safety Instructions Keep away from direct sunlight and away from chemicals. Make sure the environment does not experience abrupt changes in temperature or humidity. Place the product right side up at all times. Do not place near any liquids. Before cleaning, unplug the power cord. Wipe with damp paper towels. Do not use chemical or aerosol cleaners. To prevent the unit from falling over, do not place on carts or any unstable surfaces. The power cord must plug in to the correct supply voltage.
Setting Up 2 Tools and Parts for Drive Installation • A screwdriver • At least one 3.5” or 2.5” SATA drive (please visit www.synology.com for compatible drive models.) Warning: If you install a drive that contains data, the system will format the drive and erase all data. If you still need the data, please back it up before installation. Install Drives 1 Find the small button located on the drive tray handle. Press the button down and pull the drive tray handle out as illustrated below.
• For 2.5” drives: Place the drive in the drive tray. Turn the tray upside down and tighten screws into the four spots indicated below to secure the drive. 3 Insert the loaded drive tray into the empty drive bay. Note: Make sure the tray is pushed in all the way. Otherwise, the drive might not be able to function properly. 4 Push the handle inward to secure the drive tray. 5 Repeat the steps above to assemble the other drives you have prepared. 6 Drives are numbered as shown below.
Connect with Synology RackStation 1 Connect one end of the power cord(s) to the power port of the expansion unit, and the other to the power outlet(s). 2 Connect one end of the expansion cable to the expansion unit, and the other to the main RackStation unit. 3 Power on the expansion unit (make sure the redundant power supply unit is switched on first): • If the AUTO/MANUAL switch is switched to AUTO, the expansion unit will power on or off automatically when the linked RackStation powers on or off.
• If the AUTO/MANUAL switch is switched to MANUAL, press the POWER button located on the front panel to power on the expansion unit. Note: To prevent any unexpected volume crashes, we recommend that you set the AUTO/MANUAL switch to AUTO.
Confirm Connection and Manage Storage Spaces 1 Login to the DiskStation Manager (DSM) of the main RackStation unit 2 Go to Control Panel > External Devices > External Devices to confirm the expansion unit is successfully connected. 3 Go to Storage Manager to manage storage space creation or expansion. • If you want to create a new volume on the expansion, click Create and follow the instructions of the wizard.
• If you want to expand an existing volume with expansion unit, select the volume you want to expand from the volume list, click Manage, and follow the instructions of the wizard. For detailed information about volume management, go to Storage Manager and see DSM Help. Limitations: Before using this expansion unit, please see the limitations below. • This expansion unit can be linked to only one Synology RackStation at a time.
Maintenance 3 Replace Malfunctioning Fan If a system cooling fan malfunctions, please see the instructions below to open the expansion unit and replace the malfunctioning fan 1 Slide the latches on the sides and lift to remove the fan cover.
3 Find the malfunctioning fan. Lift the fan upward to remove it. 4 Apply firm pressure to the power plug and slide it off the power port as shown below. 5 Remove the malfunctioning fan from the fan casing. 6 Slide a new fan into the casing.
7 Apply firm pressure and slide the power cord onto the power port. 8 Slide the new cooling fan into the expansion unit. Make sure the power port is aligned properly.
Chapter 3: Maintenance
SYNOLOGY, INC. END USER LICENSE AGREEMENT IMPORTANT–READ CAREFULLY: THIS END USER LICENSE AGREEMENT ("EULA") IS A LEGAL AGREEMENT BETWEEN YOU (EITHER AN INDIVIDUAL OR A LEGAL ENTITY) AND SYNOLOGY, INC. ("SYNOLOGY") FOR THE SYNOLOGY SOFTWARE INSTALLED ONTO THE SYNOLOGY PRODUCT PUCHASED BY YOU (THE “PRODUCT”), OR LEGALLY DOWNLOADED FROM WWW.SYNOLOGY.COM, OR ANY OTHER CHANNEL PROVIDED BY SYNOLOGY ( "SOFTWARE").
modification or other alteration of the Software by anyone other than Synology; (y) combination of the Software with any product, services or other items provided by anyone other than Synology; or (z) your failure to comply with this EULA. Section 10. Support. During the period specified in the Section 9, Synology will make available to you the support services. Following the expiration of the applicable period, support for Software may be available from Synology upon written request. Section 11.
contemporaneous understandings and agreements whether written or oral. No amendment, modification or waiver of any of the provisions of this EULA will be valid unless set forth in a written instrument signed by the party to be bound thereby.
SYNOLOGY, INC. LIMITED PRODUCT WARRANTY THIS LIMITED WARRANTY ("WARRANTY") APPLIES TO THE PRODUCTS (AS DEFINED BELOW) OF SYNOLOGY, INC. AND ITS AFFILIATES, INCLUDING SYNOLOGY AMERICA CORP, (COLLECTIVELY, "SYNOLOGY"). YOU ACCEPT AND AGREE TO BE BOUND BY THE TERMS OF THIS WARRANTY BY OPENING THE PACKAGE CONTAINING AND/OR USING THE PRODUCT. IF YOU DO NOT AGREE TO THE TERMS OF THIS WARRANTY, DO NOT USE THE PRODUCT.
number when asking for such assistance. For warranty claims, Customer must return the complete Product to Synology in accordance with this Section 2.3 to be eligible for coverage under this Warranty. Any Product returned without an RMA number, or any Product that has been disassembled (except under the direction of Synology) will be refused and returned to Customer at Customer's expense.
OTHER GOODS OR SERVICES PROVIDED UNDER THIS WARRANTY IS LIMITED TO THE AMOUNT ACTUALLY PAID BY CUSTOMER FOR THE PRODUCT REGARDLESS OF THE AMOUNT OF DAMAGES CUSTOMER MAY INCUR AND WHETHER BASED ON CONTRACT, TORT (INCLUDING NEGLIGENCE), STRICT LIABILITY OR OTHER THEORY. The foregoing disclaimer of certain damages and limitation of liability will apply to the maximum extent permitted by applicable law. The laws of some states/jurisdictions do not allow exclusion or limitation of certain damages.
4.9 E n t i r e A g r e e m e n t . T h i s Wa r r a n t y constitutes the entire agreement, and supersedes any and all prior agreements, between Synology and Customer related to the subject matter hereof. No amendment, modification or waiver of any of the provisions of this Warranty will be valid unless set forth in a written instrument signed by the party to be bound thereby.
P/N 15-06E010541 Printed in Taiwan