USB Station 2 User's Guide Based on DSM 3.
Table of Contents Chapter 1: USB Station 2 at a Glance Chapter 2: Get Started with DiskStation Manager Set up USB Station 2.............................................................................................................................................................. 6 Log in to Synology DiskStation Manager ............................................................................................................................. 6 DiskStation Manager Appearance .............................
Download Music .................................................................................................................................................................... 79 Chapter 11: Download Files with Download Station Enable Download Station..................................................................................................................................................... 80 Set up BT/HTTP/FTP/NZB ................................................................................
Introduction Congratulations on your purchase of USB Station 2. USB Station 2 is a multi-functional Network-Attached Storage server, serving as a file-sharing center within your Intranet. Moreover, it is specially designed for a variety of purpose, allowing you to perform the following tasks with the web-based Synology DiskStation Manager: Store and Share Files over the Internet Windows users and Mac users can easily share files within the Intranet or through the Internet.
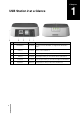
Chapter Chapter 1: 5 1 USB Station 2 at a Glance No. Article Name Location Description 1) LED Indicators Front Panel The LED indicator is used to display the status of the external disk and the system. For more information, see "Appendix B: LED Indication Tables". 2) USB Port Back Panel The USB ports are used for connecting USB storage devices, USB printers, or other USB devices. 3) RESET Button Back Panel To restore system settings to default value.
Chapter Chapter 2: Get Started with DiskStation Manager This chapter explains how to log in to USB Station 2's web-based management UI, Synology DiskStation Manager (DSM), customize your own desktop, manage its taskbar, and use the Main Menu to access DSM settings and applications. Set up USB Station 2 For more information setting up USB Station 2, see the Quick Installation Guide that came with your installation disc.
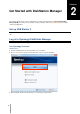
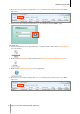
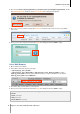
USB Station 2 User's Guide Based on DSM 3.1 4 Choose the server you want to manage. Click Connect or double-click the selected server to go to DSM's login screen. USBStation2-e 3.1-1705 USB Station 2 A1GAN00 5 Enter your user name and password, and click Login. The default password for admin is empty. Mac OS X User: 1 Insert the installation disc into the optical drive of your computer, and then double-click the SynologyInstall icon on the desktop.
USB Station 2 User's Guide Based on DSM 3.1 5 Enter your user name and password, and click Login. The default password for admin is empty. Linux (Ubuntu) User: 1 Insert the installation disc into the optical drive of your computer, and then double-click the SynologyInstall icon on the desktop. 2 In the File Browser window that appears, double-click the Linux folder, and then double-click Synology Assistant-[number].tar.gz. 3.1-1705. 3.1-1705.
USB Station 2 User's Guide Based on DSM 3.1 4 Go to the path /usr/local/SynologyAssistant (or [the path you just specified]/SynologyAssistant), doubleclick SynologyAssistant, and then select Run in Terminal in the dialog box that appears. 5 Choose the server you want to manage. Click Connect or double-click the selected server to go to DSM's login screen. USBStation2-e 3.1-1705 USB Station 2 A1GAN00 6 Enter your user name and password, and click Login. The default password for admin is empty.
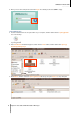
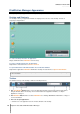
USB Station 2 User's Guide Based on DSM 3.1 DiskStation Manager Appearance When you log in to Synology DiskStation Manager (DSM), you can see the desktop and the taskbar. Desktop and Shortcuts The desktop is where your application windows are displayed. You can also create desktop shortcuts to frequently used applications. To create a desktop shortcut to an application: Drag its thumbnail from the Main Menu to the desktop.
USB Station 2 User's Guide Based on DSM 3.1 Right-click the icon and choose from the shortcut menu to manage the application window (Maximize, Minimize, Restore, Close) or its taskbar icon (Pin to Taskbar, Unpin from Taskbar). 4 The search field: Enter keywords to quickly find a list of relevant applications and DSM Help articles. 5 The Notification button (with an exclamation mark): Click to check the logs of important events. Click Clear All to remove all events and hide the Notification button.
USB Station 2 User's Guide Based on DSM 3.1 Use the Control Panel Choose Control Panel from the Main menu to see the thumbnails of DSM settings. The DSM settings on the Control Panel are grouped into the following categories: File Sharing and Privileges: Set up Win/Mac file sharing service, and assign application privileges for user accounts. Network Services: Manage and edit the settings for network services and Internet connection. System: Edit the basic settings on your USB Station 2.
USB Station 2 User's Guide Based on DSM 3.1 Manage Personal Options Click the Options button at the top-right corner of Main Menu to manage the following options for your DSM user account. Account Under Account, you can change your account's password and description. To modify your account: 1 Enter a description for your account (optional). 2 If you want to change your account's password, enter the new one and confirm it. 3 Click OK.
USB Station 2 User's Guide Based on DSM 3.1 To choose a background color for your desktop: 1 Tick Customize Wallpaper. 2 Choose a color from the Background color drop-down menu, or enter your own color value. 3 Click OK. Others Under Others, you can customize other personal options. To decide whether to expand the application after login: 1 Tick Do not expand the Main Menu after login. 2 Click OK.
Chapter Chapter 3: Modify System Settings After you have connected to Synology DiskStation Manager (DSM) and learned how to access its functions and customize its appearance, you can begin to modify its basic settings. This chapter explains how to change the network settings, specify default languages, set up time, and use energy saving features. Change DSM Settings Go to Main Menu > Control Panel > DSM Settings to change the following DSM settings.
USB Station 2 User's Guide Based on DSM 3.1 HTTP Service Click the HTTP Service tab to change the port number or enable HTTPS connection. To change the default HTTP or HTTPS port number (for DSM and Audio Station): 1 Enter the port number in the HTTP or HTTPS field. 2 Click OK. To enable HTTPS connection: 1 Tick Enable HTTPS connection. 2 Click the optional Import Certificate or check Automatically redirect HTTP connections to HTTPS. (See the section below for more information.) 3 Click OK.
USB Station 2 User's Guide Based on DSM 3.1 Security Click the security tab to modify the security level for each DSM browsing session. To set the logout timer: 1 Enter any value between 1 to 65535 in Logout timer (minutes) to specify the idle time period before the automatic logout. 2 Click OK. An automatic logout occurs if you are inactive for the specified time period. To skip IP checking: 1 Tick Enhance browser compatibility by skipping IP checking. 2 Click OK.
USB Station 2 User's Guide Based on DSM 3.1 Enable File Browser log Click the File Browser tab to start monitoring the File Browser activities of all users, including Upload, Download, Delete, Rename, Move, Copy and Property set. Note: For more information about File Browser, see "Access Files via File Browser" on Page 50. To enable File Browser log: 1 Tick Enable File Browser log. 2 Click OK. To see the File Browser log: Click View Logs.
USB Station 2 User's Guide Based on DSM 3.1 Enable Router Port Configuration Click the Router Port tab to enable router port configuration. When you set up DSM's port forwarding rule on your router, if you specifies different port numbers for the router port (assigned on your router) and the local port (assigned on your USB Station 2), you need to enter the router port number here to make sure USB Station 2 files you shared to Internet services (such as Google docs) can be accessed successfully.
USB Station 2 User's Guide Based on DSM 3.1 Change Network Settings Go to Main Menu > Control Panel > Network to modify the network settings of your USB Station 2. General In this section, you can change your USB Station 2 identification on the network by entering a server name. You can also set up the domain name server and default gateway here. To rename USB Station 2: Enter the new server name in the Server Name field, and click OK.
USB Station 2 User's Guide Based on DSM 3.1 Network Interface In this section, you can connect your USB Station 2 to the network via any of the following network interfaces. LAN If your USB Station 2 is connected to a local area network, you can click LAN on the left side to configure the network interface. To decide how your USB Station 2 obtains IP address: 1 Choose either of the following: Get network configuration automatically (DHCP): Get IP address automatically via DHCP.
USB Station 2 User's Guide Based on DSM 3.1 Wireless Network Click Wireless on the left side to connect USB Station 2 to a wireless network. Note: Wireless network is available only when a wireless dongle is plugged into the USB port of your USB Station 2. To set up a wireless network: Click Set up a wireless network and choose from the following options (If you are already connected to a wireless network, click Disconnect first).
USB Station 2 User's Guide Based on DSM 3.1 IPv6 Setup When you are configuring the LAN or Wireless interface, click the IPv6 Setup button to change the IPv6 settings. USB Station 2 supports IPv4/IPv6 dual stack scheme. This means that both IPv4 and IPv6 can work simultaneously on USB Station 2. The default setting for IPv6 is Auto. On the IPv6 Setup page, choose between the different setup types: Auto: USB Station 2 will automatically generate a local IPv6 address.
USB Station 2 User's Guide Based on DSM 3.1 To connect to the Internet via PPPoE: 1 Click PPPoE Setting. 2 Enter the account information provided by your ISP. 3 Click OK. Note: If you are still facing connection problems, contact your Internet Service Provider. Tunnel Tunnel is a technique that encapsulates IPv6 packets within IPv4 packets, allowing isolated IPv6 host or network to be compatible with IPv4 network backbone.
USB Station 2 User's Guide Based on DSM 3.1 Modify Regional Options Go to Main Menu > Control Panel > Regional Options to configure the following regional options. Language Click the Language tab to set the language for Synology DiskStation Manager, email notification, and specify the codepage for Unicode filename conversion. Display Language: Choose your preferred display language, or have it the same as your default browser setting.
USB Station 2 User's Guide Based on DSM 3.1 Set Up Time Click the Time tab to set up the time. You can check the current time, manually set the server's date and time, or have them set automatically using a network time server. To set the time zone: 1 Choose a time zone from the Time zone drop-down menu. 2 Click OK. To set the date and time manually: 1 Choose Manually and select the date and time. 2 Click OK.
USB Station 2 User's Guide Based on DSM 3.1 More Information Network Time Protocol (NTP) is used to synchronize the time of all clients and servers over a data network. Below are a few recommended NTP servers: time.apple.com time.asia.apple.com time.euro.apple.com time.nist.gov For more information about NTP Server, please visit http://www.eecis.udel.edu/~mills/ntp/servers.html Use Energy Saving Features Go to Main Menu > Control Panel > Power to manage the energy saving features provided by DSM.
Chapter Chapter 4: Manage External Disks Before sharing USB Station 2 with your users, you need to set up storage spaces first. This chapter explains how to access external disks connected to USB Station 2, and check their status. Manage External Disks You can attach external USB disks to the USB port of your USB Station 2 for backup or file sharing purposes. Go to Main Menu > Control Panel > External Devices to manage the attached external disks.
Chapter Chapter 5: Access USB Station 2 from the Internet You can connect to your USB Station 2 over the Internet, allowing its services to be accessible from anywhere and anytime. This chapter explains how to set up Internet connection with the easy-to-use Synology EZ-Internet wizard, or with the more advanced port forwarding function, and register a friendly DDNS hostname for your USB Station 2.
USB Station 2 User's Guide Based on DSM 3.1 Go to Main Menu > Control Panel > Router Configuration to set up your router and port forwarding rules. Note: To configure port forwarding rules and assign static IP address, you must have the administrative permission to the router. Set up Router Before adding port forwarding rules, you need to set up your router first. To set up your router: 1 Click Set up router to open the settings window.
USB Station 2 User's Guide Based on DSM 3.1 Add Port Forwarding Rules Add port forwarding rules to specify the destination ports of your USB Station 2 that will receive packages from specific router ports. To add port forwarding rules: 1 Click Create. 2 Do one of the following: If you want to create port forwarding rules for system services (for example, FTP), choose Built-in application and tick the system services. If you want to create port forwarding rules for custom services, choose Custom port.
USB Station 2 User's Guide Based on DSM 3.1 Service Requirement The DDNS server of the service provider is working normally. The gateway connection is normal. USB Station 2 is able to connect to the DNS server. The following addresses are unblocked in the Firewall: http://members.dyndns.org:80 http://checkip.dyndns.org:80 DDNS will only run in a network environment where there is no proxy server required.
USB Station 2 User's Guide Based on DSM 3.1 Method 2: Register a DDNS account at No-IP.com 1 Tick Enable DDNS support, choose No-IP.com from the Service provider drop-down menu, and then click Register Now. 2 In the window that appears, enter the hostname you want in the Hostname field. 3 Enter your account information: If you already have a No-IP.com account, select Use an existing No-IP.com account and enter the account information in the Email and Password field to log in. If you don't have a No-IP.
USB Station 2 User's Guide Based on DSM 3.1 4 Tick Enable email notification to receive email notification when an IP address is blocked. Make sure email notification is enabled for your USB Station 2 before using this option. Note: For more information about email notification, see "Receive Email Notification" on Page 115. To manage the blocked IP addresses: 1 Click Block List to check the blocked IP addresses. 2 If you want to remove an IP address from the block list, select it and click Remove.
Chapter Chapter 6: Set Up File Sharing File sharing is one of USB Station 2’s major functions. USB Station 2 can become the file sharing center within the Intranet or over the Internet, allowing users to access its files anytime and anywhere. This chapter explains how to enable the support for file sharing protocols for all platforms, create and manage users, and allow or deny access to the shared folders, applications or subfolders from specific users.
USB Station 2 User's Guide Based on DSM 3.1 Advanced Settings WINS Server Microsoft Windows Internet Name Service (WINS) is a NetBIOS name- to-IP-address mapping service. Window users will locate the system more easily on TCP/IP networks if the system has been configured to register with a WINS server. Support Windows offline files This option will enable support for Windows offline files and automatically enables CIFS opportunistic locking.
USB Station 2 User's Guide Based on DSM 3.1 To enable Mac file service: 1 Tick Enable Mac file service checkbox to make USB Station 2 a Mac file server (AFP server). 2 Set AppleTalk Zone or Time Machine backup folder if necessary. (See the sections below for more information.) 3 Click OK. More Information About AppleTalk Zone: A "Zone" is a logical grouping of devices in an AppleTalk network. If there are AppleTalk zones configured in your own network, the system will join the default zone automatically.
USB Station 2 User's Guide Based on DSM 3.1 Create and Edit Users Follow the steps below to create a user account. The user can login to edit his/her account info after the user account has been established. You can also choose to set an account expiration date or disallow the user to change account password. To create a user account: 1 Click Create to open the User Creation Wizard. 2 Enter the user name and other information, and click Next.
USB Station 2 User's Guide Based on DSM 3.1 Note: All fields are optional except Username. An example of the text file is shown as follows: eddy 1234 father eddy@abc.com rosy 5678 mother rosy@abc.com chaddy 8901 brother chaddy@abc.com eric 2345 cousin eric@abc.com 2 Save the text file in UTF-8 encoding. 3 Go to Main Menu > Control Panel > User and choose Create > Import Users. 4 Choose the text file and click OK to start uploading.
USB Station 2 User's Guide Based on DSM 3.1 Note: Password Strength rules only work for passwords created or modified after the Password Strength service is enabled. Existing passwords won’t be affected by the rules. The rules won’t apply to the passwords of users created by importing users list. To apply password strength rules: 1 Click Password Strength. 2 Tick Apply password strength rules.
USB Station 2 User's Guide Based on DSM 3.1 3 Do any of the following if you want to see the complete users list: Choose Privilege includes and any from the drop-down menus. Delete the name you entered in the search field. To allow users to access applications for USB Station 2: 1 From the users list, select the users whose application privileges you want to modify. (Press and hold Shift or Ctrl while making multiple selections.) 2 Click Edit and tick the checkboxes to grant access to the applications.
USB Station 2 User's Guide Based on DSM 3.1 Read/Write (RW): The user can access and make changes to the files and subfolders in the shared folder. Read only (RO): The user can access the files and subfolders in the shared folder, but cannot make changes to them. No access (NA): The user cannot access the files and subfolders in the shared folder. 4 Click OK. Note: When you encounter privilege conflicts, the privilege priority is as follows: No access > Read/Write > Read only.
Chapter Chapter 7: 7 Access Files from Anywhere When you have set up users with proper access privileges to the shared folders, they can share their files with your USB Station 2 from anywhere. This chapter explains the ways to access the USB Station 2 shared folders within the Intranet or over the Internet. Access Files within the Intranet This section explains how to allow users to use Windows or Mac computer to access shared folders on USB Station 2 within the Intranet.
USB Station 2 User's Guide Based on DSM 3.1 Method 3: Use Window Explorer. 1 Open a Windows Explorer window and choose Tools > Map network drive to show the Map Network Drive window. 2 Choose a drive number from the Drive drop-down menu. 3 Locate the shared folder by doing one of the following: Enter \\Synology_Server_Name\Shared_Folder_Name in the Folder field. Click Browse to locate the shared folder, and then click OK. 4 Click Finish.
USB Station 2 User's Guide Based on DSM 3.1 Access Shared Folders from Mac 1 Choose Go > Connect to Server from the menu bar. 2 Type USB Station 2's IP address or server name (appended with .local) preceded by smb:// or afp:// in the Server Address field and click Connect. (e.g. smb://EricaWang.local or afp://192.168.0.2) Note: For better performance, it is recommended that you connect to the shared folders via SMB. 3 Select the shared folder you want to access.
USB Station 2 User's Guide Based on DSM 3.1 Access Files via WebDAV This section explains how to allow users to use Windows or Mac computer to manage and edit files on USB Station 2 via WebDAV remotely. To Enable WebDAV: Click the WebDAV tab at Main Menu > Control Panel > Web Services to enable WebDAV. For HTTP connection: a Tick the Enable WebDAV checkbox. The default port number for the WebDAV service is 5005. b Click OK. For HTTPS connection: a Tick the Enable WebDAV HTTPS connection checkbox.
USB Station 2 User's Guide Based on DSM 3.1 8 Name this network drive. Click Next. 9 Click Finish to finish the settings. Note: Before you start using a WebDAV client software under Windows environment, please check if you have installed Windows patch Web Folders (KB907306). When using WebDAV service under Windows environment, if you want to switch to another user account, you need to log out of Windows system first.
USB Station 2 User's Guide Based on DSM 3.1 Access Files via FTP If your USB Station 2 is accessible over the Internet, you can use a FTP application to access the shared folders. Note: For more information about making USB Station 2 accessible over the Internet, see "Chapter 5: Access USB Station 2 from the Internet" on Page 29. Go to Main Menu > Control Panel > FTP to enable FTP service, allowing users to upload or download USB Station 2 data via FTP. To enable FTP service: 1 Tick Enable FTP service.
USB Station 2 User's Guide Based on DSM 3.1 Advanced Settings Report external IP in PASV mode By enabling this option, the server will report its external IP to FTP clients. The reported IP will be listed in the connection log of the FTP client. This option only works when the server is behind a NAT, and with the FTP clients residing in a different subnet as the server.
USB Station 2 User's Guide Based on DSM 3.1 Enable Anonymous FTP Click the Security Settings tab to allow anyone to log in to USB Station 2's FTP service (with the anonymous or ftp account). To manage FTP security settings: 1 Tick Enable Anonymous FTP. You can also tick Change Anonymous root and select a shared folder to restrict anonymous users’ FTP access to that folder only. 2 Click OK.
USB Station 2 User's Guide Based on DSM 3.1 File Browser Requirement To use the full featured File Browser, you will need the newest web browser, Java and Flash Player. Browser: Chrome, Firefox 3.5 or later, Safari 4.0 or later, Internet Explorer 7 or later; with AJAX and JavaScript enabled Java (For browsing folders on the local computer): Java Runtime Environment (JRE) 5 or later Flash: Flash Player 9.0.
USB Station 2 User's Guide Based on DSM 3.1 To search for files or folders in the current folder: 1 Use File Browser to go to the folder containing contents you want to search. 2 In the Filter field at the top-right corner of the File Browser window, enter a keyword and see the filtered result in the main area of the window. To perform advanced search: 1 Use File Browser to go to the folder containing contents you want to search.
USB Station 2 User's Guide Based on DSM 3.1 Method 1: 1 Select the files or folders you want to download. (Press and hold Shift or Ctrl while making multiple selections.) 2 Choose Download from the Action menu. Method 2: 1 Select the files or folders you want to download. (Press and hold Shift or Ctrl while making multiple selections.) 2 Right-click the files or folders, and choose Download.
USB Station 2 User's Guide Based on DSM 3.1 You can also click the upward arrow at the right end of the taskbar to see the Upload Queue. Copy or Move Files or Folders on USB Station 2 Use any of the following methods to copy files or folders between folders on USB Station 2. Method 1: 1 Select the files or folders you want. (Press and hold Shift or Ctrl while making multiple selections.) 2 Choose Copy or Move from the Action menu. 3 Select a destination folder on USB Station 2 in the window that appears.
USB Station 2 User's Guide Based on DSM 3.1 Create a Folder 1 Go to the directory where you want to create a folder. 2 Do any of the following: Click Create folder. Choose Create folder from the Action menu. 3 Enter a new name in the window that appears and click OK. Delete Files or Folders 1 Select the files or folders you want. (Press and hold Shift or Ctrl while making multiple selections.) 2 Do one of the following: Choose Delete from the Action menu.
USB Station 2 User's Guide Based on DSM 3.1 Obtain a File or Folder’s Download Link You can obtain the download link to a file or folder and share the link with other users. To obtain a file or folder's download link: 1 Select the file or folder for which you want to obtain its download link. 2 Do one of the following to open the Properties window: Choose Properties from the Action menu. Right-click the file or folder and choose Properties.
USB Station 2 User's Guide Based on DSM 3.1 To view or edit music information: 1 Right-click the music file and choose Edit music information. 2 Here you can view or modify the music file's information, or choose a language from the Codepage drop-down menu to convert non-Unicode text to Unicode and display the text in the correct language. (System default is the codepage you specified at Main Menu > Control Panel > Regional Options.) 3 Click Save to finish the setup.
USB Station 2 User's Guide Based on DSM 3.1 Preview Photos 1 Browse to the folder where the photos are located. 2 Right-click any of the photos and choose Preview to open the Photo Viewer window. You should be able to view the photo now.
USB Station 2 User's Guide Based on DSM 3.1 Play Videos 1 Browse to the folder where the video is located. 2 Right-click the video and choose Play to open the Video Player window. 3 The video should start playing right away. If not, please make sure you have installed VLC Player (Windows, Linux) or VLC web browser plugin (Mac) on your local computer. Note: While installing VLC Player, make sure you have ticked Mozilla plugin and ActiveX plugin.
USB Station 2 User's Guide Based on DSM 3.1 Display Additional Attributes You can display additional attributes of files or folders to show them in new columns of the main section. To display additional attributes: 1 Hover your mouse to any column header and click the downward triangle that appears on the right. 2 From the drop-down menu that appears, choose the Columns submenu. 3 Tick the checkboxes next to the extra attributes to show them in new columns.
Chapter Chapter 8: Back Up Data Synology offers comprehensive backup solutions for your computer. You can back up data on your computer to USB Station 2. Back Up Computer Data Synology-designed Data Replicator 3 allows you to back up data from a Windows computer to USB Station 2. Use Data Replicator for Windows The Synology Data Replicator installation package can be found on the installation disc and Synology's Download Center at: http://www.synology.com/support/download.
USB Station 2 User's Guide Based on DSM 3.1 Important: Your computer and USB Station 2 should use the same encoding. See "Language" on Page 25 for more information.
Chapter Chapter 9: Host a Print Server USB Station 2 is especially designed for small and medium businesses (SMB), providing them with the ability to set up a print server on USB Station 2 without spending extra money. Set USB Station 2 as Print Server Go to Main Menu > Control Panel > External Devices to set USB Station 2 as the print server over your local area network, allowing client computers or mobile devices to access printers connected to USB Station 2 for 1 printing, faxing, or scanning.
USB Station 2 User's Guide Based on DSM 3.1 Set up Print Server on USB Station 2 Under the External Devices tab, you can set up print server on USB Station 2. To set up print server on USB Station 2: 1 Connect the network printer to the USB port of USB Station 2, and select the printer's thumbnail appearing on the device list.
USB Station 2 User's Guide Based on DSM 3.1 Access Print Server with iOS Devices If you have enabled DSM's AirPrint support by following the instructions of the "Set up Print Server on USB Station 2" section, any iOS devices running on iOS 4.2 or later can print to the printer connected to your USB 1 Station 2. To access the print server with an iOS device: 1 Use your iOS device to browse to the document, web page, mail message, or photo you want to print. 2 Tap the action button, and then tap Print.
USB Station 2 User's Guide Based on DSM 3.1 Set up Computer to Access Print Server After the print server is set up on your USB Station 2, Windows, Mac, and Linux client over the local area network can connect to the print server and access its print/fax/scan service. To set up print server access with Windows: 1 Install and open Synology Assistant on your computer. 2 Click the Printer Device tab, click the Add button, and follow the wizard to complete the setup process.
USB Station 2 User's Guide Based on DSM 3.1 For more information about attaching or releasing a printer, click the Help button at the top-right corner of Synology Assistant, and refer to the Attach/Release the printer section. To release the connection between the multifunctional printer and a client: 1 Select the printer from the device list. 2 Choose USB Printer Manager > Release Printer. Note: Release Printer is only necessary for the Network MFP mode.
Chapter Chapter 10: Play Music with Audio Station 10 Audio Station is a web-based audio application, allowing you to access the music library on your USB Station 2, choose available audio sources on the local area network, and add your favorite music to playlists for playback. With Audio Station, you can also browse and play songs on your iPod or on the DLNA-certified Digital Media Servers, and listen to Internet radio.
USB Station 2 User's Guide Based on DSM 3.1 Enable Audio Station Go to Main Menu > Control Panel > Audio Station to enable Audio Station. To Enable Audio Station: Click Enable Audio Station 3 and click OK. To re-index audio files: Click Re-index to reconstruct the index structure of the audio files If you found missing music in Audio Station. The process will be executed in the background. To launch Audio Station, do any of the following: Click Launch Audio Station.
USB Station 2 User's Guide Based on DSM 3.1 Choose Audio Source On the left section of Audio Station are several audio sources you can choose from for playback on Audio Station. Library The library contains music in the music shared folders of your USB Station 2, which will be organized into the following categories. To browse your music library, do any of the following: Click All Music to browse all music in the music shared folder. Click By Folder to browse music by directory.
USB Station 2 User's Guide Based on DSM 3.1 Smart Playlist You can click the disclosure triangle next to Smart Playlist to see your smart playlists. To refresh your smart playlist: Select Refresh to update all smart playlists. To add or edit a smart playlist, do any of the following: Add or edit in DSM: a Go to Main Menu > Control Panel > iTunes in Synology DiskStation Manager. b Click Smart Playlist to add or edit your playlist.
USB Station 2 User's Guide Based on DSM 3.1 Organize Your Music After selecting one of the audio sources on the left side, you can browse its contents in the main section of the Audio Station, and organize your favorite music into playlists. Browse Music You can change views, see your current location, and use the search field to find your music quickly.
USB Station 2 User's Guide Based on DSM 3.1 Click any of the path names to the right of the Up icon to go back to a previous directory. Search Music You can use the search field above the music player section of Audio Station to search your music. To search music: 1 Choose a category from the All Categories drop-down menu. 2 Enter a word or phrase in the search field. 3 Press Enter (PC) or Return (Mac) on your keyboard. The search result will appear in the main section.
USB Station 2 User's Guide Based on DSM 3.1 Display Additional Attributes You can display additional attributes of your music to show them in new columns of the main section. To display additional attributes: 1 Hover the pointer over any column header of the main section, and click the downward arrow that appears to the right of the header. 2 From the pop-up menu, choose the Columns submenu. 3 Tick the checkboxes next to the extra attributes to show them in new columns.
USB Station 2 User's Guide Based on DSM 3.1 Note: You cannot add folders to playlists. You can also add songs from the queue to a new playlist. See "About the Output Modes and the Queue Panel" on Page 76 for more information. DSM admin can create shared smart playlists by going to DSM's Main Menu > Control Panel > iTunes and clicking the Smart Playlist button. To rename or remove a playlist: Right-click the playlist and choose Rename or Delete.
USB Station 2 User's Guide Based on DSM 3.1 About the Output Modes and the Queue Panel To play music via different devices, you can add songs to the different output modes in the queue panel. The output modes include the following: Streaming Mode: Stream music to your computer for playback via the speakers of your computer.
USB Station 2 User's Guide Based on DSM 3.1 To add a playlist to the queue and replace the existing songs in the queue: Right-click the playlist and choose Play. Audio Station will play the songs in the playlist immediately. To append a playlist to the queue without replacing the existing songs in the queue: Right-click the playlist and choose Add to queue. Manage Songs in the Queue Panel To play a song in the queue: Right-click the song and choose Play to play it right away.
USB Station 2 User's Guide Based on DSM 3.1 To skip to any point in the currently playing song: Drag the playhead along the timeline (below the song's duration) to any point you want. To customize sound frequencies with equalizer (USB mode only): Click the EQ button to open the equalizer, tick the checkbox, and choose a preset from the drop-down menu. You can also drag the sliders and save your own User Defined preset. To adjust the volume: Drag the volume slider below the timeline.
USB Station 2 User's Guide Based on DSM 3.1 To enable transcoder: 1 Go to Settings > Transcoder. 2 Tick Enable transcoders. 3 Click OK. Note: Transcoder is supported on specific browsers only: Firefox 3.5 and above, Safari 5, Opera 10.60 Download Music You can enable music download and then download songs from Audio Station to your local computer. To enable music download: 1 Click Settings and then click the Options tab. 2 Tick Enable music download. 3 Click OK.
Chapter Chapter 11: Download Files with Download Station 11 Download Station is a web-based download application, allowing you to download files from the Internet to your USB Station 2. This chapter explains how to enable Download Station and manage download tasks. Important: Before enabling Download Station, make sure you have chosen your multimedia source and refreshed the multimedia database at Main Menu > Control Panel > Multimedia Database.
USB Station 2 User's Guide Based on DSM 3.1 To enable Download Station: Tick Enable BT/HTTP/FTP/NZB downloads or/and Enable eMule downloads, depending on which download methods you want to use. To connect to Download Station, do any of the following: Click Launch Download Station. Go to Main Menu > Download Station. To go to the BT/HTTP/FTP/NZB or eMule section of Download Station: After connecting to Download Station, click the BT/HTTP/FTP/NZB or eMule tab at the bottom of Download Station.
USB Station 2 User's Guide Based on DSM 3.1 General In this section, you can set download schedule, specify download destination folder, prioritize process order, and enable notification. usbshare1 Download Schedule You can limit BT/HTTP/FTP/NZB's download tasks to certain time period of a week and alternative speeds, so that you can free up more network bandwidth when needed.
USB Station 2 User's Guide Based on DSM 3.1 To set advanced schedule: 1 Tick Advanced schedule. 2 Click Schedule Plan and do the following: a If you want to limit download tasks to alternative speeds during certain periods of a week, enter the maximum download or upload rates in the Alternative Speed Settings section. ("0" means unlimited.) b Choose any of the following and click on the grid to limit download tasks' time or speeds to certain period of a week: No Download: Do not download or upload files.
USB Station 2 User's Guide Based on DSM 3.1 Torrent Search In this section, you can see a list of default BitTorrent search engines. When you use the Torrent Search function to search for torrent files, Download Station will list search results provided by these search engines. You can also click Add and upload a BitTorrent search engine plug-in to add your favorite BitTorrent search engines to the list.
USB Station 2 User's Guide Based on DSM 3.1 Create BT/HTTP/FTP/NZB Download Tasks This section explains how to create BitTorrent/HTTP/FTP/NZB tasks. Create by Uploading Files You can create download tasks by uploading the following files from your local computer to Download Station: Torrent (.torrent) contains information for downloading files being shared over the BitTorrent network. NZB (.nzb) contains information for retrieving posts from news servers. URL (.
USB Station 2 User's Guide Based on DSM 3.1 Create by Entering URLs You can create download tasks by entering URLs. usbshare1 To create download tasks by entering URLs: 1 Click Add. 2 In the window that appears, enter the URLs of the file you want to download. You can enter up to 20 URLs in the box. Note: If you want to download a FTP folder, simply enter the FTP link with the forward slash (/) at the end of the link. All of the files and sub-directories in the folder will be downloaded.
USB Station 2 User's Guide Based on DSM 3.1 Create via Torrent Search You can search for torrent files with BitTorrent search engines to help you find your favorite downloads more easily. Note: Before you use the Search function, make sure you have enabled at least one search engine at Setting > Torrent Search. See "Torrent Search" on Page 84 for more information.
USB Station 2 User's Guide Based on DSM 3.1 Create Download Tasks for RSS Feeds You can use Download Station to download RSS feeds. More Information What is RSS? RSS (Really Simple Syndication, also known as RSS feed) is an alternative way of web browsing. Web publishers often use RSS feeds to publish frequently-updated works, such as blog entries, news headlines, podcasts, photo albums, or audio/video clips.
USB Station 2 User's Guide Based on DSM 3.1 5 Select the RSS file and view the list of its RSS feeds under the RSS Feeds tab. 6 Click Update above the file list to update the list of RSS feeds for the selected RSS file, or click Update All to update the lists of RSS feeds for all RSS files in the file list. Note: Download Station automatically updates the lists of RSS feeds on a daily basis.
USB Station 2 User's Guide Based on DSM 3.1 To create download tasks by setting download filter: 1 Click RSS Feeds on the left panel, and then select the RSS file containing feeds you want to download. 2 Under the Download Filter tab, click Add.
USB Station 2 User's Guide Based on DSM 3.1 Manage BT/HTTP/FTP/NZB Download Tasks You can check and manage the download tasks you just created. View BitTorrent/HTTP/FTP/NZB Tasks Click any of the following on the left panel to view BitTorrent/HTTP/FTP/NZB tasks: All Downloads lists all download tasks. Downloading lists download tasks that are currently downloading. Completed lists download tasks that are completely downloaded.
USB Station 2 User's Guide Based on DSM 3.1 To edit download tasks: 1 Click Edit to customize the general settings (auto stop task, maximum upload/download rate, maximum peers allowed per torrent) and tracker lists for the current task. 2 Click OK. Note: To edit the default setting for all download tasks, refer to "Set up BT/HTTP/FTP/NZB" on Page 81. The maximum upload/download rates and the maximum peers allowed per torrent cannot exceed the default setting.
USB Station 2 User's Guide Based on DSM 3.1 Set up eMule Click the eMule tab at the bottom of Download Station, and click the gear icon next to the search field at the top of Download Station to manage the following settings of eMule. Note: For detailed information about eMule settings, open DSM Help and then go to Download Station > eMule > Set up eMule. General In this section, you can manage the settings of ED2K server, notification, and protocol obfuscation.
USB Station 2 User's Guide Based on DSM 3.1 Connection In this section, you can set up connection for eMule downloads. Location In this section, you can set the default destination folder for eMule, and share your files on the ED2K network. usbshare1 usbshare1/muse To set the download destination folder for eMule: 1 Click Select and choose a folder. 2 Click Select. 3 Click OK. To specify folders you want to share with other eMule clients: 1 Click Select and choose a folder. 2 Click Select. 3 Click OK.
USB Station 2 User's Guide Based on DSM 3.1 Bandwidth In this section, you can set upload and download rates and download schedule to limit download and upload bandwidths. To set upload and download rates: Enter the maximum upload and download rate for eMule downloads and uploads. ("0" means unlimited.) To set the download schedule: Like BT/HTTP/FTP/NZB’s download schedule, eMule’s download schedule is set up in the same manner. See "Download Schedule" on Page 82 for more information.
USB Station 2 User's Guide Based on DSM 3.1 Update server.met from URL: Enter the URL of the server.met file (e.g. http://www.synology.com/server.met). 3 Click Add. To delete ED2K servers: Select the servers from the list and click the Delete button. To connect to a random ED2K server: 1 Double-click a server from the server list. 2 Wait for the server to be connected. When the selected server is full or has an invalid IP address, the system will randomly connect to an available server.
USB Station 2 User's Guide Based on DSM 3.1 Create by Uploading Files You can create download tasks by uploading a text file (.txt) containing ED2K links from your local computer to Download Station: usbshare1 To create download tasks by uploading a file: 1 Click Download Queue on the left panel, and then click the Create button. 2 Choose Open a file and click the button to browse to the text file for upload. 3 Click Create. To resume an eMule download task: 1 Select one or more tasks in the list.
USB Station 2 User's Guide Based on DSM 3.1 Create by Entering URLs You can create download tasks by entering URLs. usbshare1 To create download tasks by entering URLs: 1 Click Create. 2 In the window that appears, choose Enter URL, and enter the URLs of the file you want to download. You can enter up to 20 URLs in the box. 3 Click Create. Create via eMule Search Click Search on the left panel to search and download the files your are looking for.
USB Station 2 User's Guide Based on DSM 3.1 To create download tasks via general search: 1 Enter a keyword in the search field at the top-left corner of eMule, select a file type and search method. Press "Enter" on your keyboard to start searching. Click Start/Stop search to stop searching. 2 The search result of available files will be listed in the main area, and might be shown in the following colors: Blue: There are sufficient sources available on the network for those files.
USB Station 2 User's Guide Based on DSM 3.1 Manage eMule Download Tasks You can check the download tasks you just created, and manage the tasks with eMule. Manage Download Queue Click Download Queue on the left panel to manage the download tasks. To pause/resume/remove download tasks: 1 Select the download task(s) you want to pause, resume, or remove. 2 Click Pause or Resume or Remove. To view detailed information about a download task: 1 Select the download task you want to view.
USB Station 2 User's Guide Based on DSM 3.1 To edit download tasks: 1 Click Edit to edit the priority and change destination folder for the task. /usbshare1/muse Note: To change the default destination folders for all download tasks, see "Location" on Page 94. 2 Click OK. To clear finished download tasks: Click Clear. Downloaded files will remain in the destination shared folder. Check Upload Queue Click Uploading on the left panel to check your shared files currently uploaded to other eMule clients.
Chapter Chapter 12: Manage Media Server and iTunes Service 12 USB Station 2 can become a multimedia server on the local area network, allowing computers (using Windows Media Player or iTunes) and DLNA/UPnP home devices (such as stereo system or TV set) to play its multimedia contents. This chapter explains how to stream multimedia contents from USB Station 2 to your computer or other DLNA/UPnP home devices.
USB Station 2 User's Guide Based on DSM 3.1 To enable DLNA/UPnP media server: Tick Enable DLNA/UPnP media server and click OK. Determine the DMA Menu Language and Style You can decide how to organize your multimedia files on the DMA menu by selecting a predefined menu style or customizing your own. The system can save up to three different sets of customized menu styles. To determine the DMA menu language: Choose a language from the DMA menu language drop-down menu.
USB Station 2 User's Guide Based on DSM 3.1 Manage Browsing Settings In the Browsing Settings section, you can manage the browsing settings for DMA. To change how your music files will be displayed: Select a Music display format from the drop-down menu. To set album cover (for music files without an embedded image) or video thumbnails: 1 Tick Set images with the below filenames as music/video cover. 2 Enter Filenames such as Cover.
USB Station 2 User's Guide Based on DSM 3.1 Enhance DMA Compatibility In the DMA Compatibility section, you can enhance DMA compatibility to make sure the multimedia contents on your USB Station 2 are played smoothly on your DMA devices. To enable transcoder settings: Tick the following checkboxes to enable transcoders if your DMA does not support the following audio formats: FLAC, APE, AAC, OGG, and AIFF.
USB Station 2 User's Guide Based on DSM 3.1 Manage iTunes Service Go to Main Menu > Control Panel > iTunes to use iTunes service. After it is enabled, all iTunes clients on the same local area network can browse and play songs or videos on your USB Station 2. The following formats will be supported by iTunes service: Audio: MP3, M4A, M4P Video: MOV, MP4, M4V Playlist: WPL, M3U Enable iTunes Service 1 Tick Enable iTunes service and enter your Shared name.
USB Station 2 User's Guide Based on DSM 3.1 Select the item and click Edit. 2 Do any of the following to modify the rules: Modify the rules by choosing items from the drop-down menus. Click Add Rule if you want to add a rule. Select a rule and click Delete Rule if you want to delete the rule. 3 Click OK. To delete a smart playlist: 1 Select the smart playlist you want to delete. 2 Click Delete and then click Yes. Note: You can also create and edit smart playlists with Audio Station.
Chapter Chapter 13: Perform Advanced Management Tasks 13 Synology DiskStation Manager comes with a variety of management functions, allowing you to check system information, monitor system resources, receive notification, restore or upgrade DSM, and more. This chapter explains how to comprehend those management functions to make sure your USB Station 2 is providing the best performance.
USB Station 2 User's Guide Based on DSM 3.1 3 Click OK. Multimedia files and log records in the selected shared folders will be indexed, and the indexed information will be added to the multimedia database. To refresh the multimedia database: 1 Click Refresh Database. All data in the multimedia database will be replaced by re-indexed information about the current multimedia source. The process will be executed in the background. 2 Click OK.
USB Station 2 User's Guide Based on DSM 3.1 Network You can view the status of network configuration and network interfaces. The network status includes the following: Basic information: See the basic information of your USB Station 2’s network configuration. [Interface Name]: See the detailed information of the network interface(s) currently configured on your USB Station 2. Storage You can check the free or used space and the status of your USB storage devices.
USB Station 2 User's Guide Based on DSM 3.1 To check volume usage: From the pie charts, you can see the free or used space of your USB storage devices. The hard drive status might be any of the following: Normal: USB storage devices are available for use. Not Initialized: USB storage devices cannot be recognized by USB Station 2. Crashed: Failed to access data on USB storage devices. We recommend that you replace this device.
USB Station 2 User's Guide Based on DSM 3.1 To refresh the log: Click Refresh to reload the page and get the most updated log records. Note: When the log size reaches its limit, the oldest record will be removed for space-saving consideration. Monitor System Resources Go to Main Menu > Resource Monitor to monitor system resources. When you launch Resource Monitor, it will start to collect and display data. The data will be deleted when you quit the application.
USB Station 2 User's Guide Based on DSM 3.1 Update DSM Go to Main Menu > Control Panel > DSM Update to keep your USB Station 2 up to date. Important: The data saved on the USB Station 2 will not be erased during the updating process. However, for security reason, we strongly recommend that you back up the data first. To check if the latest DSM is available for download: When you go to this page, the system will check available space on your external storage device.
USB Station 2 User's Guide Based on DSM 3.1 4 Do any of the following: If DSM download completed, click Update now to start updating DSM immediately. If DSM download failed, click Retry to have the system download the latest DSM from Synology again. Troubleshooting If you see error messages (in red text) during checking or downloading the latest DSM, the following suggestions might help solve your problem: Make sure your USB Station 2 is connected to the Internet.
USB Station 2 User's Guide Based on DSM 3.1 Receive Event Notification Go to Main Menu > Control Panel > Notification and set up USB Station 2 to notify you via Email whenever an important event occurs (for example, status change, system error, or lost connection). Receive Email Notification Click the Email tab in the main section to set up email notification. To set up Email notification: 1 Enter the SMTP server name or IP address. 2 By default, the SMTP port number is 25.
USB Station 2 User's Guide Based on DSM 3.1 Reset admin's Password If you forgot the password for admin and are therefore unable to log in to DSM, you can reset the password to blank and set a new password. To reset admin's password: Press and hold the RESET button on the back panel of your USB Station 2 for 4 seconds. Note: Other than resetting administrator's password, using the RESET button will also restore USB Station 2 to factory defaults.
USB Station 2 User's Guide Based on DSM 3.1 Note: When you disable the SSH service, all SSH tasks will be terminated immediately. If you disable the SSH service while performing a backup task, perform the task again after the SSH service is disabled. 2 Click OK. Important: Use the Terminal service with caution. Improper manipulation or modification to USB Station 2 may result in system malfunction or data loss.
Chapter Chapter 14: Communicate with Mobile Devices 14 As Internet access grows popular on mobile devices, Synology provides you with several creative alternatives to communicate with your USB Station 2 using iOS, Android, or other mobile devices. Use iOS and Android Apps The mobile apps designed by Synology are now available on Apple's App Store or Android Market, allowing you to communicate with USB Station 2 wherever wireless network access is available.
Appendix Appendix A: A Specifications For the most recent product specification, please visit www.synology.com. USB Station 2 Model USB Station 2 CPU 800 MHz RAM DDR2 128MB External Interface USB x 2 Max HDD Capacity 4TB (2TB USB Disk x 2) LAN Port Gigabit x 1 Size (HxWxD) (mm) 46 x 122 x 111 Weight (g) 147 ‧Windows 2000 onward Supported Clients ‧Mac OS X 10.3 onward Max. User Accounts 32 Max.
Appendix Appendix B: B LED Indication Tables USB Station2 LED Indication LAN Color Green Green Status Description Static Gigabit Link Blinking Network is active Off Network is down Static USB Disk is normal Blinking USB Disk is being accessed Off No USB Disk Static USB Disk error Static Power ready Blinking Booting up Off Power off USB DISK Orange POWER Green
USB Station 2 User's Guide Based on DSM 3.1 Troubleshooting For any questions about managing your USB Station 2, go to Main Menu > DSM Help or click the Help button (with a question mark) at the top-right corner of every window. For any questions other than that, please visit Synology Inc. website www.synology.com for further assistance.
SYNOLOGY, INC. END USER LICENSE AGREEMENT IMPORTANT–READ CAREFULLY: THIS END USER LICENSE AGREEMENT ("EULA") IS A LEGAL AGREEMENT BETWEEN YOU (EITHER AN INDIVIDUAL OR A SINGLE ENTITY) AND SYNOLOGY, INC. AND ITS AFFILIATES, INCLUDING SYNOLOGY AMERICAN CORP AND SYNOLOGY UK LTD., (COLLECTIVELY, "SYNOLOGY") FOR ANY SYNOLOGY SOFTWARE, TOGETHER WITH ANY OTHER ASSOCIATED FIRMWARE, MEDIA, PRINTED MATERIALS AND "ONLINE" OR ELECTRONIC DOCUMENTATION (COLLECTIVELY, THE "SOFTWARE") AVAILABLE FOR DOWNLOAD AT WWW.
INABILITY TO USE THE SOFTWARE OR OTHERWISE UNDER OR IN CONNECTION WITH THIS EULA OR THE SOFTWARE, WHETHER BASED ON CONTRACT, TORT (INCLUDING NEGLIGENCE), STRICT LIABILITY OR OTHER THEORY EVEN IF SYNOLOGY HAS BEEN ADVISED OF THE POSSIBILITY OF SUCH DAMAGES. Section 13. Limitation of Liability.
SYNOLOGY, INC. LIMITED PRODUCT WARRANTY THIS LIMITED WARRANTY ("WARRANTY") APPLIES TO THE PRODUCTS (AS DEFINED BELOW) OF SYNOLOGY, INC. AND ITS AFFILIATES, INCLUDING SYNOLOGY AMERICA CORP AND SYNOLOGY UK LTD., (COLLECTIVELY, "SYNOLOGY"). YOU ACCEPT AND AGREE TO BE BOUND BY THE TERMS OF THIS WARRANTY BY OPENING THE PACKAGE CONTAINING AND/OR USING THE PRODUCT. IF YOU DO NOT AGREE TO THE TERMS OF THIS WARRANTY, DO NOT USE THE PRODUCT.
Product specifications and such failure is attributable to causes not within or under Synology's control.
proceedings will be final and binding on the parties, and judgment may be entered thereon in any court of competent jurisdiction.