
Manual Thermoplus


Thermoplus
17
EN
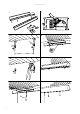
1. Remove the front plate, and detach the
electrical connections from the back plate.
2. Fit the brackets to the wall below the
coving. See Table B for distance between
brackets. Allow 15 mm for heater
expansion.
3. Break off the top spacing part of the
brackets at the break mark.
4. Fasten the back plate to the brackets.
5. In the connection box on the heater there
are additional plinths to make it possible to
further connect to a slave device (ECVTN).
6. Press the two u-nuts into place in the
bottom flange of the backplate.
7. Re-connect the wiring, be sure to place
the joints in the connections box. Hook
the front panel onto the top flange of the
backplate.
8. Lower the front plate and screw into place
via the two u-nuts.
Connection
Thermoplus is intended for permanent
installation. Thermoplus is equipped with
extra terminal board sections for further
current distribution. A junction box is
therefore not required.
Mounting
Thermoplus among other things is used to
protect against cold draughts from windows
and is mounted horizontally above the
window. Two wall mounting brackets are
included as standard. Fixtures for ceiling
mounting are extra, TF1. For minimum
mounting distance, see p.3.
Installation and operating instructions
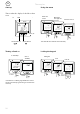
Control
When using this product as a local space
heater according to Ecodesign Regulation
(EU) 2015/1188, it must be supplemented
with one of the following approved controls.
Please note that a relaybox RB3 is required
for 400V~ products.
• TAP16R, electronic thermostat that
includes:
- Electronic room temperature control plus
week timer
- Room temperature control with open
window detection
The product can be controlled in a different
way, e.g. by an overall control system (BMS),
but in that case the responsibility lies with
the installer to ensure that the control system
is programmed to make the installation meet
the requirements of Ecodesign Regulation
(EU) 2015/1188. For ECVTN with a built-
in thermostat, see separate chapter about
control.
Start-up
When the unit is used for the first time or
after a long period of disuse, smoke or odour
may result from dust or dirt that has collected
on the element. This is completely normal
and disappears after a short time.
Maintenance
In all electrical heating appliances, small
clicks can occur due to movement when the
material expands and contracts with changes
in temperature.
General Instructions
Read these instructions carefully before
installation and use. Keep this manual for
future reference.
The product may only be used as set out in
the assembly and operating instructions. The
guarantee is only valid if the product is used
in the manner intended and in accordance
with the instructions.
Application area
Thermoplus is mounted above windows
and gives an effecient protection against
cold draught. The slim shape also makes it
suitable for heating areas with limited space,
like for example bathrooms. Thermoplus can
furthermore be a cost-effective and flexible
alternative to floor heating.
• Thermoplus is available in following
versions:
- - Type EC, for dry rooms. IP20.
- - Type ECV, for wet rooms. IP44.
- - Type ECVTN, for wet rooms. With a built-
in thermostat (+5 – +37 °C). IP44.
- Can also be connected to control over ECV,
max. total load 10A/3200W.