nets n IH ‘Dear Customer, please read the following information carefully before using the appliance for the first ime for your awn safety and to ensure correct use and installation. « The Flush Mount Enclosure i an ideal way to neatly install the heater into a ceiling. Flush mounting can be used with any bulling grade selling materials. ~ Maximum mounting heights should be strictly followed, otherwise the performance of the units may be reduced. The enclosure is manufactured from stainless steel.
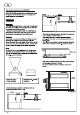
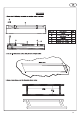
1 Please check if following accessories are complete before installation: ts Part no. Part name Heater 2. Hale cut-out dimensions on the ceiling is shown in figure below: 3.
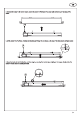
. Fix the bracket (n0.2) on the back of the heater, as shown In the figure below: 5. Lock the bracket by tightening the 4 resews (M5*12mm) shew In the figure below: 6. Fix the frame on the ceiling and fix t by 4 pes STS*30mm screws.
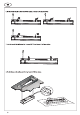
7. Connect the heater to the parer source, ensure the power is OFF. Ensure the power cable will not lay on tha back of the heater. & Lift the heater Into the frame, ensuring the brackets go through the cut holes on the top of the frame shown (n figure below: Move the heater to the left direction and then drop in, ensuring the brackets place rightly an the hanger, Gently shake the heater to ensure that It Is securely mounted.