
INSTALLATION OPERATION AND MAINTENANCE INSTRUCTION TFC CE003


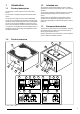
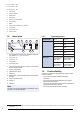


Table Of Contents
- 1Introduction
- 2Safety
- 3Transportation and storage
- 4Installation
- 5Electrical connection
- 6Commissioning
- 7Operation
- 8Maintenance
- 9Troubleshooting
- 10Disposal
- 11Warranty
- 12Technical data
- 13Accessory overview
- 14EU Declaration of Conformity
- 15UK Declaration of Conformity

6 If a roof curb is used, obey these steps:
A. Attach the fan on to the roof curb by screwing it in
place using supplied screws to the bottom of the fan
casing.
Note:
Do not fill the space at the bottom of the fan casing. The
space is for drainage if water enters the fan.
B. Connect the main electric supply to the main switch
of the product, refer to 12.3 Wiring diagrams.
C. Pull the main electric supply cable trough the cable
gland on the connection box and trough the cable
gland on the roof curb.
D. Use the integrated cable hose to lead the main elec-
tric supply cable safely to the corner on the inner
side of the roof curb.
E. Install the roof curb on the roof in accordance with
applicable building standards and connect the fan to
a duct system.
Note:
Obey local laws and regulations for installation of the roof
curb on the roof.
7 Close the electrical cabinet lid and tighten the screws.
8 Close the service lid and tighten the screws.
4.2.2 To operate the pressure
controller
Pressure controller navigation buttons
P P = Programming button and select menu.
Arrow Down = Navigate down, decrease value.
Arrow Up = Navigate up, increase value.
Arrow Down + Arrow Up = Leave menu.
Note:
Full instruction manual for PCA-2 1000 D2 controller is
available at www.systemair.com.
4.2.3 To set up the controller for
VAV
Note:
The pressure controller is supplied from the factory pre-
pared for VAV.
1 Press “Down” to go to “Base set-up”.
2 Press “P” to enter the menu.
3 Press “Down” to go to “Mode” and press “P” to choose
4.01 (the factory setting).
6