
Installation, Operation and Maintenance instruction 001

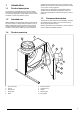


Table Of Contents

4 Installation
4.1 To do before the installation
of the product
• Make sure that you have the necessary installation
accessories:
– Refer to 13 Accessory overview page 17 for an over-
view of the accessories.
– If you install the product outdoors, it is necessary to in-
stall a weather protection roof.
– To decrease vibrations transmitted from the product to
the duct system, Systemair recommends to install vi-
bration dampers, fast clamps or flexible connections.
– If you install the product with free suction or free dis-
charge, it is necessary to install a protection grille.
Make sure that the safety distance agrees with the
standard DIN EN ISO 13857 and the standard DIN
24167–1.
• Use installation material with fire resistance rating for the
installation location.
• Examine the packaging for transportation damage and re-
move the packaging from the product carefully.
• Examine the product and all components for damage.
• Make sure that the motor effect and the fan performance
agrees with the expectations at the installation location.
• Make sure that the information on the name plate and the
motor name plate agrees with the operation conditions.
• Install the product in a location where there is space for
commissioning, troubleshooting and maintenance.
• Make sure that the installation location is clean and dry,
for full safety during electrical work.
• Make sure that the installation surface has sufficient ca-
pacity to hold the weight of the product.
• Refer to the airflow direction arrows on the name plate or
on the product to install the product in the correct position.
• Make sure that all cable glands are tight against the ca-
bles to prevent leaks.
4.2 To install the product
1 Install the product on the mounting feet. Make sure that
the weight of the product is equal on the mounting feet.
Make sure the drain plug is always put at the lowest point
of the product to drain the condensation.
Caution
Risk of damage to the product if there is
much water that cannot drain.
2 If wall brackets are used, install the wall brackets.
Note:
Wall brackets for installation on walls are available as
accessories.
3 Connect the ducts to the product, refer to 4.2.1 To con-
nect the ducts to the product page 5.
4