Remote control manual Manuel de télécommande Ferbedienung Anleitung Manuale del controllo a distanza Manual de mando a distancia RC08A English Français Deutsch Italiano Remote control Télécommande Fernbedienung Controllo a distanza Mando a distancia UM RC8 01-N-1 01-N-1ALL Part number / Code / Teil Nummer / Codice / Código : 3990679 Supersedes / Annule et remplace / Annulliert und ersetzt / Annulla e sostituisce / Anula y sustituye : None / Aucun / Keine / Nessuno / Ninguno Español
REMOTE CONTROL MANUAL MANUEL DE TELECOMMANDE FERNBEDIENUNG ANLEITUNG MANUALE DEL CONTROLLO A DISTANZA MANUAL DE MANDO A DISTANCIA
PRECAUTIIONS DISPLAY Information are displayed when the remote control unit is powered up.
TRANSMITTER When you press the buttons of the remote control unit, the mark appears on the display to transmit the setting changes to the receiver in the air conditioner. SENSOR Air temperature sensor inside the remote control unit detects the room temperature Where the remote control is located. TEMPERATURE SETTING BUTTONS - (cooler)Press this button to decrease the set temperature. + (warmer)Press this button to increase the set temperature.
USIING THE REMOTE CONTROL UNIIT HOW TO INSTALL BATTERIES Remove the lid in the rear part of the remote control unit. Insert two AAA alkaline batteries of 1,5 V-DC.Make sure to insert the batteries according to the polarity(+/-) marked in the battery compartment. Push the lid back on. HOW TO REMOVE BATTERIES Remove the lid in the rear part. Press the battery toward the negative end and lift it out by its positive end as shown. Remove the other battery in the same way.
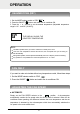
OPERATIION TEMPERATURE SENSOR SELECTOR Under normal conditions the room temperature is detected and checked by the temperature sensor placed in the air conditioner. Press the remote control I FEEL button to activate the temperature sensor placed in the remote control. This function is designed to provide a personalised environment by transmitting the temperature control command from the location next to you.
OPERATIION COOLING Verify that the unit is connected to the main power and the STANDBY lamp is lighted up. 1. Set the MODE selector to COOL . 2. Press the ON/OFF ( ) button and switch the airconditioner ON. 3. Press the - or +. buttons to set the desired temperature The temperature range is between 16℃ and 30℃(61-86 F). THE DISPLAY SHOWS THE SELECTED TEMPERATURE.. 4. Press the FAN SPEED button to select the fan speed. HEATING 1. Set the MODE selector to HEAT . 2.
OPERATIION NOTE For several minutes after the start of heating operation, the indoor fan will not run until the indoor heat exchanger coil has warmed up sufficiently. This is because the COLD DRAFT PREVENTION SYSTEM is operating. DEFROSTING OF HEAT EXCHANGE / OUTDOOR UNIT “STANDBY” When the outdoor temperature is low, frost or ice may appear on the heat exchanger coil,reducing the heating performance. When this happens, a microcomputer defrosting system operates.
OPERATIION DEHUMIDIFYING (DRY) 1. Set the MODE selector switch to “DRY” . 2. Press the ON/OFF ( ) button and switch the air condioner ON. 3. Press the + or - buttons to set the desired temperature (Adjustable temperature range is 16℃ and 30℃(61-86F)). THE DISPLAY SHOWS THE SELECTED TEMPERATURE. NOTE Use DRY operation when you want to reduce the humidity in the room.
OPERATIION MANUAL If you want to manually adjust speed just set the FAN SPEED selector as desired. Each time the button is pressed, the fan speed is changed in sequence: (Low) (High) (Medium) (Turbo) (Auto) TURBO FUNCTION In Cool or Heat Mode, if start the turbo function, the unit will run at super-high fan speed to cool or heat quickly to approach the set temperature. SLEEP MODE The SLEEP mode enables you to save energy. 1. Set the MODE selector to cool, dry or heat. 2. Press the SLEEP button. 3.
OPERATIION In cooling mode or dehumidifying mode, 1 hour after the sleep curve is set, the setting temperature will rise by 1 degree C , 2 hours later, the setting temperature will rise by 2 degree C. After 3 hours, the setting temperature will not change any more. In heating mode, 1 hour after the sleep curve is set, the setting temperature will decrease by 1 degree C 2 hours later, the setting temperature will decrease by 2 degree C. After 3 hours, the setting temperature will not change any more.
OPERATIION SETTING THE TIMER The timer can be selected by pressing TIMER ON button. The daily timers can be set for ON and OFF separately for two different time periods. Timer setting will not change until new setting is input. A) HOW TO SET THE ON TIME 1. Press the TIMER ON button to select the desired timer. 2. Press the TIMER ON button till the ON sign blinks. 3. Press the + or - button until the desired value is displayed. 4. Press the TIMER ON button to activate the timer.
OPERATIION C) HOW TO SET A PROGRAM FOR DAILY ON/OFF OPERATION 1. Press the TIMER OFF button to select the desired timer. 2. Press the TIMER OFF button till the ON sign blinks. 3. Press the + or - button until the desired value is displayed. 4. Press the TIMER OFF button again, the OFF sign blinks. 5. Press the + or - button until the desired value is displayed. 6. Press the TIMER OFF button to activate the timer.
OPERATIION Set vertical vanes to the front position during COOLING/DRY operation if humidity is high. If the vertical vanes are set to the left-most or right-most position, condensation may form around the air outlet and drip off. Do not move the flap with your hands when the air conditioner is running. Use the button on the remote control to adjust the position of the flap. If you move the flap by hand, the factual flap position and the flap position on the remote control may no longer match.
14
REMOTE CONTROL MANUAL MANUEL DE TELECOMMANDE FERNBEDIENUNG ANLEITUNG MANUALE DEL CONTROLLO A DISTANZA MANUAL DE MANDO A DISTANCIA
PRECAUTIONS AFFICHAGE Les informations s'affichent lorsque la télécommande est allumée. Mode de fonctionnement uniquement Automatique Chauffage Refroidissement Ventil. uniquement Déshumidification (séchage) S'affiche lorsque les données ont été transmises.
TRANSMETTEUR Lorsque vous pressez le bouton de l'unité de télécommande, le symbole s'affiche sur l'écran et transmet les modifications de réglage au récepteur du climatiseur. CAPTEUR Le capteur de température de l'air situé à l'intérieur de la télécommande détecte la température de la pièce où se trouve la télécommande. BOUTONS DE REGLAGE DE LA TEMPERATURE - (plus frais) Appuyer sur ce bouton pour réduire la température réglée. + (plus chaud) Appuyer sur ce bouton pour augmenter la température réglée.
UTILISATION DE LA TELECOMMANDE COMMENT INSTALLER LES PILES • Retirer le couvercle à l'arrière de la télécommande. • Insérer deux piles alcaline AAA de 1,5 V CC. Veiller à insérer les piles en fonction des polarités (+/-) indiquées sur le compartiment à piles. • Replacer le couvercle. COMMENT RETIRER LES PILES • Retirer le couvercle à l'arrière de la télécommande. • Appuyer sur la pile en direction du pôle négatif et la soulever par son pôle positif comme indiqué sur l'illustration.
FONCTIONNEMENT SELECTION DU CAPTEUR DE TEMPERATURE • Dans des conditions normales, la température de la pièce est détectée et vérifiée par le capteur de température situé à l'intérieur du climatiseur. • Presser le bouton I FEEL de la télécommande pour activer le capteur de température de la télécommande. Cette fonction a été conçue pour offrir un environnement personnalisé ,en transmettant les commandes de contrôle de température à partir d'un endroit situé près de vous.
FONCTIONNEMENT REFROIDISSEMENT Vérifier que l'unité est reliée au secteur et que la lampe témoin STANDBY (veille) est allumée. 1. Régler le sélecteur de mode sur COOL (refroidissement). 2 Presser le bouton ON/OFF (marche arrêt) ( allumer le climatiseur. ) et 3. Presser le bouton- ou + pour régler la température. La plage de température est comprise entre 16 et 30ºC (61º et 86ºF). L'AFFICHAGE INDIQUE LA TEMPERATURE SÉLECTIONNÉE 4.
FONCTIONNEMENT REMARQUE Après le démarrage de l'opération de chauffage, le ventilateur interne ne se met pas en marche tant que la bobine de l'échangeur de chauffage interne n'est pas suffisamment chauffée, cela prend quelques minutes. Ceci est dû au système de prévention des courants d'air froid.
FONCTIONNEMENT DÉSHUMIDIFICATION (séchage) 1 Régler le sélecteur de mode sur DRY (séchage). ) ON/OFF pour allumer le climatiseur. 2 Presser le bouton ( 3. Presser le bouton- ou + pour régler la température. La plage de température est comprise entre 16 e 30ºC (61º et 86ºF). L'AFFICHAGE INDIQUE LA TEMPERATURE SÉLECTIONNÉE REMARQUE • Utiliser le mode DRY lorsqu'il est nécessaire de réduire le taux d'humidité d'une pièce.
FONCTIONNEMENT ● MANUEL Pour régler manuellement la vitesse, il suffit de placer le sélecteur de vitesse du ventilateur dans la position désirée.
FONCTIONNEMENT En mode refroidissement ou déshumidification, une heure après le réglage de la courbe de sommeil, la température prédéfinie augmente de 1°C, 2 heures plus tard, elle augmente de 2 degrés. Au bout de 3 heures elle reste inchangée. En mode chauffage , une heure après le réglage de la courbe de sommeil, la température prédéfinie diminue de 1°C, 2 heures plus tard, elle diminue de 2 degrés. Au bout de 3 heures elle reste inchangée.
FONCTIONNEMENT REGLAGE DE LA MINUTERIE La minuterie peut être sélectionnée en pressant le bouton TIMER ON (minuterie, marche). La minuterie de jour peut être réglée sur ON et OFF séparément pour deux segments temporels. Le réglage de la minuterie ne change que lorsqu'une nouvelle valeur est saisie. A) COMMENT ACTIVER LA MINUTERIE 1. Presser le bouton TIMER ON (minuterie, marche) pour sélectionner la minuterie souhaitée. 2. Presser le bouton TIMER ON jusqu'à ce que le symbole ON se mette à clignoter. 3.
FONCTIONNEMENT C) COMMENT INITIALISER UN PROGRAMME DE FONCTIONNEMENT QUOTIDIEN ON/OFF 1. Presser le bouton TIMER OFF (minuterie, arrêt) pour sélectionner la minuterie souhaitée. 2. Presser le bouton TIMER OFF jusqu'à ce que le symbole ON se mette à clignoter. 3. Presser les boutons + ou - jusqu'à ce que la valeur souhaitée s'affiche. 4. Presser le bouton TIMER OFF jusqu'à ce que le symbole OFF se mette à clignoter. 5. Presser les boutons + ou - jusqu'à ce que la valeur souhaitée s'affiche. 6.
FONCTIONNEMENT Placer les lames verticales en position avant, pendant le refroidissement/chauffage si le taux d'humidité est élevé. Si les lames verticales sont placées à l'extrémité droite ou gauche, une condensation peut se former autour de la sortie d'air et des gouttes peuvent tomber. Attention Eviter de déplacer le volet manuellement pendant le fonctionnement du climatiseur. Attention Utiliser le bouton de la télécommande pour régler la position du volet.
14
REMOTE CONTROL MANUAL MANUEL DE TELECOMMANDE FERNBEDIENUNG ANLEITUNG MANUALE DEL CONTROLLO A DISTANZA MANUAL DE MANDO A DISTANCIA
VORSICHTSMASSNAHMEN ANZEIGE Informationen werden bei eingeschalteter Fernbedienung angezeigt. Betriebsmodus Automatisch Heizbetrieb Kühlbetrieb Nur Gebläse Entfeuchtung (trocken) Wird bei Datenübertragung angezeigt.
SIGNALGEBER Wenn Sie die Taste der Fernbedienung drücken, erscheint das Symbol auf dem Display, um die geänderten Einstellungen dem Empfänger in der Klimaanlage zu senden. SENSOR Der Lufttemperatursensor innerhalb der Fernbedienung erkennt die Raumtemperatur, wo sich die Fernbedienung befindet. TEMPERATUREINSTELLTASTEN - (kühler) Drücken Sie die Taste, um die Einstelltemperatur zu verringern. + (wärmer) Drücken Sie die Taste, um die Einstelltemperatur zu erhöhen.
VERWENDUNG DER FERNBEDIENUNG EINSETZEN DER BATTERIEN • Entfernen Sie die Abdeckung auf der Rückseite der Fernbedienung. • Setzen Sie zwei AAA-Alkali-Batterien 1,5 V ein. Achten Sie beim Einsetzen der Batterien auf die Polarität (+/-), die im Batteriefach gekennzeichnet ist. • Bringen Sie wieder die Abdeckung an. ENTNEHMEN DER BATTERIEN • Entfernen Sie die Abdeckung auf der Rückseite. • Drücken Sie die Batterie zum negativen Pol und heben Sie diese am positiven Pol heraus, wie dargestellt.
BEDIENUNG TEMPERATURSENSOR-WAHLTASTE • Unter normalen Bedingungen wird die Raumtemperatur erkannt und von dem in der Klimaanlage eingebauten Temperatursensor überprüft. • Drücken Sie die I FEEL-Taste der Fernbedienung, um den in der Fernbedienung eingebauten Temperatursensor zu aktivieren. Diese Funktion wurde konzipiert, um für ein persönliches Umfeld zu sorgen, indem der Temperatursteuerbefehl von Ihrer Position gesendet wird.
BEDIENUNG KÜHLBETRIEB Überprüfen Sie, dass die Anlage an die Hauptstromversorgung angeschlossen ist und die STANDBY-Lampe aufleuchtet. 1. Stellen Sie die MODUS-Wahltaste auf ein. KÜHLBETRIEB 2 Drücken Sie die EIN/AUS ( )-Taste und schalten Sie die Klimaanlage EIN. 3. Drücken Sie die + oder - Tasten, um die gewünschte Temperatur einzustellen. Der Temperaturbereich liegt zwischen 16o und 30o (61º und 86ºF). DAS DISPLAY ZEIGT DIE AUSGEWÄHLTE TEMPERATUR AN 4.
BEDIENUNG HINWEIS Nach dem Start des Heizbetriebs läuft für mehrere Minuten nicht das Innengebläse, bis sich die Wärmetauscherschlange der Inneneinheit ausreichend erwärmt hat. Das liegt daran, weil das PRÄVENTIONSSYSTEM GEGEN KALTE ZUGLUFT arbeitet. ● ENTFROSTEN DES WÄRMETAUSCHERS / AUSSENEINHEIT “STANDBY” Wenn die Außentemperatur niedrig ist, können sich Frost oder Eis auf der Wärmetauscherschlange bilden und die Heizleistung reduzieren. Wenn das geschieht, wird ein Mikrocomputer-Abtausystem aktiviert.
BEDIENUNG ENTFEUCHTUNG (TROCKEN) 1. Stellen Sie die MODUS-Wahltaste auf “TROCKEN” ein. )-Taste und schalten Sie die Klimaanlage EIN. 2. Drücken Sie die EIN/AUS ( 3. Drücken Sie die + oder - Tasten, um die gewünschte Temperatur einzustellen (der einstellbare Temperaturbereich liegt zwischen 16ºC und 30ºC (61º und 86ºF). DAS DISPLAY ZEIGT DIE AUSGEWÄHLTE TEMPERATUR AN HINWEIS • Verwenden Sie den TROCKEN-Betrieb, wenn Sie die Feuchtigkeit im Zimmer reduzieren möchten.
BEDIENUNG ● MANUELL Wenn Sie manuell die Geschwindigkeit anpassen möchten, stellen Sie die Wahltaste der GEBLÄSEGESCHWINDIGKEIT nach Wunsch ein.
BEDIENUNG 1 Stunde, nachdem die Sleep-Kurve im Kühl- oder Entfeuchtungsbetrieb eingestellt wurde, wird sich die Einstelltemperatur um 1°C erhöhen und 2 Stunden später wird sich die Einstelltemperatur um 2°C erhöhen. Nach 3 Stunden wird sich die Einstelltemperatur nicht mehr ändern. 1 Stunde, nachdem die Sleep-Kurve im Heizbetrieb eingestellt wurde, wird sich die Einstelltemperatur um 1°C verringern und 2 Stunden später wird sich die Einstelltemperatur um 2°C verringern.
BEDIENUNG EINSTELLUNG DES TIMERS Der Timer kann durch Drücken der TIMER ON (AN)-Taste ausgewählt werden. Die täglichen Timer können auf AN und AUS für zwei verschiedene Zeitabschnitte getrennt eingestellt werden. Die Timer-Einstellung ändert sich nicht, bis die neue Einstellung eingegeben wird. A) EINSTELLUNG FÜR TIMER AN 1. Drücken Sie die TIMER ON (AN)-Taste, um den gewünschten Timer auszuwählen. 2. Drücken Sie die TIMER ON (AN)-Taste, bis das ON (AN)-Symbol blinkt. 3.
BEDIENUNG C) EINSTELLPROGRAMM FÜR TÄGLICHEN EIN/AUS-BETRIEB 1. Drücken Sie die TIMER OFF (AUS)-Taste, um den gewünschten Timer auszuwählen. 2. Drücken Sie die TIMER OFF (AUS)-Taste, bis das ON (AN)-Symbol blinkt. 3. Drücken Sie + oder - Taste, bis der Sollwert angezeigt wird. 4. Drücken Sie die TIMER OFF (AUS)-Taste erneut, bis das OFF (AUS)-Symbol blinkt. 5. Drücken Sie + oder - Taste, bis der Sollwert angezeigt wird. 6. Drücken Sie die TIMER OFF (AUS)-Taste, um den Timer zu aktivieren.
BEDIENUNG Stellen Sie die vertikalen Lamellen auf Vorderposition während des KÜHL-/ TROCKEN-Betriebs, wenn die Luftfeuchtigkeit hoch ist. Sind die vertikalen Lamellen auf die äußerst linke oder rechte Position eingestellt, kann sich Kondensation um den Luftauslass bilden und abtropfen. Achtung! Bewegen Sie die Klappe nicht mit Ihren Händen, wenn die Klimaanlage läuft. Achtung! Betätigen Sie die -Taste auf der Fernbedienung, um die Position der Klappe passend einzustellen.
14
REMOTE CONTROL MANUAL MANUEL DE TELECOMMANDE FERNBEDIENUNG ANLEITUNG MANUALE DEL CONTROLLO A DISTANZA MANUAL DE MANDO A DISTANCIA
PRECAUZIONI SCHERMO Le informazioni sono visualizzate quando il telecomando è attivato. Modo di funzionamento Automatico Riscaldamento Raffreddamento Solo ventilatore Deumidificazione (aria secca) Appare quando i dati sono trasmessi.
TRASMITTENTE SENSORE Premendo il pulsante del telecomando, sullo schermo appare il che indica simbolo la trasmissione della modificata impostazione al ricevitore del climatizzatore. Il sensore della temperatura dell›aria all’interno del telecomando rileva la temperatura ambiente dove il telecomando si trova. PULSANTI PER L’IMPOSTAZIONE DELLA TEMPERATURA - (raffreddamento) Premere il pulsante per diminuire la temperatura impostata.
USO DEL TELECOMANDO COME INSERIRE LE BATTERIE • Togliere il coperchio che si trova sulla parte posteriore del telecomando. • Inserire due batterie alcaline AAA da 1,5 VDC. Assicurarsi di inserire le batterie secondo le polarità (+/-) indicate nell’alloggiamento batterie. • Spingere indietro il coperchio. COME TOGLIERE LE BATTERIE • Togliere il coperchio che si trova sulla parte posteriore del telecomando. • Premere la batteria verso il polo negativo e sollevarla dal polo positivo come illustrato.
FUNZIONAMENTO BEDIENUNG SELEZIONE DEL SENSORE DI TEMPERATURA NOTA • In condizioni normali la temperatura ambiente viene misurata e controllata dal Dopo aver attivato il climatizzatore in modalità di riscaldamento, il ventilatore interno non sensore temperatura si trovadinel climatizzatore. parte fino adiquando la spiraleche di scambio calore non si è riscaldata a sufficienza. Questo in quanto è attivato il SISTEMA DI PREVENZIONE DELLA VENTATAdiFREDDA.
FUNZIONAMENTO RAFFREDDAMENTO Verificare che l’unità sia collegata alla presa di rete e che l’indicatore STANDBY sia illuminato. 1. Impostare il selettore MODE su . RAFFREDDAMENTO 2 Premere l’interruttore ON/OFF ( ) per accendere il climatizzatore 3. Premere il pulsante - o + per impostare la temperatura desiderata. Il campo di temperatura va da 16o a 30oC (61-86oF). IL DISPLAY MOSTRA LA TEMPERATURA SELEZIONATA 4. Premere il tasto FAN SPEED per selezionare la velocità del ventilatore. RISCALDAMENTO . 1.
FUNZIONAMENTO NOTA Dopo aver attivato il climatizzatore in modalità di riscaldamento, il ventilatore interno non parte fino a quando la spirale di scambio di calore non si è riscaldata a sufficienza. Questo succede in quanto è attivato il SISTEMA DI PREVENZIONE DELLA VENTATA FREDDA. ● SBRINAMENTO DELLO SCAMBIATORE DI CALORE / UNITÀ ESTERNA “IN ATTESA” Quando la temperature esterna è bassa, brina o ghiaccio possono formarsi sulla serpentina scambiatrice di calore, riducendo le prestazioni di riscaldamento.
FUNZIONAMENTO DEUMIDIFICAZIONE (SECCO) 1. Impostare il selettore MODE su deumidificazione . ) per attivare il climatizzatore. 2. Premere il pulsante ON/OFF ( 3. Premere il pulsante - o + per impostare la temperatura desiderata. Il campo di temperatura va da 16ºC a 30ºC (61-86oF). IL DISPLAY MOSTRA LA TEMPERATURA SELEZIONATA NOTA • Usare il funzionamento in deumidificazione quando si vuole ridurre l’umidità dell’ambiente.
FUNZIONAMENTO ● MANUALE Se si vuole regolare manualmente la velocità, impostare il selettore FAN SPEED come desiderato. Ogni volta che il pulsante viene premuto, la velocità del ventilatore cambia nella seguente sequenza: (bassa) (media) (Low) (Medium) (Turbo) (alta) (High) (Auto) ● LA FUNZIONE TURBO In modalità raffreddamento o riscaldamento, attivando la funzione turbo, l’unità funziona a una velocità molto alta del ventilatore per raffreddare o riscaldare velocemente alla temperatura impostata.
FUNZIONAMENTO In modalità di raffreddamento o deumidificazione, 1 ora dopo l›impostazione della curva SLEEP, la temperatura impostata aumenta di 1 grado e, 2 ore dopo, di 2 gradi. Dopo 3 ore, la temperatura impostata non cambia più. In modalità di riscaldamento, 1 ora dopo l›impostazione della curva SLEEP, la temperatura impostata diminuisce di 1 grado e, 2 ore dopo, di 2 gradi. Dopo 3 ore, la temperatura impostata non cambia più.
FUNZIONAMENTO IMPOSTAZIONE DEL TIMER Si può selezionare il timer premendo il pulsante TIMER ON. I timer diurni possono essere impostati separatamente ON ed OFF per due diversi periodi di tempo. L›impostazione del timer non cambia fino alla prossima impostazione. A) COME ATTIVARE IL TIMER 1. Premere il pulsante TIMER ON per selezionare il timer desiderato. 2. Premere il pulsante TIMER ON fino a quando il simbolo ON lampeggia. 3. Premere il pulsante (+) o (-) fino ad ottenere il valore desiderato. 4.
FUNZIONAMENTO C) COME IMPOSTARE UN PROGRAMMA PER IL FUNZIONAMENTO QUOTIDIANO ON/OFF 1. Premere il pulsante TIMER OFF per selezionare il timer desiderato. 2. Premere il pulsante TIMER ON fino a quando il simbolo ON lampeggia. 3. Premere il pulsante (+) o (-) fino ad ottenere il valore desiderato. 4. Premere il pulsante TIMER OFF fino a quando il simbolo ON lampeggia. 5. Premere il pulsante (+) o (-) fino ad ottenere il valore desiderato. 6. Premere il pulsante TIMER OFF per disattivare il timer.
FUNZIONAMENTO Impostare i vani verticali in posizione frontale durante il funzionamento in RAFFREDDAMENTO/DEUMIDIFICAZIONE se l›umidità è alta. Se i vani verticali sono posizionati tutti a sinistra o tutti a destra, si può formare condensa attorno all›apertura d›uscita dell›aria e gocciolare. Attenzione Non spostare le alette manualmente durante il funzionamento del climatizzatore. Attenzione Usare il pulsante sul telecomando per regolare la posizione delle alette.
14
REMOTE CONTROL MANUAL MANUEL DE TELECOMMANDE FERNBEDIENUNG ANLEITUNG MANUALE DEL CONTROLLO A DISTANZA MANUAL DE MANDO A DISTANCIA
ADVERTENCIAS VISOR La información se exhibe cuando se enciende la unidad de control remoto.
TRANSMISOR Cuando presiona el botón de la unidad de control remoto, la aparece marca en el visor para transmitir los cambios de configuración al receptor ubicado en el acondicionador de aire. SENSOR El sensor de temperatura del aire ubicado en la unidad de control remoto detecta la temperatura ambiente en donde se encuentra el control remoto. BOTONES DE CONFIGURACIÓN DE LA TEMPERATURAS - (más frío) Presione el botón para disminuir la temperatura establecida.
USO DE LA UNIDAD DE CONTROL REMOTO CÓMO INSTALAR LAS BATERÍAS • Quite la tapa en la parte posterior de la unidad de control remoto. • Inserte dos baterías alcalinas AAA de 1,5 VCC. Asegúrese de que las baterías se insertan de acuerdo con la polaridad (+/-) marcada en el compartimiento de baterías. • Vuelva a colocar la tapa. CÓMO QUITAR LAS BATERÍAS • Quite la tapa en la parte posterior. • Presione la batería hacia el extremo negativo y súbala desde su extremo positivo, tal como se muestra.
O FUNCIONAMIENTO SELECTOR DEL SENSOR DE TEMPERATURA • Bajo condiciones normales, se detecta la temperatura ambiente y se verifica respecto al sensor de temperatura ubicado en el acondicionador de aire. • Presione el botón I FEEL del control remoto para activar el sensor de temperatura ubicado en el control remoto. Esta función está diseñada para brindar un entorno personalizado al transmitir el comando de control de temperatura desde una ubicación cercada al usuario.
FUNCIONAMIENTO REFRIGERACIÓN Verifique que la unidad está conectada a la alimentación principal y la lámpara EN ESPERA está encendida. . 1 Fije el selector de MODO en ENFRIAR 2 Presione el botón ENCENDIDO/APAGADO ( ) ENCIENDA el acondicionar de aire. 3. Presione los botones – o + para fijar la temperatura deseada. El rango de temperatura es de 16ºC y 30ºC (61º y 86ºF). EL VISOR MUESTRA LA TEMPERATURA SELECCIONADA 4. Presione el botón de VELOCIDAD DEL VENTILADOR para seleccionar la velocidad del ventilador.
FUNCIONAMIENTO NOTA Durante varios minutos luego del encendido de la operación de calefacción, el ventilador interior no funcionará hasta que el serpentín interior se haya calentado lo suficiente. Esto se debe a que está en funcionamiento el SISTEMA DE PREVENCIÓN DE ASPIRACIÓN DE FRÍO.
FUNCIONAMIENTO DESHUMECTACIÓN (SECO) 1 Fije el selector de MODO en “SECO” . ) y encienda el acondicionador 2 Presione el botón ENCENDIDO/APAGADO ( de aire. 3. Presione los botones – o + para fijar la temperatura deseada (el rango de temperatura ajustable es de 16ºC y 30ºC (61º y 86ºF)). EL VISOR MUESTRA LA TEMPERATURA SELECCIONADA NOTA • Use el funcionamiento SECO cuando desee reducir la humedad en el ambiente.
FUNCIONAMIENTO ● MANUAL Si desea ajustar la velocidad manualmente, fije el selector de VELOCIDAD DEL VENTILADOR como desee. Cada vez que se presione el botón, la velocidad del ventilador se cambia en secuencia: (baja) (media) (Low) (alta) (High) (Medium) (Turbo) (Auto) ● FUNCIÓN TURBO En Modo Frío o Calor, si se enciende la función turbo, la unidad accionará la velocidad del ventilador en súper-alto para enfriar o calentar rápidamente y lograr la temperatura fijada.
FUNCIONAMIENTO En modo de enfriamiento o deshumectación, 1 hora después de determinada la curva de suspensión, la temperatura configurada aumentará 1ºC, 2 horas después, la temperatura determinada aumentará en 2ºC. Después de 3 horas, la temperatura determinada no cambiará más. En modo de enfriamiento o deshumectación, 1 hora después de determinada la curva de suspensión, la temperatura configurada aumentará 1ºC, 2 horas después, la temperatura determinada aumentará en 2ºC.
FUNCIONAMIENTO CONFIGURACIÓN DEL TEMPORIZADOR El temporizador se puede seleccionar presionando el botón TEMPORIZADOR ENCENDIDO. Los temporizadores diarios se pueden fijar en ENCENDIDO y APAGADO en forma separada para dos períodos diferentes. La configuración del temporizador no cambiará hasta que se ingrese un nuevo parámetro. A) CÓMO DEFINIR LA HORA ACTUAL 1. Presione el botón de TEMPORIZADOR ENCENDIDO para seleccionar el horario deseado. 2.
FUNCIONAMIENTO C) CÓMO DEFINIR UN PROGRAMA PARA EL ENCENDIDO/APAGADO DIARIO 1. Presione el botón de TEMPORIZADOR APAGADO para seleccionar el horario deseado. 2. Presione el botón de TEMPORIZADOR APAGADO hasta que parpadee el símbolo ENCENDIDO. 3. Presione los botones + o – hasta que se muestre el valor deseado. 4. Presione el botón de TEMPORIZADOR APAGADO de nuevo: el símbolo APAGADO parpadea. 5. Presione los botones + o – hasta que se muestre el valor deseado. 6.
FUNCIONAMIENTO Fija las aspas verticales en la posición delantera durante el funcionamiento de ENFRIADO/SECO, si la humedad es alta. Si las aspas verticales se fijan en las posiciones más a la izquierda o derecha, se puede formar condensación alrededor de la salida de aire y gotear. ¡Precaución! No mueva la paleta con las manos cuando está en funcionamiento el acondicionador de aire. ¡Precaución! en el control remoto para ajustar la posición de la paleta.
14
As part of our ongoing product improvement programme, our products are subject to change without prior notice. Non contractual photos. Dans un souci d’amélioration constante, nos produits peuvent être modifiés sans préavis. Photos non contractuelles. In dem Bemühen um ständige Verbesserung können unsere Erzeugnisse ohne vorherige Ankündigung geändert werden. Fotos nicht vertraglich bindend.