REMOTE CONTROLLER OWNER’S MANUAL IMPORTANT NOTE: Thank you for purchasing our air conditioner. Please read this manual carefully before operating your new air conditioning unit. Make sure to save this manual for future reference.
Table of Contents Remote Controller Specifications ......................................................02 Handling the Remote Controller ....................................................03 Buttons and Functions ...................................................................04 Remote Screen Indicators ..............................................................08 How to Use Basic Functions ..........................................................09 How to Use Advanced Functions ..................
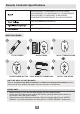
Remote Controller Specifications RRG10A(E2S)/BGEF, RG10A(E2S)/BGEFU1,RG10A1(E2S)/BGEF, RG10A2(E2S)/BGEFU1, RG10A2(E2S)/BGCEFU1, RG10A2(E2S)/BGCEF, RG10A10(E2S)/BGEF, RG10B(E2)/BGEF, RG10B1(E2)/BGEF, RG10B2(E2)/BGCEF,RG10B10(E2)/BGEF, RG10B10(E2)/BGCEF 3.
Handling the Remote Controller Inserting and Replacing Batteries Your air conditioning unit may come with two batteries(some units). Put the batteries in the remote control before use. 1. Slide the back cover from the remote control downward, exposing the battery compartment. 2. Insert the batteries, paying attention to match up the (+) and (-) ends of the batteries with the symbols inside the battery compartment. 3. Slide the battery cover back into place.
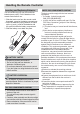
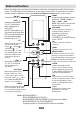
Buttons and Functions Before you begin using your new air conditioner, make sure to familiarize yourself with its remote control. The following is a brief introduction to the remote control itself. For instructions on how to operate your air conditioner, refer to the How to Use Basic Functions section of this manual. MODE Scrolls through operation modes as follows: AUTO COOL DRY HEAT FAN NOTE: HEAT mode is not supported by the cooling only appliance.
MODE Scrolls through operation modes as follows: AUTO COOL DRY HEAT FAN NOTE: HEAT mode is not supported by the cooling only appliance. ON/OFF Turns the unit on or off. TEMP Increases temperate in 1°C (1°F) increments. Max. temperature is 30°C (86°F). NOTE: Press together & buttons at the same time for 3 seconds will alternate the temperature display between the °C & °F.
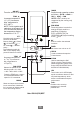
ON/OFF Turns the unit on or off. MODE Scrolls through operation modes as follows: AUTO COOL DRY HEAT FAN NOTE: HEAT mode is not supported by the cooling only appliance. TEMP Increases temperate in 1°C (1°F) increments. Max. temperature is 30°C (86°F). NOTE: Press together & buttons at the same time for 3 seconds will alternate the temperature display between the °C & °F. SLEEP Saves energy during sleeping hours.
MODE Scrolls through operation modes as follows: AUTO COOL DRY HEAT FAN NOTE: HEAT mode is not supported by the cooling only appliance. ON/OFF Turns the unit on or off. TEMP Increases temperate in 1°C (1°F) increments. Max. temperature is 30°C (86°F). NOTE: Press together & buttons at the same time for 3 seconds will alternate the temperature display between the °C & °F. SLEEP Saves energy during sleeping hours.
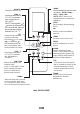
Remote Screen Indicators Information are displayed when the remote controller is power up.
How to Use Basic Functions ATTENTION Before operation, please ensure the unit is plugged in and power is available. AUTO Mode Select AUTO mode Set your desired temperature Turn on the air conditioner MODE NOTE: 1. In AUTO mode, the unit will automatically select the COOL, FAN, or HEAT function based on the set temperature. 2. In AUTO mode, fan speed can not be set.
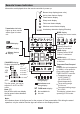
Setting the TIMER TIMER ON/OFF - Set the amount of time after which the unit will automatically turn on/off. TIMER ON setting Press TIMER button to initiate the ON time sequence. Press Temp. up or down button for for multiple times to set the desired time to turn on the unit. Point remote to unit and wait 1sec, the TIMER ON will be activated. x5 TIMER 1sec ON /OFF MO DE FA N TE MP SLE EP SH OR CU T T TIM ER TIM ER ON OFF TIMER OFF setting Press TIMER button to initiate the OFF time sequence.
How to Use Advanced Functions Swing function Press Swing button 2s Swing Swing The horizontal louver will swing up and down automatically when pressing Swing button. Press again to make it stop. Keep pressing this button more than 2 seconds, the vertical louver swing function is activated. (Model dependent) Airflow direction If continue to press the SWING button, five different airflow directions can be set. The louver can be move at a certain range each time you press the button.
ECO/GEAR function(some units) Press X-ECO button to enter the energy efficient mode in a sequence of following: ECO GEAR(75%) GEAR(50%) Previous setting mode ECO...... Note:This function is only available under COOL mode. ECO operation: Under cooling mode, press this button, the remote controller will adjust the temperature automatically to 24 O C/75 OF, fan speed of Auto to save energy (only when the set temperature is less than 24O C/75 OF).
Silence function 2s Keep pressing Fan button for more than 2 seconds to activate/disable Silence function(some units). Due to low frequency operation of compressor, it may result in insufficient cooling and heating capacity. Press ON/OFF, Mode, Sleep, Turbo or Clean button while operating will cancel silence function. FP function 2 The unit will operate at high fan speed (while compressor on) with temperature automatically set to 8 C/46 F. Note: This function is for heat pump air conditioner only.
SET function SET SET OK or Press the SET button to enter the function setting, then press SET button or TEMP or TEMP button to select the desired function. The selected symbol will flash on the display area, press the OK button to confirm. To cancel the selected function, just perform the same procedures as above.
The design and specifications are subject to change without prior notice for product improvement. Consult with the sales agency or manufacturer for details.