
User Manual


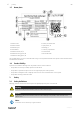

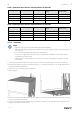

Table Of Contents
- GB User Manual
- DE Bedienungsanleitung

8
| Installation
GB
4 Installation
4.1 To do before installation of the product
• Make sure that you have the necessary installation equipment:
• air duct connections (DN250)
• power supply 230 VAC
• tubes and siphon for condensate drain
• pipes for geothermal heat collector
• damper for outdoor air duct if the system is used in areas with temperatures bellow -15 °C
• Examine the packaging for transportation damage and remove the packaging from the product carefully.
• Examine the product and all components for damage.
• Install the product in a location where there is space for commissioning, troubleshooting and maintenance.
• Make sure that the installation location is clean and dry, for full safety during electrical work.
• Make sure that the installation location is protected against frost. The liquid inside the system must not freeze.
• Make sure that the installation surface has sufficient capacity to hold the weight of the product.
• Refer to the airflow direction arrows on the name plate or on the product to install the product in the correct
position.
• Make sure that all cable glands are tight against the cables to prevent leaks.
4.2 To install the product
1. Attach the wall mounting bracket horizontally on the wall, at least 100 mm distance from the ventilation unit. Mind
the dimensions of the product – 590 x 390 x 720 mm.
2. Hang the product.
3. Connect the air ducts to the corresponding connections (DN250) on the product.
4. Seal all air duct connections.
5. Install an outdoor temperature sensor (OAT) at least 50 cm distance before the product in the outdoor air duct.
6. Insulate steam-tight the outdoor air duct to the product and from the product to the ventilation unit.
7. Connect the condensate drain air-tight to the siphon (with a surge tank of minimum 60 mm). Use a pipe or a hose.
Place the upper edge of the siphon minimum 40 mm under the condensate drain of the product.
8. Connect the siphon to the sewer.
4.2.1 To install the geothermal heat collector
4.2.1.1 Recommendation
Approximately 0,5 m of collector pipe is required for 1 m³/h air. However, a minimum of 100 m for smaller system. Put
collector pipes in a bed of 0.4 m of sand (depending on the type of PE pipe). This will prevent damage to the collector
pipes.
The length of the polyethylene (PE) pipe depends on local conditions, e.g. type of soil or ground water level. Compact
and loamy soil is able to transfer more heat to the brine than loose, sandy soil. If the pipe lays below the ground water
level, the brine absorbs more energy from the soil.
278349 | v01