
INSTALLATION OPERATION AND MAINTENANCE INSTRUCTION KV DUO KVK DUO KVK001
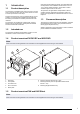
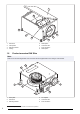
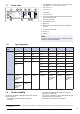
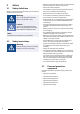
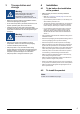
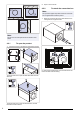
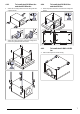

Table Of Contents
- 1Introduction
- 2Safety
- 3Transportation and storage
- 4Installation
- 4.1 To do before the installation of the product
- 4.2 To install the product
- 4.2.1 To open the product
- 4.2.2 To attach the connection box
- 4.2.3 To install the KVK Silent fan and the KVK Slim fan
- 4.2.4 To install the KVK DUO fan and the KVK fan
- 4.2.5 To install the KV DUO 150 EC fan
- 4.2.6 To install the KV DUO 250 – 315 EC fan
- 4.2.7 To install the KV DUO 400 – 630 EC fan
- 4.2.8 To connect the ducts to the product
- 5Electrical connection
- 6Commissioning
- 7Operation
- 8Maintenance
- 9Troubleshooting
- 10Disposal
- 11Warranty
- 12Technical data
- 13Accessory overview
- 14EU Declaration of Conformity
- 15UK Declaration of Conformity

2 Attach the product to the floor, the wall or the ceiling with
4 washers and 4 screws.
4.2.6 To install the KV DUO 250 –
315 EC fan
1 Attach the product to the floor, the wall or the ceiling with
4 screws through the 4 press nuts in the bottom of the
fan casing.
4.2.7 To install the KV DUO 400 –
630 EC fan
1 Attach the product to the floor, the wall or the ceiling with
screws through the outer mounting rails.
4.2.8 To connect the ducts to the
product
Note:
Systemair recommends to use flexible connections or FK
fast clamps to attach the duct to the product. Flexible con-
nections and FK fast clamps are available as accessories.
1 Put the ducts on each side of the product.
2 Use the fast clamps to attach the duct to the product.
3 Tighten the fast clamps around the duct and the product
with the supplied screws. Make sure that there is a dis-
tance between the duct and the product to decrease vi-
brations transmitted from the product to the duct system.
8