7472000COM 4 Drawer Cabinet Date of Purchase ___ / ___ / ___ Lot Number: Do Not Return This Product! Contact our customer service team for help first. Call: 1-866-452-4081 (toll free) Monday-Friday 9am - 5pm CST Visit: www.systembuild.
Contact Us! Helpful Hints PEOPLE NEEDED FOR ASSEMBLY: 2 ESTIMATED ASSEMBLY TIME: 1 HOUR systembuild.
k Quic bly m Asse Ti p Before You You Start Start Before Read through each step carefully and follow the proper order Separate and count all your parts and hardware Give yourself enough room for the assembly process Have the following tools: Flat Head Screwdriver, #2 Phillips Head Screwdriver and Hammer Caution: If using a power drill or power screwdriver for screwing, please be aware to slow down and stop when screw is tight. Failure to do so may result in stripping the screw.
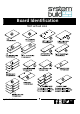
Board Identification Not actual size systembuild.
Board Identification Not actual size systembuild.
Part List Actual Size 3 6 4 10 Not Actual Size 16 systembuild.
STEP1 How To SEPARATE BALL BEARING SLIDE. systembuild.
STEP2 3 systembuild.
STEP3 5 systembuild.
STEP4 11 systembuild.
STEP5 Quick Assembly Tip 2 6 Proper orientation of CAM LOCK systembuild.
STEP7 10 systembuild.
STEP8 systembuild.
STEP9 3 systembuild.
STEP10 Quick Assembly Tip 2 4 Proper orientation of CAM LOCK systembuild.
STEP11 8 systembuild.
STEP12 systembuild.
Maximum Loads This unit has been designed to support the maximum loads shown. Exceeding these load limits could cause sagging, instability, product collapse, and/or serious injury. systembuild.
Register your product to receive the following: * New trend details - sneak peek on what's new * Surveys - have a voice within our community * Exclusive deals and discount codes * Quick and easy replacement part service To register your product, visit systembuild.
systembuild.
1) Hale como indica la flecha hasta que la ranura se detenga y luego dele vuelta. Nivelador del archivador 2.1 Una la parte (16) con (A) con (11) como se ilustra. 2.2 Atornille (1) dentro de (A) como se ilustra. 2.3 Insertar (3) dentro de (C)&(D). No apretar el tornillo (11). 3.1 Una la parte (18) con (C) & (D) con (5) como se ilustra. 3.2 Una la parte (19) con (C) & (D) con (12) como se ilustra. Utilizando tornillo (10) y dos tornillos (11) fije la parte superior del pie (13) como se muestra.
IMPORTANTE: ESTA UNIDAD DEBE SER SEGURO A LA PARED PARA PREVENIR VUELCO. SIGA ESTAS INSTRUCCIONES PARA INSTALAR EL SOPORTE DE SEGURIDAD ANTIVUELCO SUMINISTRADO CON ESTE PRODUCTO. El uso de un detector de vigas, localice un Studin la pared. Coloque la unidad contra la pared, con el soporte de seguridad (16) alineados en esta ubicaci .
CARGA MAXIMA causar inestabilidad, colapsarse y/o causar serias lesiones. ADVERTENCIA: Riesgo de lesiones a las personas - no coloque un televisor sobre muebles. Este mueble Registre su producto para recibir lo siguiente: * Detalles de nuevas tendencias - Vistazo a lo nuevo * Encuestas - alec su voz entre su comunidad Para registrar su producto, visite systembuild.
systembuild.
Page 4 Page 7 Page 8 (C) & (D). Ne pas serrer la vis (11). Page 9 Page 10 Page 11 Page 12 IMPORTANT: correctement. Attacher (N) au sous-ensemble B/D systembuild.
Page 19 CHARGES MAXIMALES charge, le meuble pourrait devenir instable, s'effondrer, et/ou causer des blessures graves. Page 20 * Offres exclusives et codes promo Pour enregistrer votre produit, visitez systembuild.com Merci systembuild.