SYSTRAN 7 Quick Start Guide Ref : DSK-7-QSG-BP-EN
SYSTRAN 7 – Quick Start Guide Welcome Congratulations on your SYSTRAN 7 purchase which uses the latest generation of language translation products from SYSTRAN, the leading supplier of translation software. SYSTRAN 7 offers a variety of features and capabilities for the translation of text in any Windows-based application. A new common interface is always available, allowing you to perform translations between more than 50 of the world’s most common language pairs.
SYSTRAN 7 – Quick Start Guide Installing, Activating, and Registering SYSTRAN Desktop 7 You can initiate the installation of SYSTRAN Desktop 7 using either a purchased DVD or an executable application (downloaded product) purchased online. Of course, as with all software installation, there are decisions and choices you will need to make as you proceed. To use SYSTRAN Desktop 7 your system must meet the following minimum requirements: Processor Memory Disk Space PC with Intel® Pentium® 1.
SYSTRAN 7 – Quick Start Guide these older versions of Office to open and save files created in the newer Microsoft Office formats (.docx, .xlsx, and .pptx). Visit http://download.microsoft.com for more information. Starting from a Downloaded File 1) Double-click on the downloaded file and select a temporary extraction folder (this is not the folder where the software will be installed). The installation program will be extracted into this folder.
SYSTRAN 7 – Quick Start Guide Your first opportunity to activate your SYSTRAN product is at the end of the installation process. If you choose not to activate your product at installation, each time you start your SYSTRAN product thereafter the Product Activation dialog will display, detailing your SYSTRAN licenses and their activation status. Click Activate your product now to continue.
SYSTRAN 7 – Quick Start Guide If you encounter any problems activating your SYSTRAN product, please contact SYSTRAN Technical Support at http://www.systransoft.com/translation-support/v7desktop-products. Managing Your SYSTRAN Account You can easily log into and manage your SYSTRAN account via the SYSTRAN Website (www.systransoft.com / www.systran.fr).
SYSTRAN 7 – Quick Start Guide Using the SYSTRAN Interactive Translator Translating Text Using the SYSTRAN Interactive Translator, you can translate text from any Windows application simply by cutting/copying and pasting it into the Translator's source text entry field. You can also type text directly into the source panel for translation.
SYSTRAN 7 – Quick Start Guide Shortcut Enter text to be translated in the source text entry field of the SYSTRAN Interactive Translator. Press Ctrl+Shift+T. The translated text appears in the translated results field of the SYSTRAN Interactive Translator. You can change the keyboard shortcut via the SYSTRAN Global Options dialog, and if you are using Firefox you may want to do so to avoid conflicts.
SYSTRAN 7 – Quick Start Guide 6) Click the Lookup button to the right of the field. Lookup results will display in the SYSTRAN Interactive Translator's Lookup results field. SYSTRAN 7 provides a great deal of information in the list of meanings for a Lookup term. Each entry may include information about the domain, usage, language level, and grammatical category of the entries.
SYSTRAN 7 – Quick Start Guide Use the Translation Options dialog box to specify if the translated page should appear in a new window or in the original window. In Firefox, you may also display the translated page in a new tab. Translating Selected Web Page Text You can use the right-click context menu to translate selected text on a Web page. 1) Set your source and target languages. 2) Select text to translate. 3) Right-click the selected text and select SYSTRAN Translate from the popup menu.
SYSTRAN 7 – Quick Start Guide 3) Click the Translate button on the SYSTRAN Toolbar, or click the right mouse button to open a popup menu for additional translation options. The translated file appears in a new window as a read-only file. You can save the translated file using the standard Windows File, Save function. For Office 2007 and Office 2010: 1) Click the SYSTRAN tab to reveal the SYSTRAN tab group in the ribbon.
SYSTRAN 7 – Quick Start Guide 4) Click the Translate button droplist in the tab group and indicate Translate Document. The translated file appears in a new window as a read-only file. You can save the translated file using the standard Windows File|Save function. Translating Email in Microsoft Outlook When SYSTRAN Desktop 7 translates an email, the source (original) text and target (translated) text appear in a revised email, separated by a banner. 1) Open Microsoft Outlook.
SYSTRAN 7 – Quick Start Guide If you are using Word as your email editor, you will see a new email message with the translated text when you click Translate, and not the split-panel display illustrated above. For Office 2007 and Office 2010: Unlike other Microsoft Office 2007 applications, Outlook 2007 maintains the layout of menus and toolbars utilized in previous versions. It is only at the actual email level that Office 2007's characteristic Tab-Ribbon design comes into play.
SYSTRAN 7 – Quick Start Guide Translation Options The Translation Options tab allows you to control how SYSTRAN Desktop 7 translates your files. Settings are organized in categories, and individual settings depend on the SYSTRAN Desktop 7 product(s) installed and activated on your PC. Profiles Translation Option settings can be saved in Profiles, allowing different users to select their own preferred options when working with SYSTRAN V7 products. User Profiles can be saved, exported and imported.
SYSTRAN 7 – Quick Start Guide When a Profile is selected, all options associated with that Profile are loade. If no profile is selected, SYSTRAN V7 will use the default Option settings. Creating a Profile 1) Click the New button to open the New Profile dialog box.Enter a name for the new profile in the Profile name field. Also, if the Service for the profile is to be of a remote nature, specify it using the provided dropdown and click OK. Enter a name for the Profile and click OK.
SYSTRAN 7 – Quick Start Guide The popup menu will only show the SYSTRAN Translate option when you right-click on a supported file format. 3) Select SYSTRAN Translate. A Save File As dialog box will display. 4) Select a Source and Target language. 5) Select a Profile to apply for the translation. 6) Click Browse to select a location for the translated file. The default is to place the translated file in the same location as the original file. 7) Click Translate to begin the translation process.
SYSTRAN 7 – Quick Start Guide Using SYSTRAN Dictionary Manager (SDM) SYSTRAN Dictionary Manager (SDM) lets you create, and maintain User Dictionaries (UDs), which can be used to customize and improve your translations. Dictionary resources can be used for a number of functions, including: Translating terms not found in the SYSTRAN Main Dictionary. Overriding the target-language meaning of a term in the SYSTRAN Main Dictionary to customize translation output.
SYSTRAN 7 – Quick Start Guide Source Category terms, used to specify the grammatical category of source terms without specifying their translations After you specify the properties for a UD, you can add source and target language terms to it. 1) Click your cursor in an open box in the Source column. Enter the term to be translated. 2) Move the cursor to the Target language box on the same row and enter the target language term.
SYSTRAN 7 – Quick Start Guide Symbol Description The target language entry does not correlate well with the source language entry or a term is unknown or seems irregular to IntuitiveCoding. A message appears in the Status Bar of the SDM screen. The entry will be used in the translation, but will probably require additional coding to work as expected. SDM cannot find any correlation between the source and target language entries or a term cannot be coded at all.
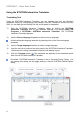
SYSTRAN 7 – Quick Start Guide How Does STPM Work? An STPM Project is defined by its indicated language pair, its related document files (source, target), and by a number of STPM-specific elements. It can consist of just a single file, or multiple files within a large Project comprised of hundreds of files and elements. In addition, any accessible file of a supported file format can be included in an STPM Project, as can Web documents obtained via an input Web address (URL).
SYSTRAN 7 – Quick Start Guide The Corpus Explorer offers a tree-style view of the open Project, serving as the point from which source Project documents are selected for display in the Document Viewer. The Document Viewer is the true “workbench” area in STPM. When a Project source document is selected in the Corpus Explorer a non-WYSIWYG simplified mirrored version of it displays in the Document Viewer, and it is on this version that all translation review and customization is performed.
SYSTRAN 7 – Quick Start Guide 3) Click OK. The new Project will display in the Corpus Explorer as New Project. 4) Select the File|Save command or click the Save standard Windows Save As dialog will display. 5) Using the Save As dialog, navigate to the folder within which you want to save the Project. 6) Enter a unique file name for the Project into the File name field of the Save As dialog and click Save. The Project will be saved to the indicated folder as a Translation Project File (.
SYSTRAN 7 – Quick Start Guide enable the checking routine using SYSTRAN Global Options). If you select Yes, though, a Refresh Source Documents dialog will display. By default, all changed Project documents are indicated for refresh. Confirm that only the documents you want to refresh are indicated and click Refresh. A Processing Status window will display. Once all of the selected documents show Refreshed status close the Processing Status window by clicking the x in the upper right-hand corner.
SYSTRAN 7 – Quick Start Guide Adding a Folder to a Project STPM allows you to simultaneously add all of the files from a selected Windows folder, rather than adding the files one at a time. on the 1) Select the Corpus|Add Folder command, or click the Add Folder button Corpus Toolbar. The Browse for Folder dialog will display. 2) Browse to the folder whose contents you want to add to your current Project and select OK.
SYSTRAN 7 – Quick Start Guide 1) Highlight the Project document for which you want to perform a crawl. 2) Select the Corpus|Crawl command or the Crawl command available in the rightclick menu. The Crawl dialog will display. 3) Input the desired depth of the crawl into the Crawl depth field. The Crawl depth field is set to 1 by default, a setting that will add all files to your Project that are directly associated with your selected document.
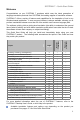
SYSTRAN 7 – Quick Start Guide Translate using SYSTRAN Interactive Translator Translate selected text in any Windows application Translate Web pages in Internet Explorer and Firefox Translate Word documents Translate OpenOffice documents (ODF, ODS, ODP) Translate email in Outlook Translate PowerPoint presentations Translate Excel spreadsheets Translate PDF# files Translate Text, Word, RTF, PowerPoint, Excel, HTML and PDF# files using SYSTRAN Quick File Translator Adapt translation to your language domain(s)
- Premium Translator Premium Manage translation Projects composed of multiple files in multiple formats Provide additional revision tools for improving source analysis Import and Export linguistic data Premium - Business Manage translation Projects using SYSTRAN Translation Project Manager (STPM) Display side-by-side source and target texts. Provide revision tools to customize translations and improve translation quality Translate DOC, RTF, TXT, HTML, XHTML, and # PDF files and Web pages.
SYSTRAN 7 – Quick Start Guide