RP·HOPPER USER MANUAL HOPPER E·SCOOTER
IMPORTANT NON-COMPLIANCE WITH SAFETY INSTRUCTIONS COULD CAUSE SERIOUS BODY DAMAGE AND IN EXTREME CASES, DEATH. WELCOME Thank you for your purchase of the Roller-Pro Hopper E-Scooter! The Roller-Pro Hopper E-Scooter takes the power of electricity, the style of a traditional scooter, adds them together, and tops it off with a bit of swag. To ensure your safety and the safety of others, please read and follow the guidelines in this user manual carefully and thoroughly before and during riding.
GENERAL INFORMATION Before operating this vehicle, please read all instructions. This manual will guide you through the functions, usage, and proper care of your Roller-Pro Hopper E-Scooter. If you have any questions or cannot find the information you need in the manual, please contact your place of purchase or our customer service center. Before contacting customer service, please have your purchase information ready as this may be needed during the call. This information may be recorded below.
Do not ride your Hopper E-scooter in ramps, curbs, slopes, slippery surfaces or try to perform acrobatics or tricks. This can cause serious injuries. Always use your Hopper E-scooter in a smooth way. Do not be aggressive as this can cause failure or an accident. Do not use your Hopper E-scooter in wet areas where water is present, muddy places, sandy places or stony roads. Do not ride your Hopper E-scooter during bad or stormy weather. Example: Rain, snow, hail, frost, fog, extreme heat.
1.3 Disposal at End-of-Life This product must not be disposed of by incineration, landfilling, or mixing with household trash. Improper disposal of the battery contained within this product may result in the battery heating up, rupturing, or igniting which may cause serious injuries. The substances contained inside the battery present chemical risks to the environment.
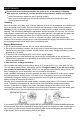
PARTS & FEATURES What’s in the Box? ■ ■ ■ ■ ■ ■ ■ ■ 1 x Roller-Pro Hopper E-Scooter 1 x Charger 2 x Handles 1 x User Manual 4 x screws Socket wrench Valve connector Warranty card Parts: Control panel: Picture may vary from actual product 1.Speed indicator: These numbers indicate the current speed. 2.Mode display: The green light indicates the power is on. When in low speed mode, the maximum speed is set to 15 km/h.
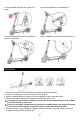
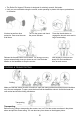
1 Insert the head tube and fold out the kick stand. 2 Install the handlebar on the head tube. 3 Use the supplied hex wrench to fasten the screws on both sides. 4 After installation you can switch the scooter on. CHARGING Remove the rubber from the connector Insert the charging plug After charging, replace the rubber cap 1. Ensure the scooter is turned off before proceeding to charge the battery. 2. Locate the charging port on the bottom part of the scooter. 3.
Do not, under any circumstances, use the E-scooter while it is connected to the charger. Do not charge longer than necessary. Standard charging time is approx. 3 hours. Charging longer than this may affect the battery life and/or performance. To maximize the battery life, charge it once every other month or once a week after riding. This process is very important for the battery to keep running. Charge preferably in places away from flammable products.
■ ■ The Roller-Pro Hopper E-Scooter is designed for relatively smooth, flat terrain. Until you are comfortable using the scooter, avoid operating in places with slopes, pedestrians, or obstacles. A helmet as well as other protective. Gear must be worn at all times. Turn on the power and check the power indicator. Release the throttle button to slow down. The energy recovery system automatically slows you down as well. Use the brake handle on the handlebar to stop the scooter.
MAINTENANCE Do not perform any maintenance when the power is on, or the battery is charging. After each ride, especially if you have travelled a long distance, inspect your scooter. ■ Inspect the brakes to make sure that is working properly. ■ Make sure all screws and bolts are taut and properly fastened to prevent injury and Unnecessary wear and tear. Cleaning: Remove dirt with a soft, damp cloth. Remove stubborn dirt with a bit of toothpaste and a toothbrush, then use a damp cloth to clean.
Adjust the vibration on the handlebar Adjust the vibration on handlebar: If your head tube of the electric scooter is vibrating, use the supplied M5 hex wrench to tighten the two screws at the folding mechanism. Tyre valve extension Tyre valve extension: If your electric scooter front and rear tyres are deflated, use an extension tube for the tyre valves to inflate the tyres. First remove the valve cap, then screw the extension tube on the tyre valve and connect the pump to inflate.
DECLARATION OF CONFORMITY Manufacturer Name: Satyatrade S. L. Address: Pol.Ind.La Raya. C/ Guadalquivir, 2.